Welcome to Lesson 1 of the Unity 3D Development Course. In this lesson, we will learn what Unity is. We will install Unity Hub and the Unity Editor step by step. Then we will make your first project. You do not need any past experience.
Goal
After this lesson, you will be able to:
- Explain what Unity is and why many people use it
- Download and install Unity Hub
- Get your free Unity Personal license
- Install the right version of the Unity Editor, and understand why we use LTS
- Create your first Unity project with the right settings
- Know the main parts of the Unity Editor: Scene, Game, Hierarchy, Inspector, Console, and Project window
About Unity 3D and Why We Use It
Unity has a big community of users. A big community is very useful for you. It means there are many free and paid assets. There are many tutorials and forum posts too. If you have a problem at 2 a.m., someone has probably already solved it and written about it online.
Is Unity Free to Use?
Yes. Unity Personal is free. You can use it if your total yearly income and funding is under $200,000 USD. If you earn more than that, you must move to Unity Pro (up to $25 million) or Unity Enterprise after that.
So how does Unity make money if most beginners pay nothing? Mainly in two ways:
- Paid plans (Pro and Enterprise) for bigger studios and companies
- Extra cloud services — like hosting, multiplayer, analytics, and “economy” tools. You pay for these based on how much you use them.
You may hear other developers talk about Unity’s “Runtime Fee” from 2023. This made many developers upset. Unity later removed this fee completely. Games made with Unity 6 (and older versions) can be published with no runtime fee, no royalty, and no revenue share. As a working developer, this change did not really affect me. This is because I build my own backend services in ASP.NET, instead of using Unity’s paid cloud tools. But it is good to know this history, since other developers will talk about it.
Why Cross-Platform Development Matters
For me, the best thing about Unity is that it works on many platforms. You build your game one time. Then, with some small changes, you can export it to:
- Desktop — Windows, macOS, and Linux
- Mobile — Android and iOS
- Web — WebGL, which runs right in a browser
- Consoles — PlayStation and Xbox (you need developer approval for these)
- VR — Meta Quest and other headsets
It is a bit like writing one document in Word. Then you can save it as a PDF, an eBook, or print it on paper. The content stays the same. Unity does most of the extra work for each format.
This matters a lot. Early in my career, deployment was often the hardest part of any project. I have seen a project get stuck for months because of one missing dependency, even when the app itself only took a few weeks to build. Unity does not remove every problem, but it removes a lot of this pain. This is one big reason why so many teams use it.
Installing Unity: Hub, License, and Editor Setup
What Is Unity Hub?
Before you install Unity, you install Unity Hub first. This is a small app that manages everything about Unity. Think of it like a control panel. It installs the Unity Editor version you need. It manages your license. It also keeps a list of all your projects, like an app store manages your other apps.
To start, search “Unity Hub” on Google. Or use the official link below. You will need to sign in with a Google account or a Unity ID (free to create) before you can download it.
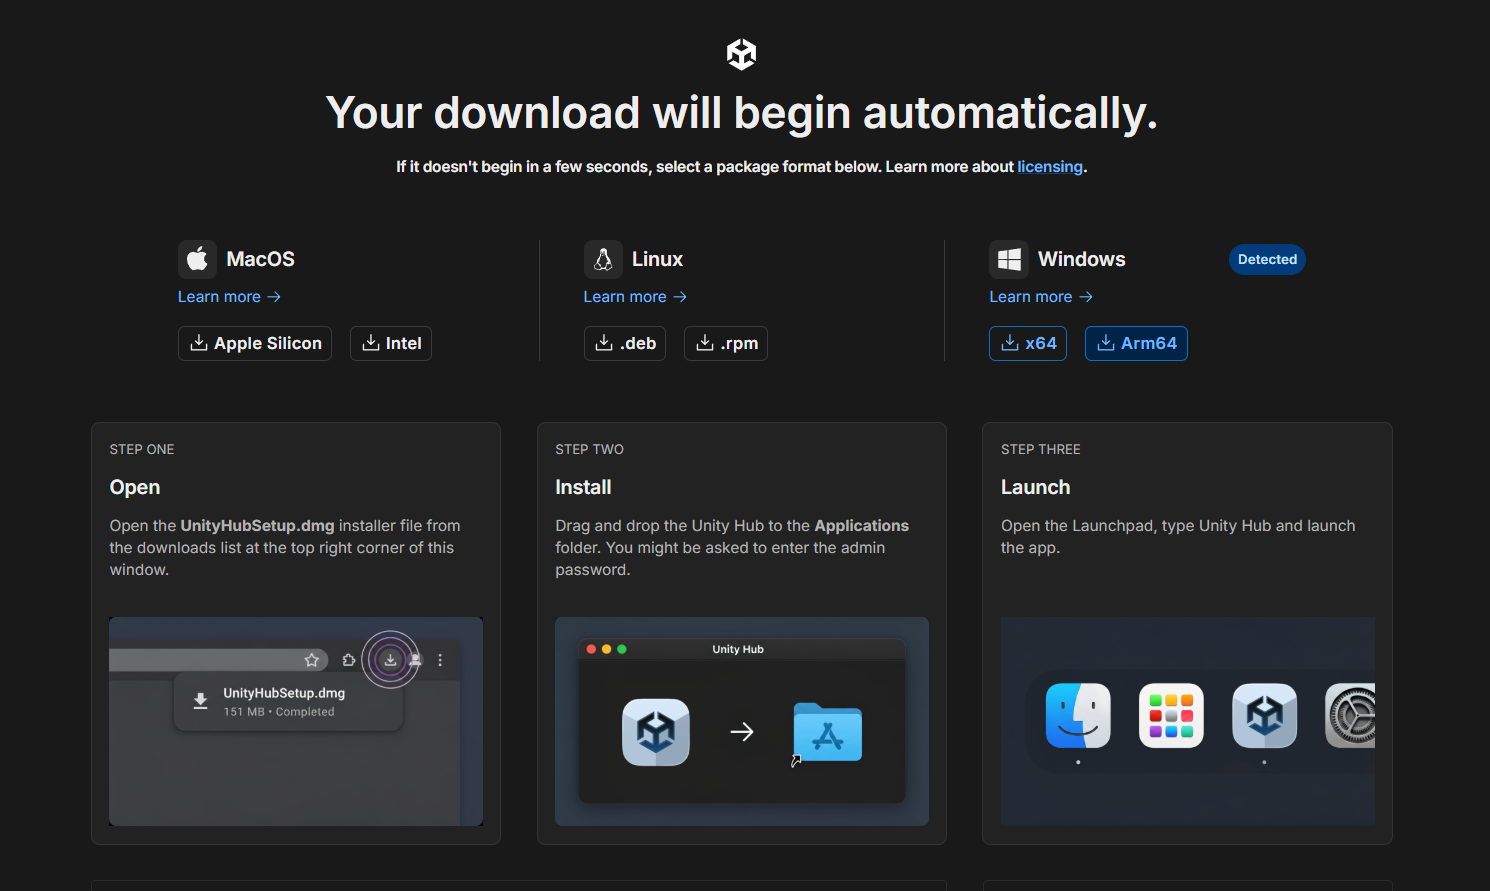
Official Unity Hub installation guide
After you install it, Unity Hub looks like this:
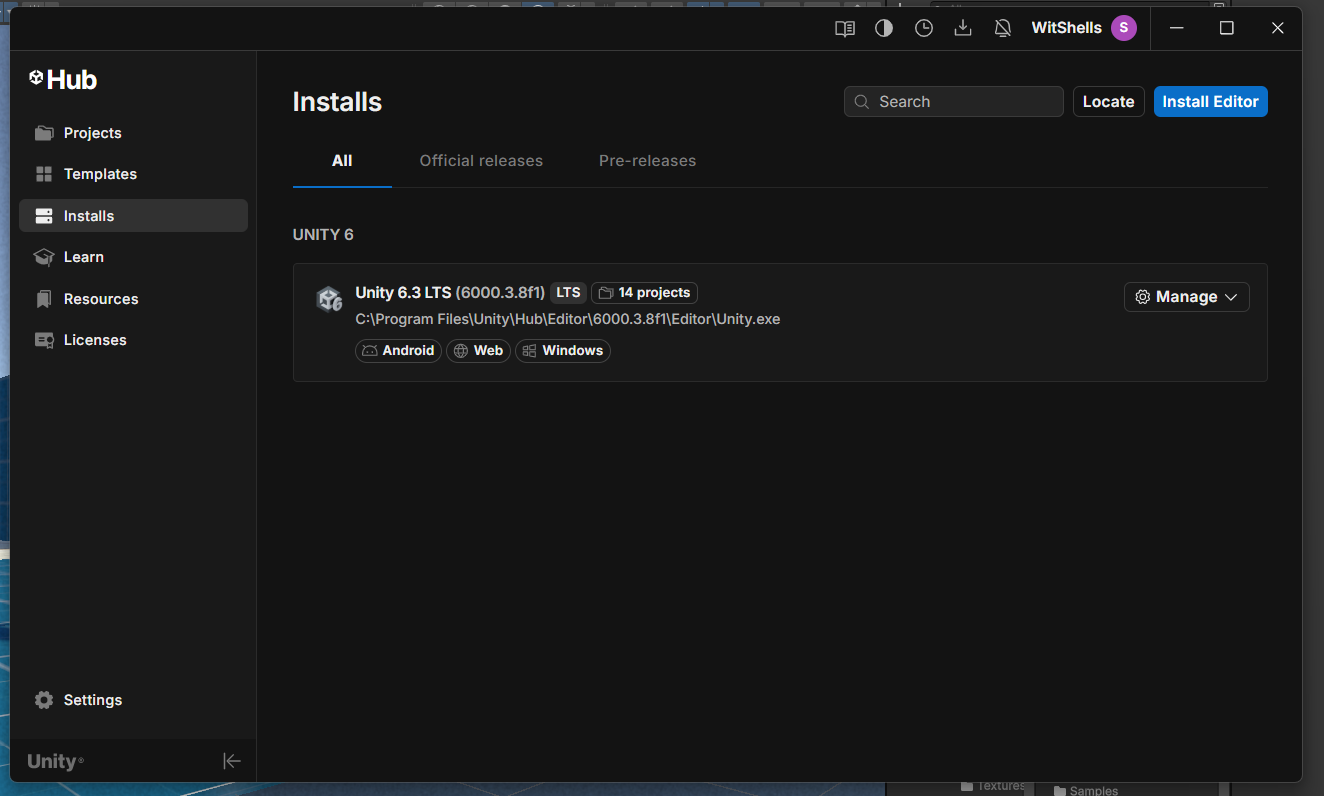
On the left side, you will see: Projects, Templates, Install, Learn, Resources, and Licenses.
Getting Your Free Unity Personal License
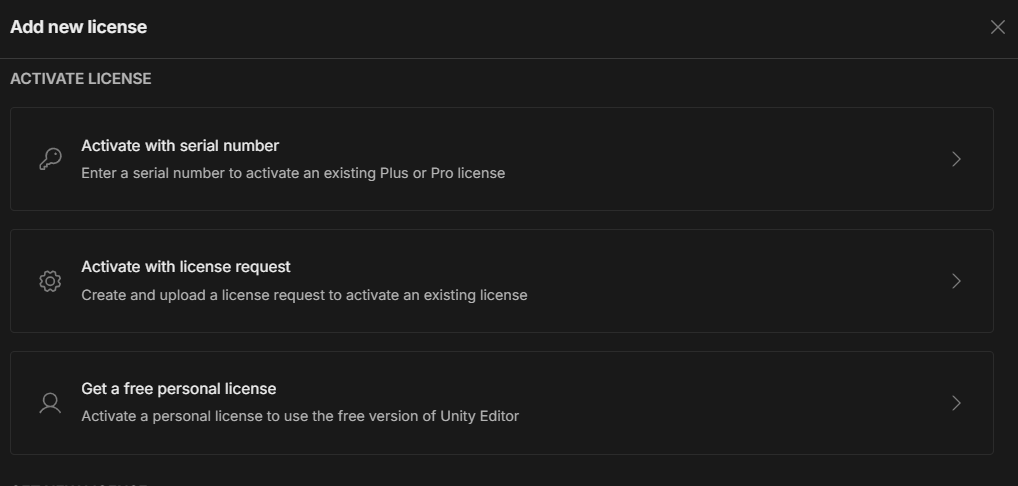
Go to the Licenses tab first. You should see a free Personal license appear automatically. If it does not appear, refresh the page, or add a license by hand.
Click “Get a free personal license,” agree to the terms, and continue. That’s it. Now you have everything you need to start building.
Installing the Unity Editor: Why LTS Matters
Next, go to the Install tab. In this course, we will only install the LTS version.
LTS means “Long Term Support.” This should always be your first choice, unless you have a good reason not to use it. Think of it like choosing a reliable family car instead of a new experimental car. LTS versions are tested well. They are stable. They get support for a long time (Unity 6.3 LTS, for example, is supported until December 2027). Newer “Update” versions get new features faster. But they get less support, and things can change more often mid-project.
Many developers are careful about updating an old project to a new Unity version. This makes sense once a project is far along. But if you are starting fresh, always choose the current LTS version. You get the most stability. You get the longest support. And you have less risk of old features being removed later.
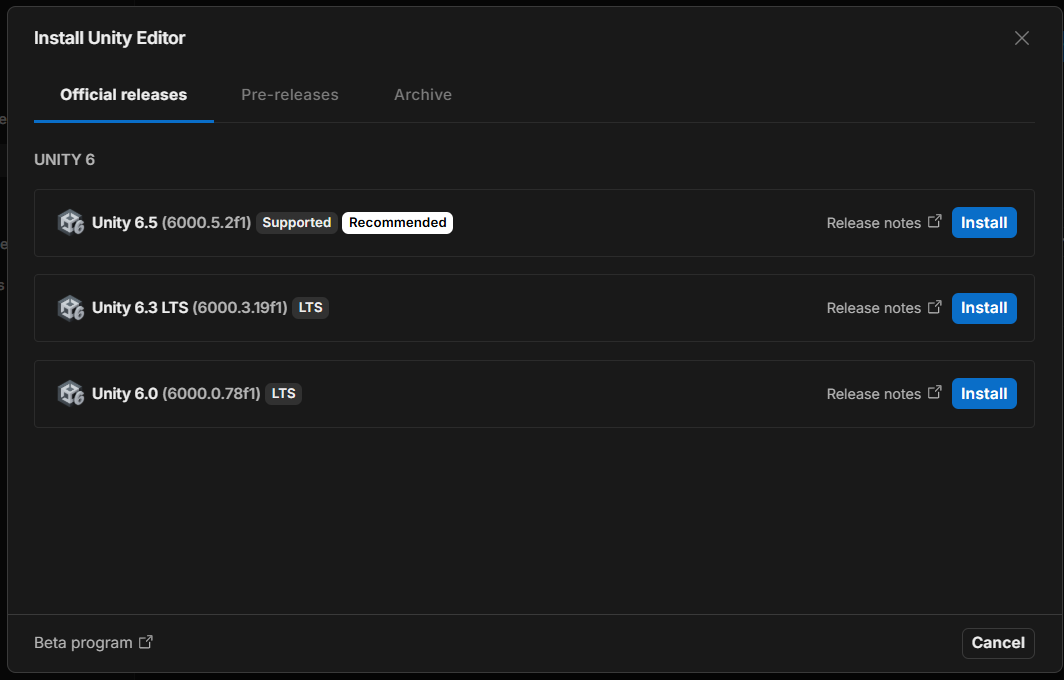
I use Unity 6.3 LTS for this course. I recommend you use the same version, unless you have a good reason to pick a different one. Click install, and Unity Hub will do the rest. Just let it run.
Once the Editor is installed, we are ready to make your first project.
Creating Your First Unity Project
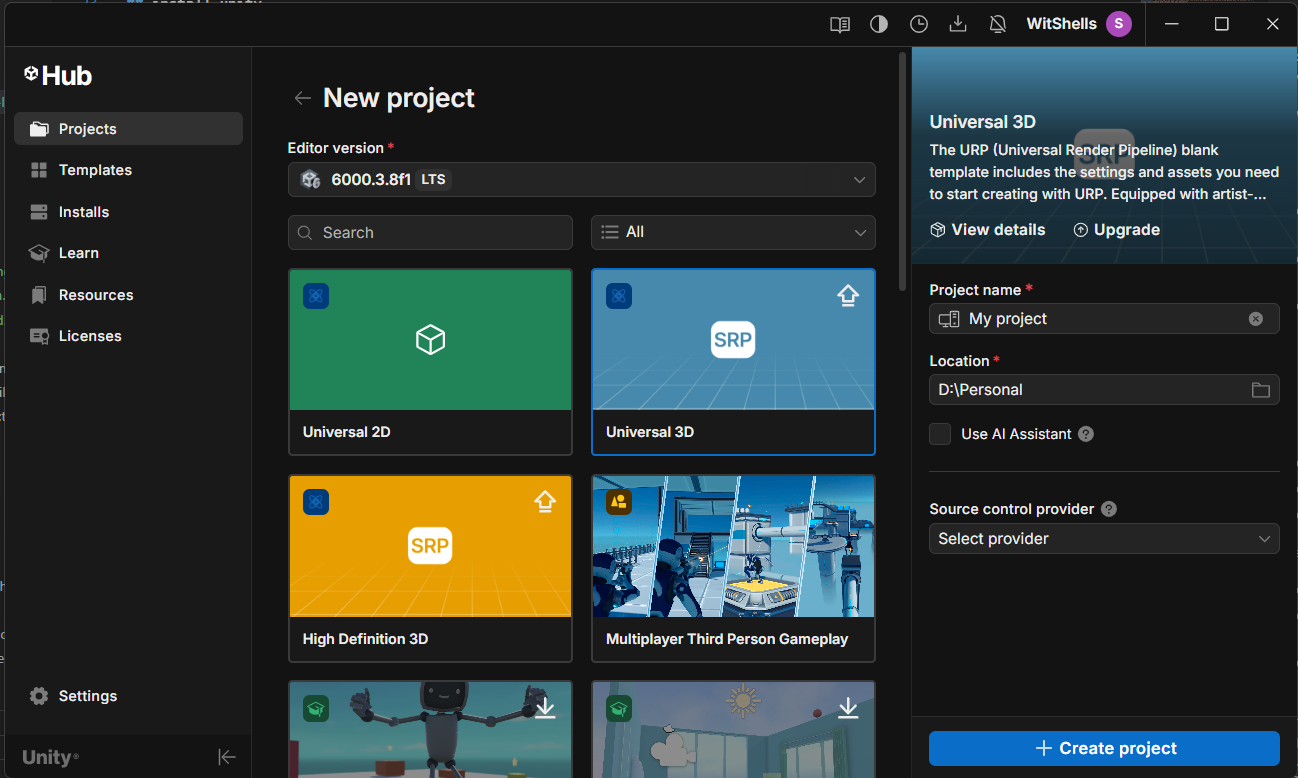
The New Project window has a few settings you should understand well. It is easy to pick the wrong one by accident.
Editor Version and Template
At the top, you choose which Editor version to use. If this is your first install, you will only see the one version you just installed.
Below that is a list of templates. Here, you choose the type of project you want:
- Universal 2D — for 2D games
- Universal 3D — for 3D games
Both of these use Unity’s Universal Render Pipeline (URP). This is a rendering system built to run well on almost every device, from low-end mobile phones to high-end PCs. If you need very high-end, movie-quality graphics for PC or console games only, Unity also has a High Definition Render Pipeline (HDRP) template. But this needs much stronger hardware, and works on fewer platforms.
Here is a simple way to think about it: URP is like a good phone camera. It is flexible, efficient, and works almost anywhere. HDRP is like a full professional camera setup. It can make amazing results, but it is heavier and needs the right conditions. For this course, and for most learning projects, Universal 3D is the right choice.
Naming and Saving Your Project
On the right side, give your project any name you like. Make sure you choose Local, not Cloud. Cloud projects sync automatically to Unity’s servers. This is not bad, but it is not needed while you are still learning. So keep things simple and local for now.
Choose a location on your computer, leave the other settings as they are, and click Create project.
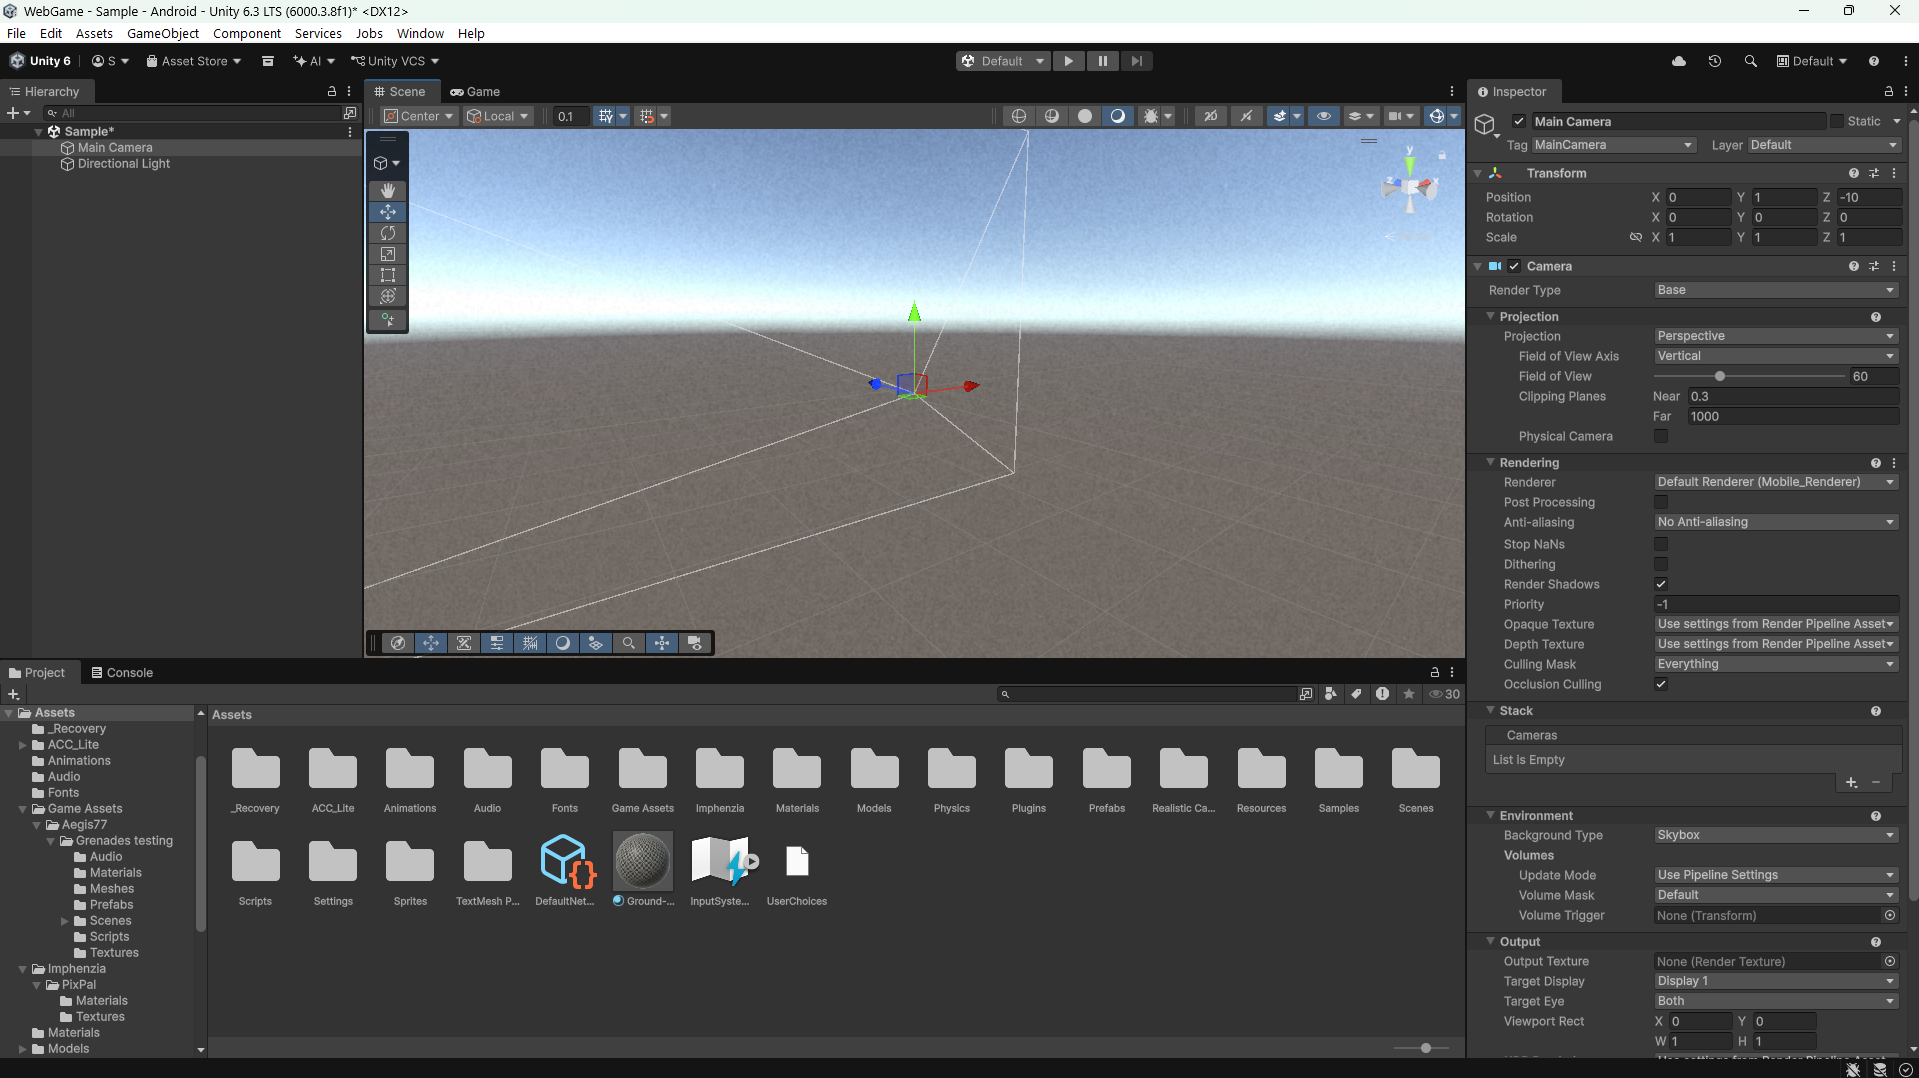
Once your project is created, Unity opens the Editor for you. It should look something like this:
Understanding the Unity Editor Layout
The Unity Editor can look a bit much the first time you see it. Do not worry — you do not need to remember everything today. You will get used to it naturally, just by using it every day. For now, here is a short introduction.
At the top, you will find the main menu bar: File, Edit, Assets, GameObject, Component, Services, Window, and Help. There are also Play, Pause, and Step buttons, so you can test your game right inside the Editor.
The rest of the Editor has six main panels: Hierarchy, Inspector, Console, Project, Scene, and Game. Let’s go through each one. We will start with the two most important ideas in Unity: the Scene and the GameObject.
Scene and GameObjects: The Building Blocks of Every Game
Think of a Scene as a stage. Imagine a classroom, with a whiteboard, a projector, and rows of student desks. That whole room, set up exactly like this, is close to what a Unity Scene is: a space that holds everything inside it. This could be a menu screen, one level, or a full game world.
A GameObject is any single item placed inside that scene. In our classroom example, each desk, the whiteboard, and the projector are each their own GameObject.
Every new Scene starts with one GameObject by default: the Camera. The Camera decides what the player actually sees. It works like the eyes of your audience. It decides the angle and position of the game world you see.
Every GameObject, with no exceptions, also has a Transform by default. This shows:
- Position — where the object is
- Rotation — which way it is facing
- Scale — how big or small it is
Here is one way to picture it: if a GameObject were a person, their Transform would be their GPS location (position), the direction they face (rotation), and their height (scale).
Hierarchy and Inspector
- Hierarchy — a list of every GameObject in your Scene right now. It is like a table of contents. Objects can also sit inside other objects (a “child” inside a “parent”), like a family tree.
- Inspector — when you click on a GameObject, its details show up here. Think of it as that object’s ID card. It shows you exactly what makes up the object, and lets you change those details directly.
Scene View vs. Game View
New users often mix these two windows up. But the difference is simple:
- The Scene window is your workspace. Think of it as a movie set, where you can see all the props, lights, and equipment while you build and arrange things.
- The Game window shows exactly what your Camera sees. It is like how a movie audience only sees what the camera filmed, not the crew standing just outside the shot. Whatever shows in the Game window is what your players will actually see.
Console
The Console shows everything worth knowing — errors, warnings, and any messages you write yourself. Treat it like the warning lights on a car’s dashboard. It is the first place to check when something is not working right.
The Project Window and Your Game’s Assets
The Project window holds every resource your game can use — models, images, sounds, scripts, and scenes. Think of it as a warehouse. Everything you might need is stored here, ready to be placed on the stage (your Scene) when you need it.
You create a new Scene right inside this window, then double-click it to open and start editing.
If you need a 3D model, you can download one from anywhere online and bring it into your project. But Unity does not support every file type the same way:
- 3D models — Unity can directly read
.fbx,.obj,.dae(Collada),.3ds,.dxf, and.skp(SketchUp) files. It can also open files like.blend(Blender) or.max(3ds Max) directly, but only if that software is also installed on the same computer. This is because Unity quietly converts them to FBX in the background during import. CAD/engineering formats like.step,.iges, or.stlare not supported directly. You need to convert them first. - Images —
.psd,.png,.jpg,.tga,.tiff,.gif,.bmp,.exr, and.hdrall work fine. Even layered Photoshop.psdfiles import without any problem — Unity flattens them for game use automatically, without changing your original file. - Audio —
.wav,.mp3,.ogg, and.aiffcover almost every case you will need.
One more thing worth knowing early: every file you import creates a matching .meta file next to it. You will not see this in the Project window, but if you look in your project folder using Windows Explorer or macOS Finder, you will find it there. Think of it as a barcode sticker Unity puts on every asset. It helps Unity keep track of that exact file, even if you rename it later. Never delete .meta files by hand.
If you look at your project folder outside Unity, you will also see a few other folders next to Assets, such as Library, Packages, and ProjectSettings. Unity manages these on its own. The Assets folder is the only one you will work in day to day.
Your development environment is now fully set up.
Contracted by NextSkill a Gamestorms company, delivering this course for Isra University