Learn to See in 3D: Understanding X, Y, Z With Unity Primitives
In the last article, you learned how to set up your Unity environment. Now you are ready for the next step.
In this article, you will learn something more important than any button or menu. You will learn how to see the real world in 3D. Once you learn this skill, you will not just build one object. You will be able to look at almost anything, like a desk, a door, or a car, and know how to build it.
By the end of this article, you will be able to:
- Find the width, height, and depth of any real object, just by looking at it
- Understand Unity’s basic 3D shapes, called primitives
- Use the Cube primitive to build a real object, step by step: a student desk
Let’s begin.
The Big Idea
Here is the most important idea in this article.
You do not need advanced tools to build great 3D scenes. You need to know how to see.
Every object around you has a shape. Every shape can be broken into simple parts. Once you learn how to “see” an object’s shape, you can build it with something as simple as a cube.
Advanced tools are useful, and you will learn them as you grow. But first, you need to train your eyes and your thinking. This is the foundation of all 3D design.
Understanding X, Y, and Z
Let’s start with something you already know well: a school desk. Look at the picture below.
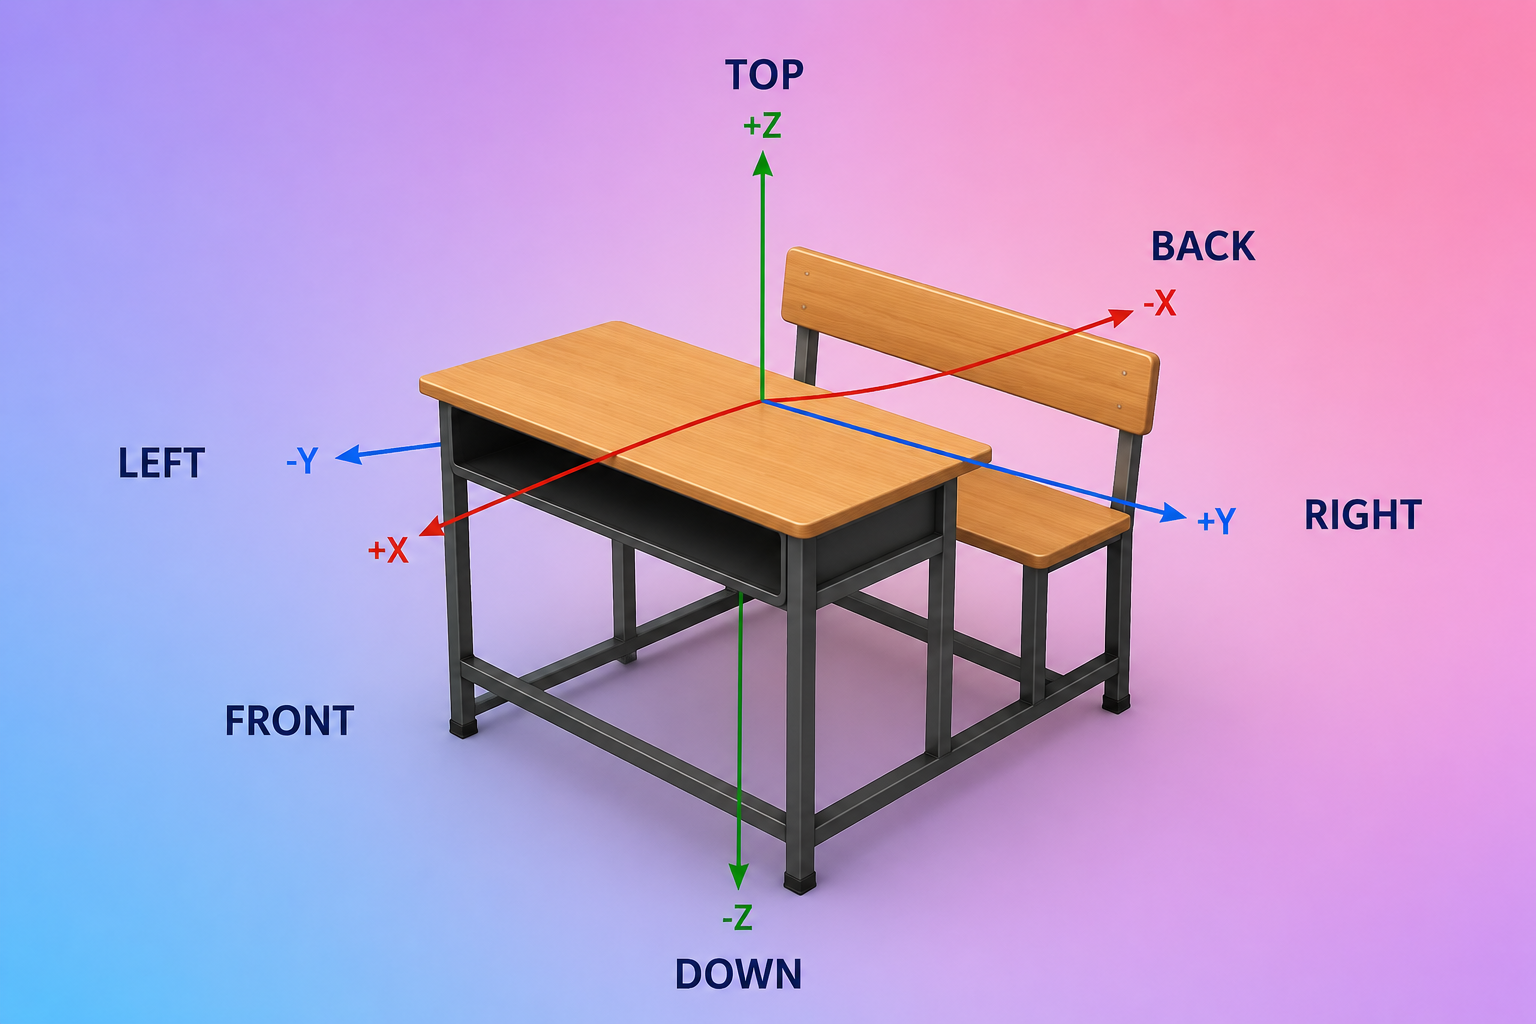
Any 3D object has three pairs of sides:
- Front and back
- Left and right
- Top and bottom
In the 3D world, we give each pair a name. We call it an axis. There are three axes: X, Y, and Z.
- X axis: left and right. This is the object’s width.
- Y axis: up and down. This is the object’s height.
- Z axis: front and back. This is the object’s depth.
If you have made 2D games before, this may feel familiar. 2D games only use the X and Y axis: left-right and up-down. There is no depth, so there is no Z axis.
3D is different. 3D adds the Z axis. This one extra axis gives an object real depth. It makes an object feel like something you could walk around.
Once you know these three words, width, height, and depth, you can describe any object in the world.
Now You Try
The best way to learn this is to practice it yourself. Try this now.
Pick up your phone. Look at it closely. Can you find its:
- Width (X)?
- Height (Y)?
- Depth (Z)?
Your phone is thin, so its depth is small. But it still has one. Every object has all three axes, even when one axis is very small.
Now look around your classroom. Pick any object, like a book, a chair, or a window. Try to picture its X, Y, and Z. This small exercise trains your brain to think in 3D. The more you practice, the more natural it becomes.
From One Object to a Whole Room
Once you can see the axis of one object, you can see the axis of many objects together. A room is not one shape. It is a group of many shapes. Each shape has its own width, height, and depth. Together, they fill the space.
Look around your classroom. You will see things like:
- Walls
- A door
- A roof
- Lights
- Patterns on the floor
- Desks, like the one you are sitting at
Now imagine your teacher asks you to build this exact classroom inside Unity. Where would you start?
You would start the same way you started with the desk: by measuring. What is the width, height, and depth of the walls? Of the door? Of the whiteboard? Of each desk? Once you know these measurements, you can place every object at the correct size. Your classroom will feel real.
This is why Unity follows a simple rule by default: 1 unit in Unity equals 1 meter in the real world. This rule lets you build objects at true, real-life size. If a wall is 3 meters tall in real life, you build it 3 units tall in Unity.
Meet Your First 3D Shape: The Cube
Now that you understand how to see in 3D, let’s open Unity and build something.
The simplest 3D shape in Unity is the Cube. Cube is one of several primitives. Primitives are simple, ready-made shapes that Unity gives you to start building with.
Let’s add one to your scene.
Step 1: Right-click inside the Hierarchy window. This is the panel that lists every object in your scene. A menu will appear. Go to 3D Object, then click Cube.
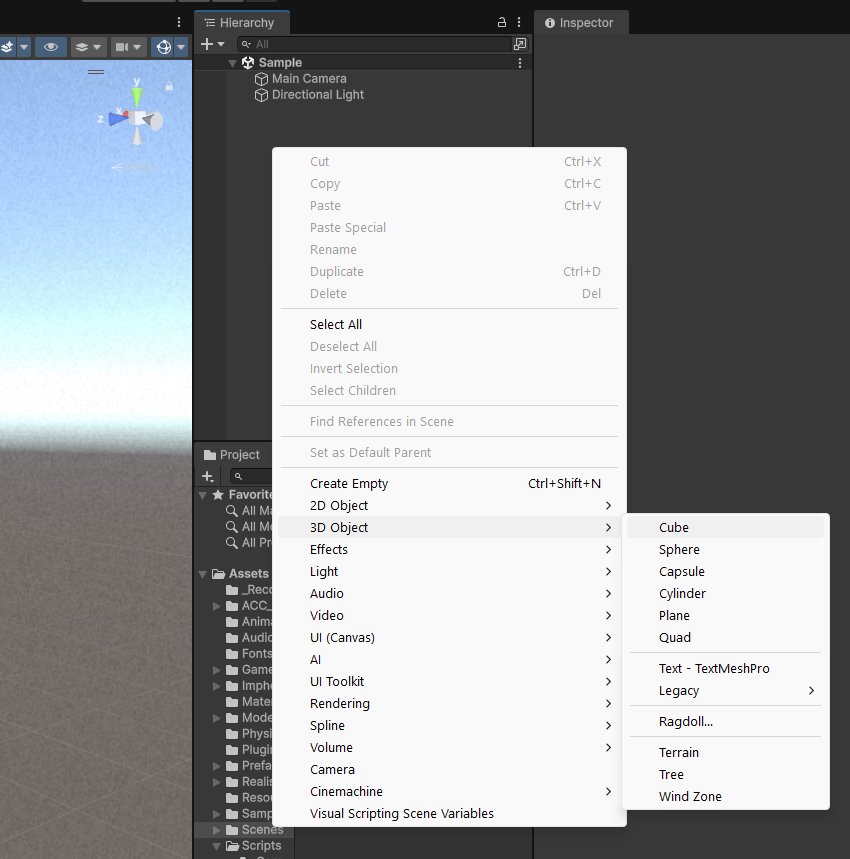
This adds a cube into your scene. In Unity, every object you add, like a cube, a light, or a camera, is called a GameObject.
Look Inside the Inspector
Now click on your new cube to select it. Look at the Inspector window.
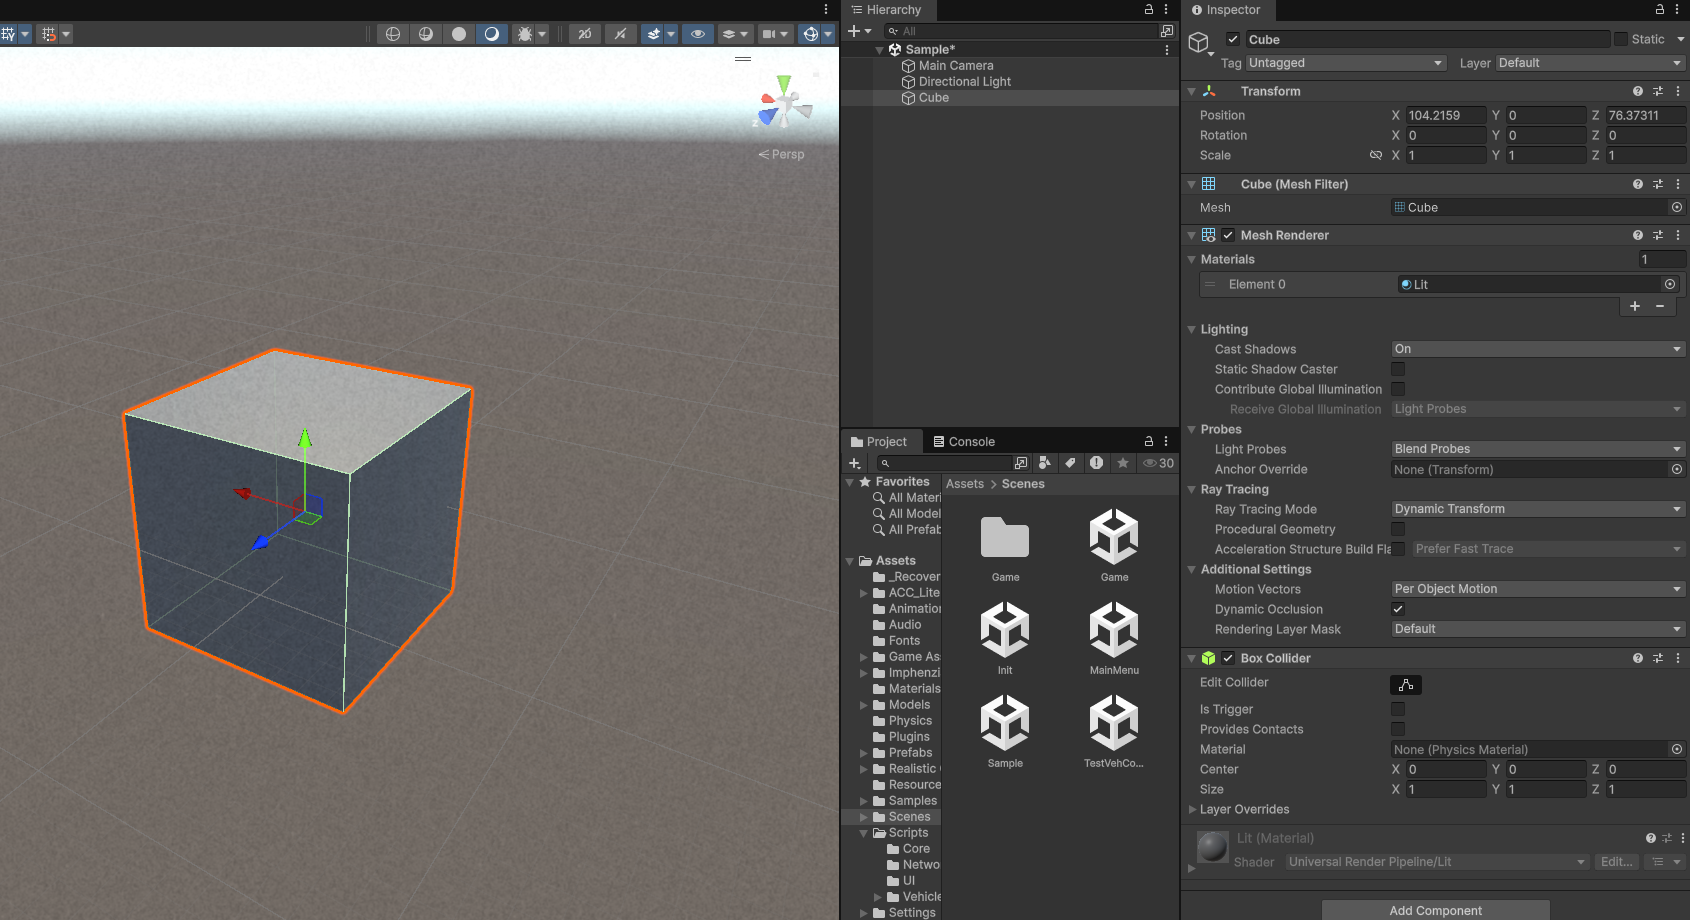
The Inspector shows a list of components. A component is a small piece that tells Unity how this object should look, where it sits, or how it acts.
Transform
At the top, you will always see the Transform component. Every GameObject has one. It controls three things, and you already know all of them:
- Position: where the object is (its X, Y, Z location)
- Rotation: how the object is turned
- Scale: how big the object is (its width, height, and depth, or X, Y, Z again)
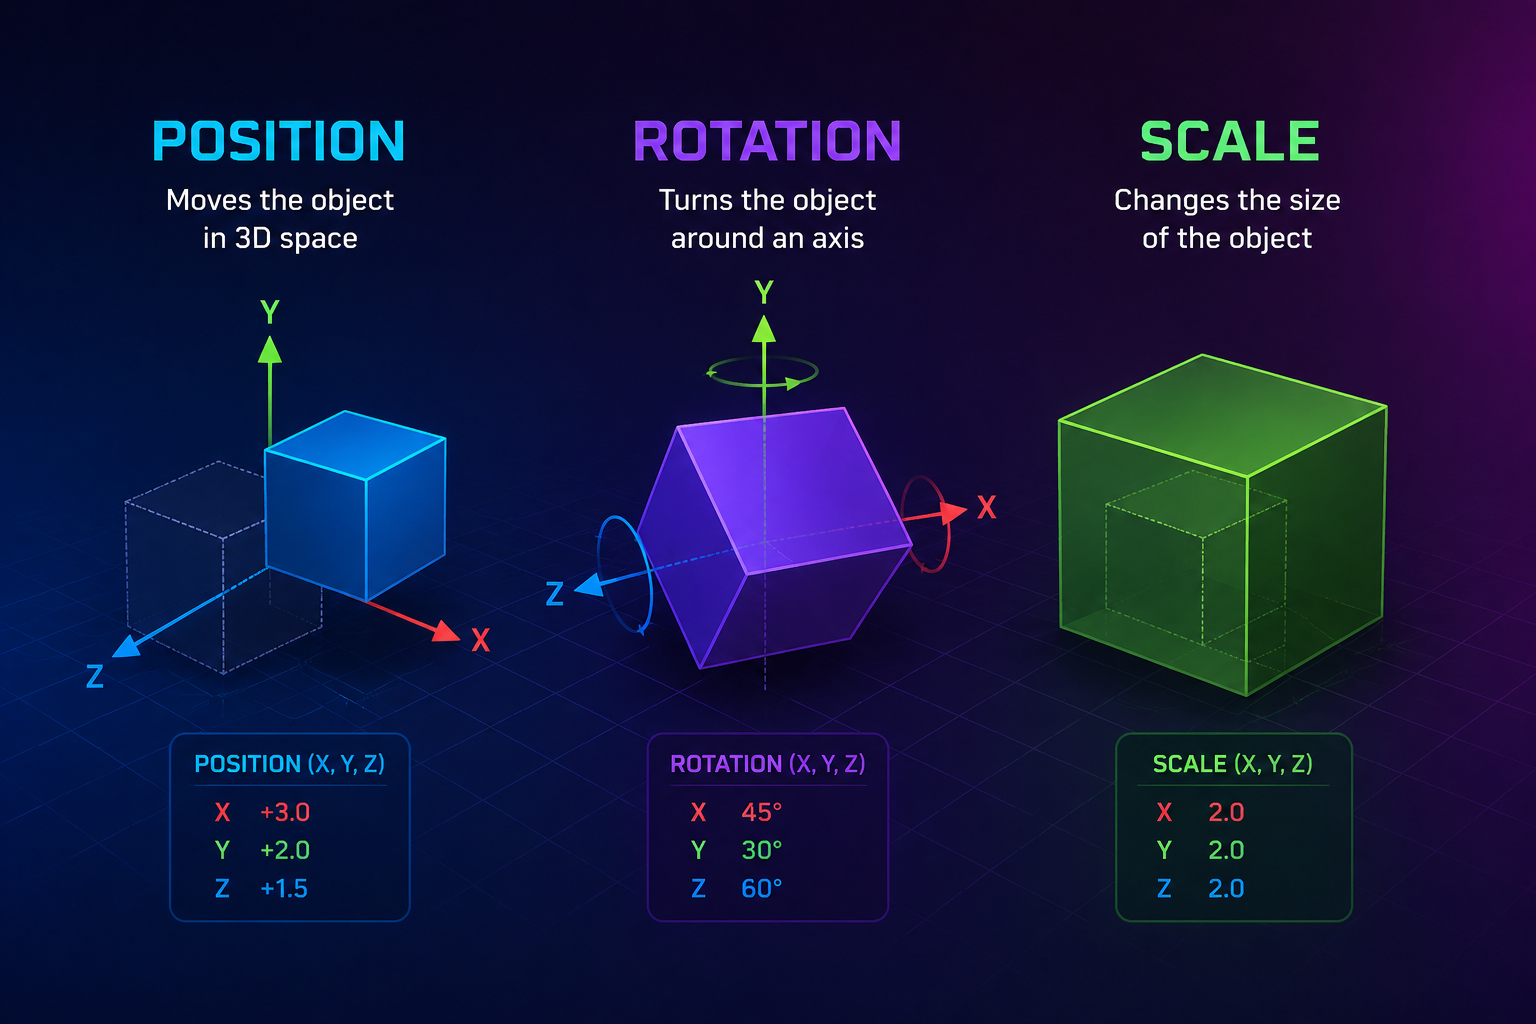
Do you see the pattern? Everything in Unity is built on the same idea you just learned: X, Y, and Z. Unity even groups these three numbers into one value. It calls this value a Vector3.
Mesh Filter and Mesh Renderer
Next, you will see the Mesh Filter and the Mesh Renderer. We will not go deep into these yet. For now, just know this:
- Mesh Filter gives the object its shape.
- Mesh Renderer gives the object its look: its color and surface.
Box Collider
Last, you will see the Box Collider. This component lets other objects touch your cube and interact with it. Without a collider, your object is like a ghost. Other objects would pass right through it, and nothing would ever notice.
Colliders are a powerful idea. As you learn more, you will use them to build many interesting things.
More Basic Shapes
The cube is not the only primitive in Unity. Take a few minutes now to explore the others.
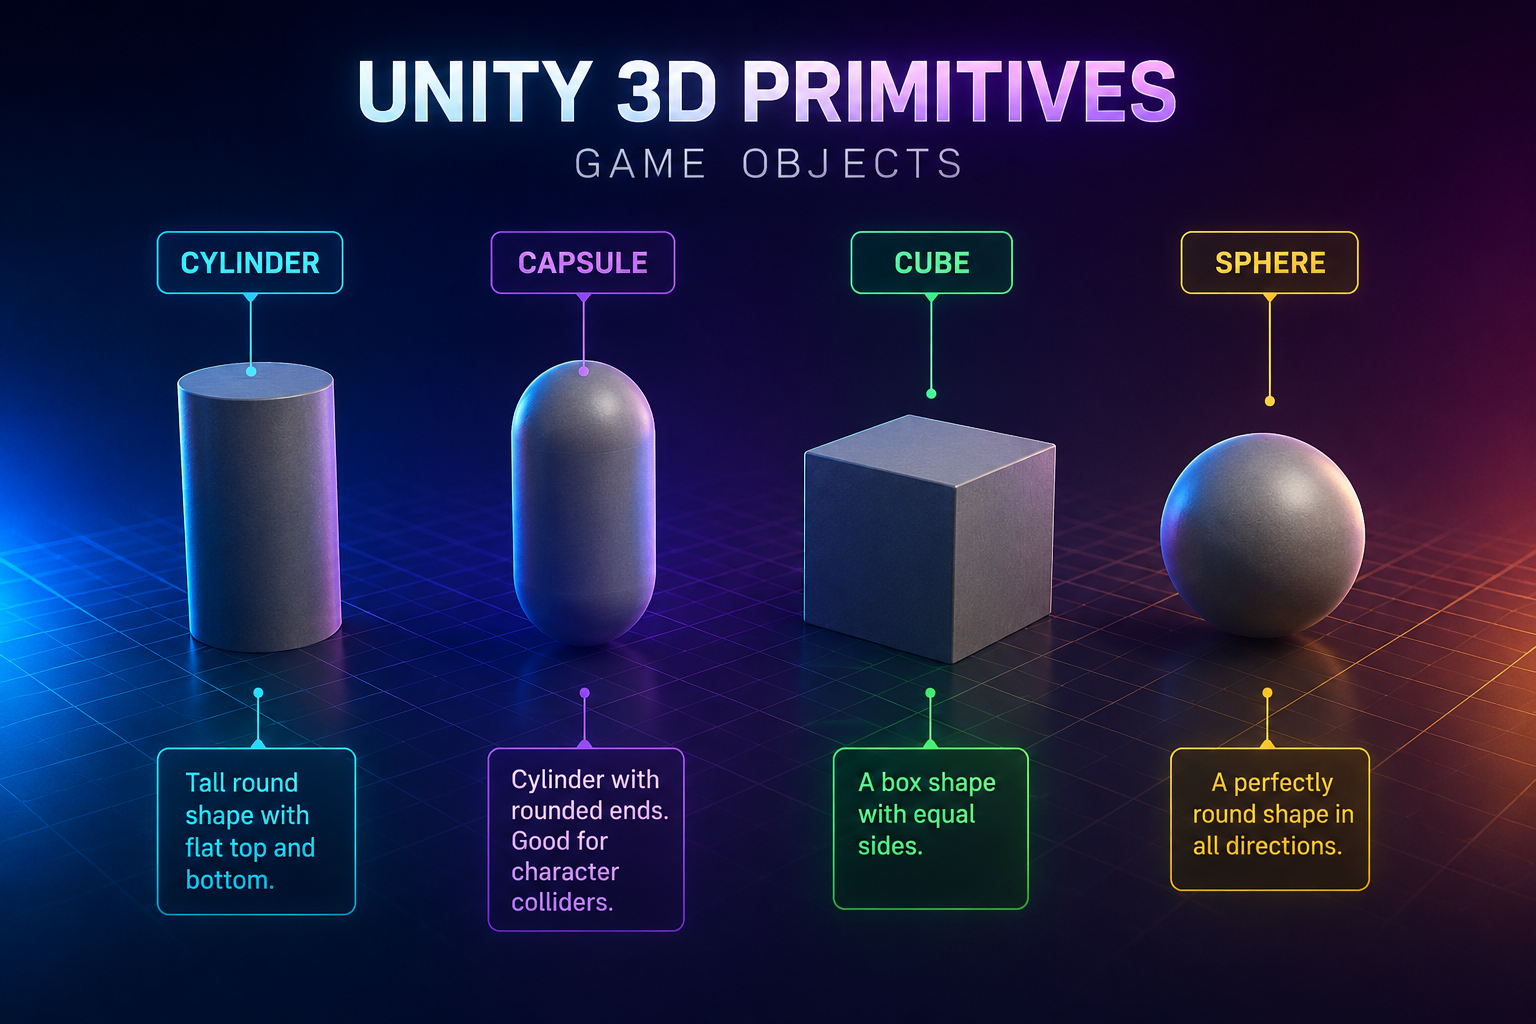
You will find shapes like Sphere, Cylinder, Capsule, and Plane. You do not need to master all of them today. Just know that they exist. You will use them later.
Moving Around Your Scene
Before you build anything, it helps to know how to move around the Scene view, and how to switch tools quickly. These few skills will make the rest of this article much easier.
Moving Your View With the Mouse
- Orbit (look around an object): hold Alt (Windows) or Option (Mac), hold the left mouse button, and drag.
- Pan (slide the view sideways): hold the middle mouse button, the scroll wheel, and drag.
- Zoom in and out: scroll the mouse wheel, or hold Alt/Option and the right mouse button, and drag.
- Look around freely: hold the right mouse button and move the mouse. While holding it, W, A, S, D fly you forward, back, left, and right, and Q and E move you down and up.
- Frame an object: click an object to select it, then press F. Unity zooms your view straight to it. This is the fastest way to find a small piece you just added.
The Gizmo
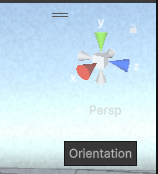
The small icon in the top corner of your Scene view is called the Gizmo. Click its center cube to switch between Perspective view (a natural, 3D-looking view) and Orthographic view (a flat view, with no distortion). Click one of its arms, like the one labeled “front,” to snap your view straight to the front, top, or side.
This is one of the most useful habits you can build. Whenever you want to check that two pieces line up exactly, switch to the Front or Side view instead of guessing from an angled view.
Switching Tools With Shortcuts
Unity gives every tool a single-key shortcut, so you never need to reach for the toolbar with your mouse:
- Q — Hand tool (moves your view without moving any object)
- W — Move tool (drag an object to a new position)
- E — Rotate tool (turn an object)
- R — Scale tool (resize an object; this is the one you will use most to build the desk)
- T — Rect Transform tool (mostly used for 2D and UI elements, not for our cubes)
Try this now: click on your cube, then tap W, E, and R, one at a time. Watch the handles on the cube change each time. This is how you will jump between moving, rotating, and resizing every part of your desk.
One more tip: on the Move and Scale gizmo, the handles are colored. Red is X, green is Y, and blue is Z, the exact same three axes you already know. Drag the red handle, and only the width changes. Drag the blue handle, and only the depth changes.
The Scene View Toolbar
Along the top of the Scene view, you will find a row of extra controls.
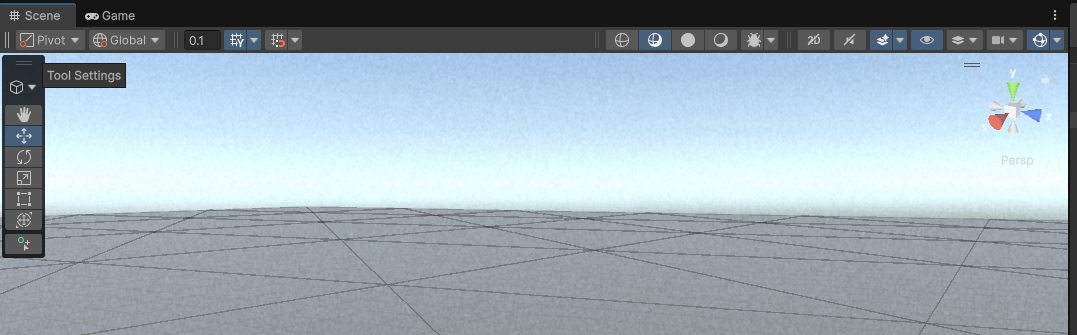
- Pivot / Center — chooses whether your tool handle appears at an object’s exact pivot point, or at the center of its visible shape.
- Local / Global — chooses whether the Move and Scale handles follow an object’s own rotated axes (Local), or always point along the world’s fixed X, Y, Z (Global). Our cubes are not rotated, so for now, both look the same.
- Grid and Snap — turns the background grid on or off, and can lock movement to fixed steps, so pieces line up perfectly with no small gaps. You can also hold Ctrl (Windows) or Cmd (Mac) while dragging a handle, to snap to the grid at any time, even with snapping turned off.
- Render mode — switches how objects are drawn: Shaded (a normal, solid look), Wireframe (see-through outlines only), or Shaded Wireframe (solid, with edges drawn on top). Wireframe is helpful for lining up pieces that are hidden behind each other.
Let’s Build a Real Object: The Student Desk
You now know how to see an object’s width, height, and depth, and how to move around your scene and switch tools. It’s time to put it all together, and build the desk you are sitting at, piece by piece.
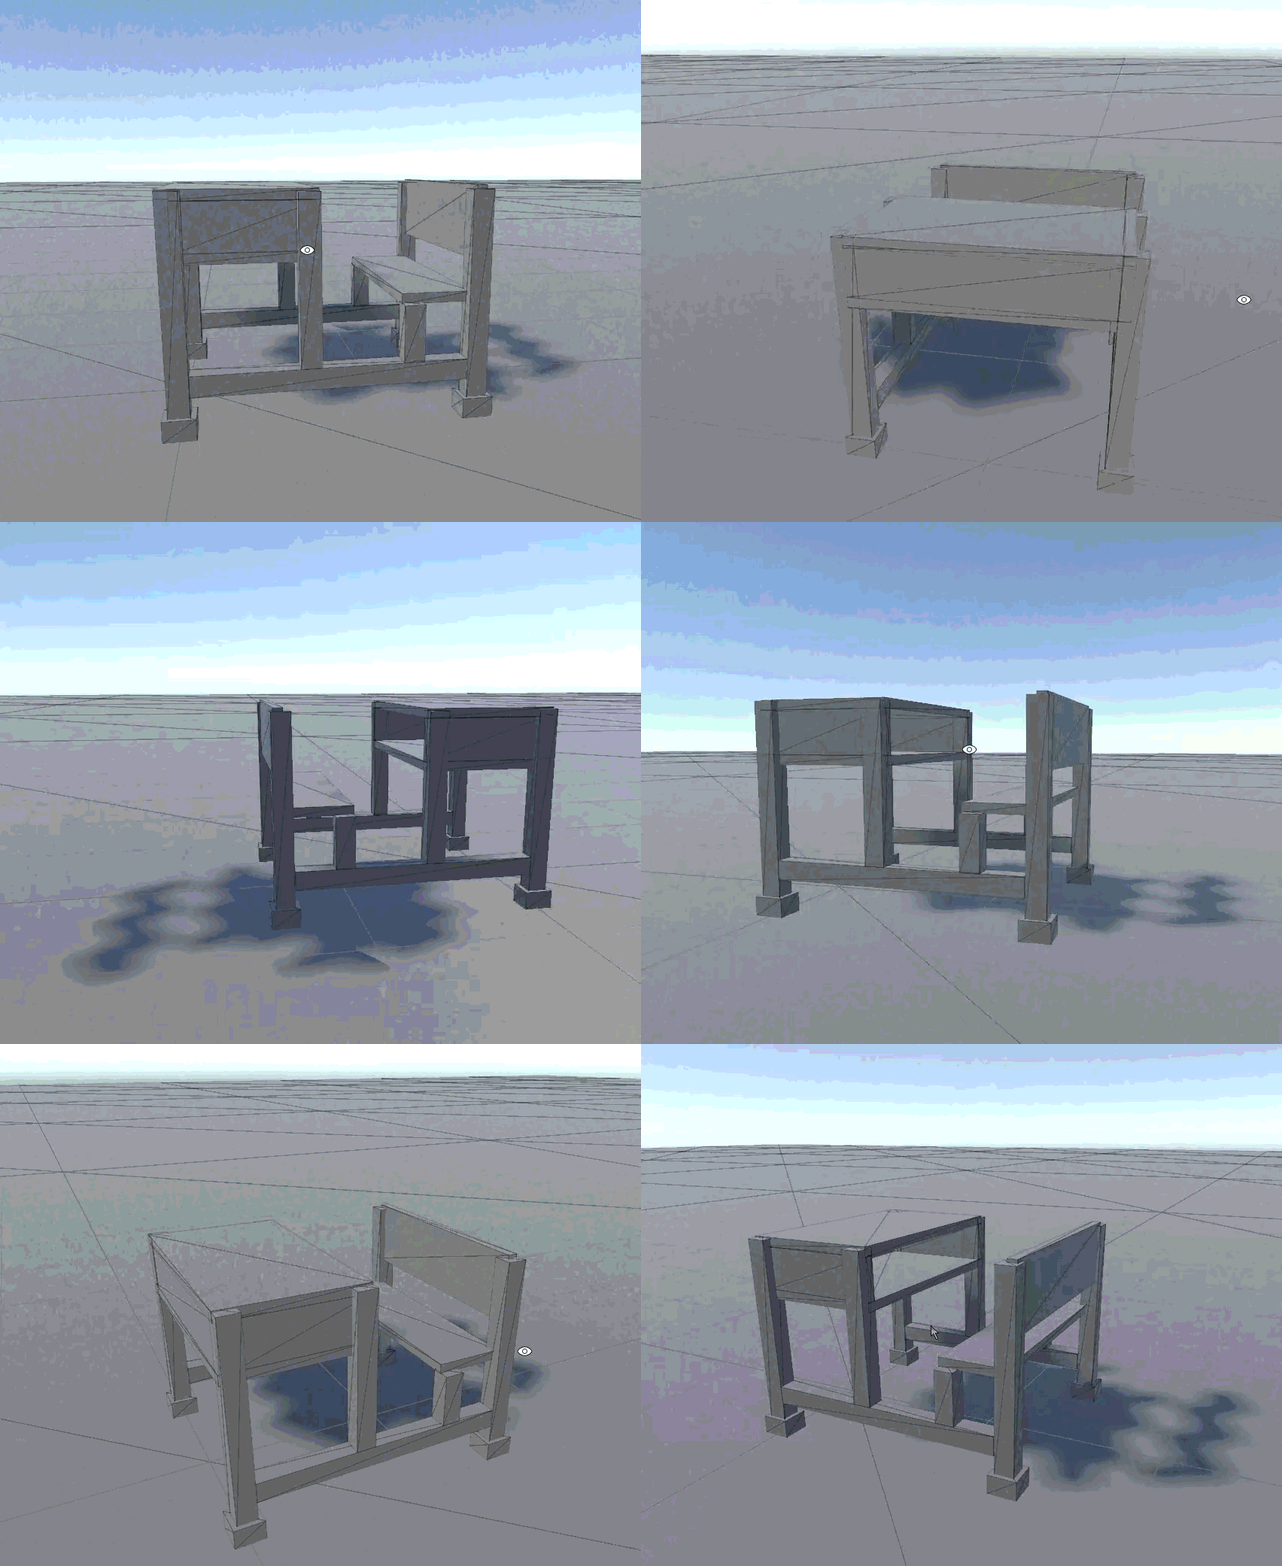
Plan the Parts
Look at your desk again, and break it into parts:
- 4 legs
- A storage box under the desktop, made of a bottom, a top, a back, and two sides, left open at the front where you sit
We will build one leg and the storage box carefully. Once you understand how they are made, you can duplicate and reuse the pieces for the rest.
Two Tricks Before You Start
Trick 1: Duplicate, don’t rebuild. Once you build one piece correctly, you rarely need to build its twin from scratch. Select it, and press Ctrl+D (Windows) or Cmd+D (Mac) to make an exact copy. Then use the Move tool (W) to slide the copy into its new position.
Trick 2: A cube grows from its center. When you make a cube taller, it grows both up and down from its own position point, evenly. So after you resize a cube, you almost always need to move it too, or half of it will sink through the floor. Check your work from the Front view often, by clicking the Gizmo’s front arm, to see this clearly.
Part A: Build One Leg
Step 1. Right-click in the Hierarchy, choose Create Empty, and name it Desk. This will hold every piece you build, so you can move the whole desk at once later.
Step 2. Right-click on Desk, choose Create Empty again, and name it Leg. Make sure it sits inside Desk, as a child.
Step 3. Right-click on Leg, add 3D Object > Cube, and rename it Post. In the Inspector, set its Scale to:
- X: 0.1
- Y: 1 (leave this at the default for now, or set it to match your own desk’s real height)
- Z: 0.1
This turns the cube from a block into a thin, tall post, like a table leg.
Step 4. Using the Move tool (W), move Post up until its bottom touches the ground. If Y scale is 1, its Position Y should be 0.5, since half of the leg sits above the center point, and half sits below.
Step 5. Add a second Cube inside Leg, and rename it Foot. Set its Scale to:
- X: 0.15
- Y: 0.1
- Z: 0.15
This foot is a little wider than the post, so it reads as a small base. Move it (W) to the very bottom of Post, right where the leg touches the floor.
You now have one complete leg. Select the Leg folder, with both Post and Foot inside, press Ctrl+D three times, and move each copy (W) to a different corner of the desk, so you end up with four legs.
Part B: Build the Desktop and Storage Box
Step 1. Right-click on Desk, choose Create Empty, and name it Storage.
Step 2. Add a Cube inside Storage, rename it Bottom, and set its Scale to:
- X: 1.2
- Y: 0.05
- Z: 0.7
This makes a wide, thin, flat slab. Move it (W) so it rests on top of your four legs.
Step 3. Select Bottom, press Ctrl+D, and rename the copy Top. Move the copy up, leaving a gap of about 0.2 to 0.3 units above Bottom. This gap becomes the space where books and bags can sit.
Step 4. Add another Cube inside Storage, and rename it Back. This piece closes the box from behind. Unlike Bottom and Top, Back stands upright, so its tall side is now Y instead of Z. Set its Scale to:
- X: 1.2
- Y: your gap size, for example 0.25
- Z: 0.05
Move it (W) to the back edge of the box, centered between Bottom and Top.
Step 5. Add two more cubes for Left and Right. These panels stand upright too, so they are thin on X instead of Y. Set their Scale to:
- X: 0.05
- Y: match Back’s height, for example 0.25
- Z: 0.7
Move one to the left edge of the box, and one to the right edge, so together with Back, they close the box on three sides. Leave the front open, facing you, like a real shelf.
Check Your Work
Switch to the Front view and the Side view often as you build, by clicking the Gizmo’s arms. From straight on, gaps and overlaps are easy to see, but from an angled, perspective view, they can hide. Zoom in with your scroll wheel, and press F to frame any single piece you want to check closely.
Here is the full list of pieces, so you can check your desk against it:
| Part | Scale (X, Y, Z) | What it does |
|---|---|---|
| Post (4 total) | 0.1, 1, 0.1 | The tall part of each leg |
| Foot (4 total) | 0.15, 0.1, 0.15 | A small base under each leg |
| Bottom | 1.2, 0.05, 0.7 | The floor of the storage box |
| Top | 1.2, 0.05, 0.7 | The desktop surface, duplicated from Bottom |
| Back | 1.2, 0.25, 0.05 | Closes the box from behind |
| Left / Right | 0.05, 0.25, 0.7 | Closes the sides, open at the front |
These numbers are a starting example, not a rule. Measure your own real desk, and use those numbers instead. That is the whole point of this article: once you can measure and scale one part correctly, you can build any part of anything.
Quick Recap
- Every object has three axes: X (width), Y (height), Z (depth).
- Unity’s Transform component uses this same idea: Position, Rotation, Scale.
- 1 Unity unit equals 1 real-world meter.
- W, E, R switch between the Move, Rotate, and Scale tools. Learn them, and you will never need to hunt for a button.
- Empty GameObjects work like folders. They have no shape of their own, but they group related pieces so you can move or duplicate them together.
- Ctrl+D (or Cmd+D) duplicates a piece, so you rarely need to build the same shape twice.
- The real skill is learning to see, not just learning to click buttons.
Keep Practicing
Look at what you just did. You built a real object, using nothing but simple cubes, a few empty folders to keep them organized, and your own understanding of 3D shape.
This is the real skill you are building. It is not “how to make a desk.” It is how to look at anything, break it into its width, height, and depth, and build it piece by piece.
Try this on your own. Look around you, and pick something new:
- A door
- A window
- A car
Use the same habits here too. Break the object into parts, group them inside empty GameObjects, and duplicate whenever a piece repeats. If you can see it, you can build it.
In the next article, you will learn how to bring these shapes to life with materials, textures, and colors.
Contracted by NextSkill a Gamestorms company, delivering this course for Isra University