A game with no color feels empty. Picture a new house before it gets paint, furniture, and light. It looks cold and unfinished. Your Unity scene works the same way. In Lesson 2, you built objects using cubes. Right now, they probably look plain and gray.
In this lesson, you will learn how to add color and detail using something called a material. By the end, you will know what a material is, how each property works, and how to use AI tools to pick great colors in seconds. You will have everything you need to turn a plain gray scene into a full, good-looking environment.
In this lesson, you will learn:
- What a material is, and how it works with the Mesh Renderer
- How to create your own material, step by step
- What each property in the Material Inspector actually does
- Simple tips to keep your game running fast
- How to use AI to pick great color palettes fast
What Is a Material in Unity?
Every 3D object in your scene has a component called a Mesh Renderer. Think of the Mesh Renderer as a projector. It takes the 3D shape of your object and shows it on your screen. But a projector alone shows nothing without a slide to project. That “slide” is the material.
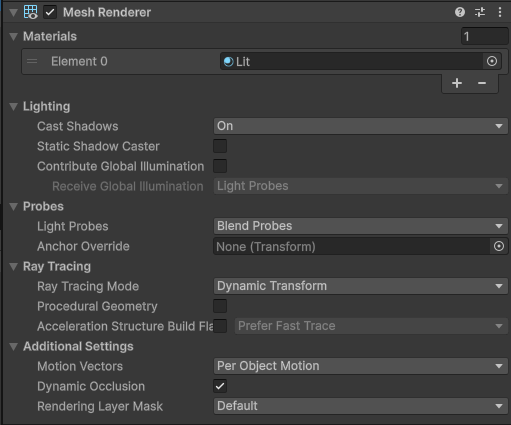
A material tells Unity three things about an object:
- What color or pattern it has
- How shiny or rough it looks
- Extra small details, like bumps, glow, or grooves
Simple Unity shapes, like a cube or a sphere, only need one material. But bigger models made in other 3D software, like Blender, can have several materials on one object. For example, a car model may use one material for the paint. It may use a second material for the glass windows.
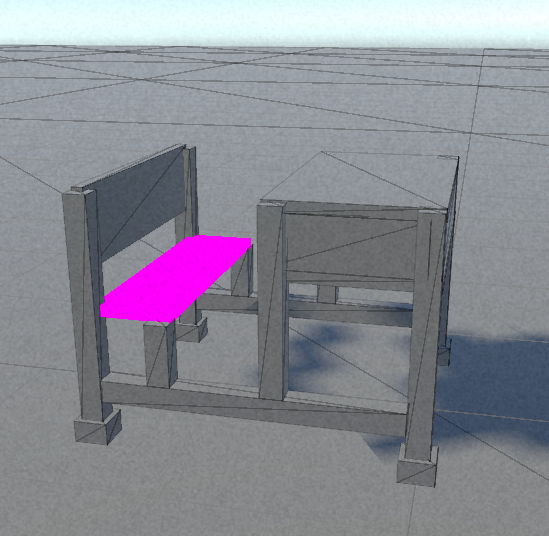
If an object is missing its material, Unity shows it in bright pink. This pink color is a warning sign, just like a warning light on a car dashboard. It tells you: “something is missing here, please fix it.”
How to Create a Material in Unity (Step by Step)
Creating a material only takes a few clicks:
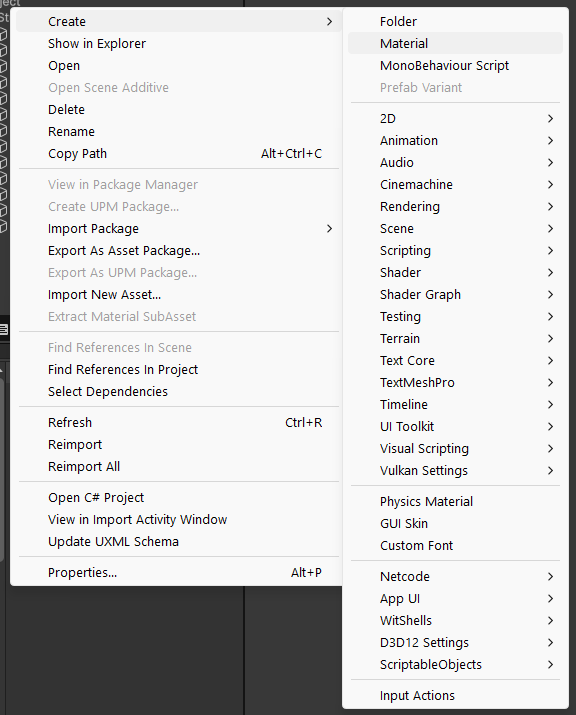
- Open your Project window (also called the Assets window).
- Right-click inside the folder where you want to save it. Many developers keep a separate “Materials” folder to stay organized. This works the same way you sort files into labeled folders on your computer.
- Select Create > Material.
- Give it a clear name, like
Wood_BenchorMetal_Legs.
Anything you create inside your Assets folder becomes a reusable resource. One material can be used on many objects in your scene. It works the same way one can of paint can cover several chairs.
Unity Shader Explained: What Does URP/Lit Mean?
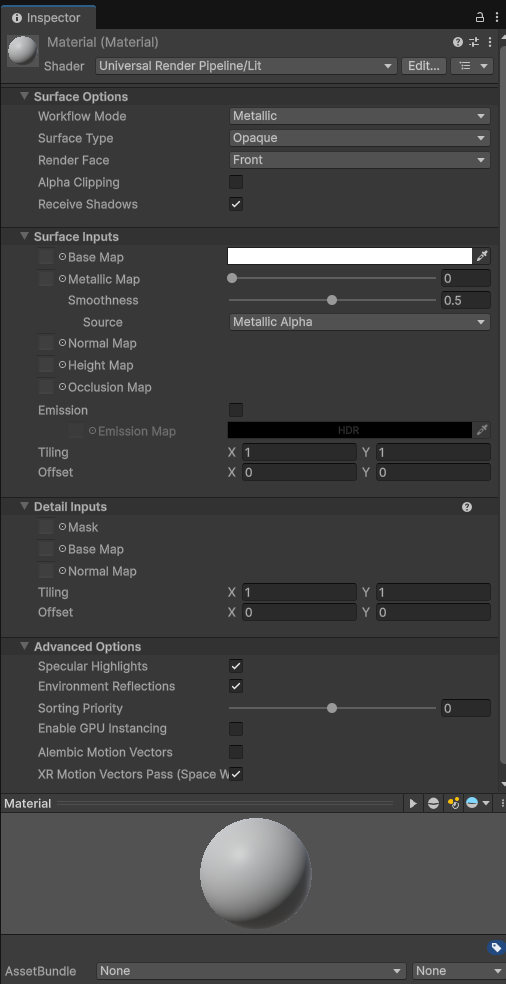
Click on your new material. Near the top, you’ll see a property called Shader. By default, it says Universal Render Pipeline/Lit, often shortened to URP/Lit.
A shader is like a recipe. It tells your computer exactly how to calculate light, shadow, and color for every pixel on your object. “Lit” means the object reacts to light in your scene. It can look bright, dark, or shiny, depending on where your lights are. This is different from an “Unlit” shader. An unlit shader ignores light completely, so it always looks the same.
For most beginner projects, leave the shader on Universal Render Pipeline/Lit. Then move on to the properties below.
Surface Options: Workflow Mode, Surface Type, and Render Face
Right under the shader, you’ll find Surface Options. These control the basic behavior of your material.
Workflow Mode: Metallic vs. Specular
- Metallic uses one slider to decide how “metal-like” a surface is. It’s the default, and the easier option for beginners.
- Specular lets you pick an exact reflection color instead of a slider. It gives more control, but beginners rarely need it.
If you’re not sure which to choose, stay on Metallic. It covers almost everything you’ll need early on.
Surface Type: Opaque vs. Transparent
- Opaque means solid. You cannot see through it. Use this for wood, stone, and metal.
- Transparent means partly see-through. Use this for glass, water, or ghost-like effects.
Think about a house: the walls are opaque, but the windows are transparent.
Render Face: Front, Back, or Both
This setting decides which side of a surface actually gets drawn. By default, it’s set to Front.
Picture a paper flag on a stick. If you walk around to the back of a one-sided flag, it disappears completely. That’s exactly what happens with a Unity plane by default. It’s usually only visible from one side. If your object vanishes when viewed from a certain angle, switch Render Face to Both to fix it.
Surface Inputs: Where Your Colors and Textures Live
Below Surface Options, you’ll find Surface Inputs. This is where you actually set the color and add detail.
Base Map: Your Main Color or Pattern
The Base Map is the main color or texture of your material, similar to choosing a paint color or a wallpaper pattern. Click the color box to pick a solid color. You can also drag in an image to use a texture, like a photo of real wood grain or fabric.
Metallic and Smoothness: How Light Bounces Off Your Surface
These two sliders work as a pair:
- Metallic controls how much a surface behaves like metal. A value of 0 looks like plastic or wood. A value of 1 looks like polished chrome.
- Smoothness controls how much a surface behaves like a mirror. A low value looks matte, like a painted wall. A high value looks polished, like a car hood or wet glass.
For a raw wooden bench seat, set both close to 0. Plain wood does not reflect much light. If the wood is varnished or painted glossy, raise the smoothness a little to match its shinier look.
Normal Map, Height Map, and Occlusion Map: Detail Without Extra Geometry
These three maps add realistic detail without adding a single extra triangle to your model. That keeps your game running fast while still looking detailed.
- Normal Map: Fakes small bumps and grooves, like wood grain or a fabric weave. It works like textured wallpaper. It tricks your eyes into seeing depth that isn’t really there.
- Height Map: Adds an even stronger illusion of depth, useful for things like brick or cobblestone. Think of a postcard with a 3D effect: it looks deep, but the surface is completely flat.
- Occlusion Map: Adds soft shadows into tiny corners and cracks, where light naturally struggles to reach. It’s the same dark line you notice where your floor meets your wall.
You don’t need to master these three right away. As you build more scenes, you’ll naturally start reaching for them to add realism.
Emission: Making Objects Glow
Turn on Emission when you want an object to give off its own light, without needing a lamp nearby. Think of a phone screen glowing in a dark room, a neon sign, or a lit window at night.
Emission has two parts:
- Color decides what color the glow is.
- Intensity decides how strong the glow looks, from a soft night-light to a bright spotlight.
Tiling and Offset: Repeating and Shifting a Pattern
- Tiling decides how many times your texture repeats across a surface. Instead of stretching one big brick image over a whole wall, you repeat a small texture many times. A single stretched image usually looks blurry. This is the same way real bricks repeat across a wall.
- Offset shifts where that pattern starts. This helps you line up a pattern correctly, like matching a brick texture neatly at a corner.
Advanced Options: GPU Instancing and Sorting Priority
At the bottom of the Inspector, you’ll find Advanced Options. Two settings here matter most for performance:
- Enable GPU Instancing: Imagine many objects that share the exact same mesh and material, like a row of identical chairs or a forest of similar trees. GPU Instancing lets your computer draw all of them in one efficient step, instead of many separate ones. Picture a waiter carrying a full tray of ten identical plates in one trip, instead of walking back and forth ten separate times.
- Sorting Priority (sometimes labeled “Priority”): Controls the order that materials get drawn. This mostly matters for transparent objects, like overlapping glass or particle effects. It helps them layer correctly instead of glitching.
Hands-On Example: Coloring a Wooden Bench
Now it’s your turn to practice. Here’s one simple way to color a bench:
- Create a material named
Wood_Seat. Set the Base Map to a warm brown color. Keep Metallic and Smoothness close to 0. - Create a second material named
Metal_Legs. Set the Base Map to a gray or silver color. Set Metallic close to 1, and raise Smoothness a little for a subtle shine. - Drag each material onto the matching part of your bench in the Scene view.
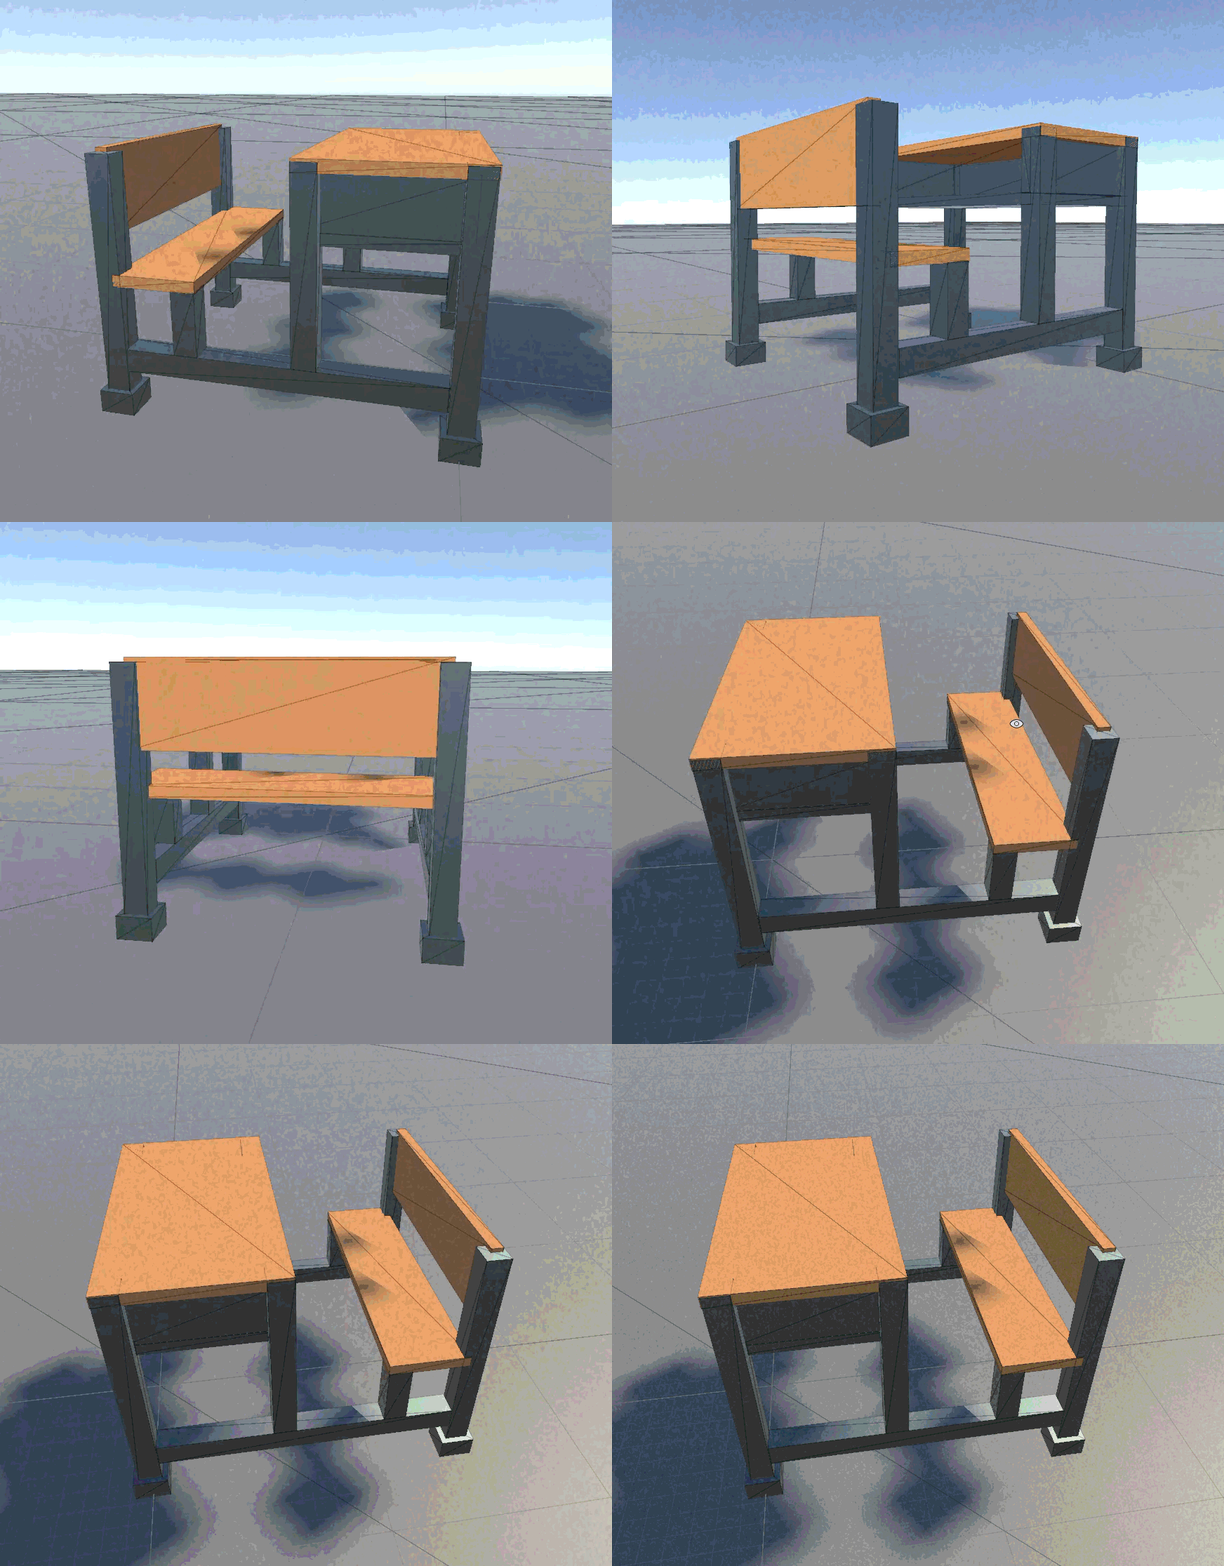
Once this feels comfortable, experiment. Try adding a wood texture to the Base Map. Or push the metal’s smoothness higher for a more polished look.
Unity Optimization: How to Reduce Draw Calls and Batches
More materials in a scene means more work for your computer. This is the same reason running many apps at once slows down your desktop.
Every time Unity draws a group of triangles with a specific material, it sends one instruction to your graphics card. This instruction is called a draw call. Too many draw calls in a single frame can slow your game down, especially on phones or inside a web browser.
Here’s a common mix-up: reusing the same material on multiple objects does not automatically merge them into one draw call. Instead, it makes Unity’s batching tools possible. Tools like Static Batching and GPU Instancing can then combine those objects into far fewer draw calls. In short, reusing materials doesn’t guarantee fewer draw calls by itself. But it’s a required first step that makes those savings possible.
Early prototypes on PC can usually ignore this. But once you’re getting ready to publish, it becomes important. As a general guideline, many mobile and WebGL games try to keep total draw calls and batches low, often under a couple hundred. This keeps performance smooth. The right number for your project always depends on your target device and how complex your game is.
How to Use AI to Pick Unity Color Palettes
Picking colors that look good together is a real skill, and it takes time to learn well. While you’re still learning, an AI assistant can help. Ask it to suggest a color palette, complete with hex codes. You can paste these hex codes straight into Unity’s Base Map color field.
Here are a few prompts you can copy and adjust:
- “Suggest a 5-color hex palette for a cozy wooden cabin scene in a low-poly game.”
- “I’m building a sci-fi Unity environment. Give me 4 hex colors for metal, glass, and glowing lights that feel cold and futuristic.”
- “Turn this mood into a color palette: a peaceful autumn forest at sunset. Give me 5 hex codes.”
- “Suggest a beginner-friendly color scheme for a fantasy village using wood, stone, and grass.”
Once you have a palette, paste each hex code into a material’s Base Map. Then adjust Metallic and Smoothness to match the material type. One tip: always test your colors inside your actual scene, under your actual lighting. A color that looks perfect on a flat color wheel can look completely different once real light hits it.
Your Turn: Build a Small Environment
You now know enough to build a full, good-looking scene on your own. Try this challenge:
- Create at least 4 materials: one for the ground, one for a wall or fence, and two for small props.
- Reuse the same material on repeated objects, like fence posts or rocks. Turn on GPU Instancing for them.
- Add one glowing object using Emission, like a lamp or a sign.
- Ask an AI assistant for a matching color palette first, so all your materials feel like they belong together.
Put these steps together, and your plain gray scene turns into a small, believable environment.
Quick FAQ
What is a material in Unity? A material controls an object’s color, shine, and surface detail. It works together with the Mesh Renderer to decide how an object looks.
Why is my Unity object bright pink? Pink means the object’s material or shader is missing or broken. Assign a working material to fix it.
How do I reduce draw calls in Unity? Reuse the same material across similar objects. Turn on GPU Instancing or Static Batching where you can. This lets Unity combine many draw calls into far fewer.
What’s Next
Your scene now has color and detail. In Lesson 4, it’s time to make it feel real. We’ll cover physics in Unity, including Rigidbody and Colliders. These let your objects fall, bounce, and collide like real-world objects.
Contracted by NextSkill a Gamestorms company, delivering this course for Isra University