From Built-in Components to Your Own Scripts
Every GameObject in Unity is built from components. Each component adds one piece of behavior. In Lesson 4, we already used some built-in components:
- Rigidbody – adds physics, like gravity and forces
- Collider – gives an object a physical shape, so it can touch other objects
- Mesh Renderer and Mesh Filter – show the 3D shape on your screen
- Transform – every GameObject has this by default. It stores position, rotation, and scale.
Unity gives us many components like these. They already know how to behave. But sometimes you want to create your own behavior. This is where MonoBehaviour comes in.
A MonoBehaviour is a C# script that you write yourself. Inside it, you give your GameObject exact instructions to follow.
Creating Your First Script
Let’s create your first script.
- Open your Assets folder.
- If you don’t have a Scripts folder yet, create one.
- Right-click inside the folder and create a new C# script.
- Give it a name. In this lesson, we will call it
TestMono. You can use any name you like.
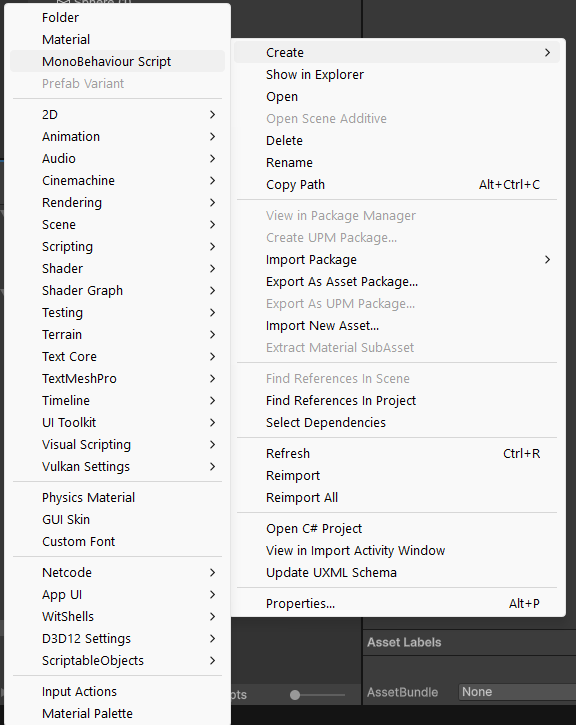
When you open the new script, it looks like this:
using UnityEngine;

public class TestMono : MonoBehaviour
{
    // Start is called once before the first execution of Update after the MonoBehaviour is created
    void Start()
    {

    }

    // Update is called once per frame
    void Update()
    {

    }
}
If you already know C#, this will look familiar. If you have never written code before, don’t worry. We will go step by step.
A Quick Look at Classes and Methods
C# is a programming language. You use it to write instructions for your GameObject. Once you attach the script to a GameObject, that GameObject follows your instructions.
Look at the first line of the script:
public class TestMono : MonoBehaviour
classmeans we are creating a new class. A class is like a blueprint. It describes what an object can do and what it can hold.TestMonois the name of our class.- The colon
:means our class inherits fromMonoBehaviour. This meansTestMonogets all the built-in powers ofMonoBehaviour, plus anything extra we write. - Everything the class does lives inside the curly brackets
{ }.
You will understand classes better with practice. For now, just remember: a class is a container for behavior.
What Is a Method?
Inside our class, we saw Start() and Update(). These are called methods.
A method is a block of instructions with a name. When you “call” a method, Unity runs the instructions inside it.
Here is a simple example. Imagine we have a Person class with a Jump() method:
public class Person : MonoBehaviour
{
    public Rigidbody rb;

    public void Jump()
    {
        rb.AddForce(Vector3.up * 5f, ForceMode.Impulse);
    }
}
If our Person has a Rigidbody attached, and something calls Jump(), Unity runs the code inside it. We push the Rigidbody upward on the Y axis, and our Person jumps.
Now here is the important part: Unity’s own MonoBehaviour methods work the same way — but you don’t call them yourself. Unity calls them for you, automatically, at specific moments. Because of this, they are often called event functions. Unity “fires” them when a specific event happens, like a new frame starting.
This automatic order is called the lifecycle of a script — a series of methods that Unity calls in a set order, from the moment a GameObject appears in the scene, to the moment it is removed.
The Full List of Lifecycle Methods
Here are the main lifecycle methods a MonoBehaviour can have:
Awake()OnEnable()Start()Update()FixedUpdate()LateUpdate()OnDisable()OnDestroy()OnValidate()(Editor only)Reset()(Editor only)
Let’s say you have 5 GameObjects in your scene, and each one has a script attached. Here is exactly what happens, step by step, the moment you press Play.
Step 1: Awake()
Unity calls Awake() on every object in the scene, one time, as soon as the scene loads. This happens before any object’s Start() runs.
When to use it: Use Awake() to set up things inside your own GameObject, like getting a reference to your own Rigidbody or Animator. At this point, other objects in the scene might not be ready yet, so don’t rely on them here.
using UnityEngine;

public class Enemy : MonoBehaviour
{
    private Rigidbody rb;

    void Awake()
    {
        // Get our own Rigidbody early.
        // Safe here, because we only need OUR OWN object, not anyone else's.
        rb = GetComponent<Rigidbody>();
    }
}
Step 2: OnEnable()
Unity calls OnEnable() every time the object becomes active. This includes the first time it appears, and any time after that when it gets turned back on.
You can see this checkbox in the Inspector:
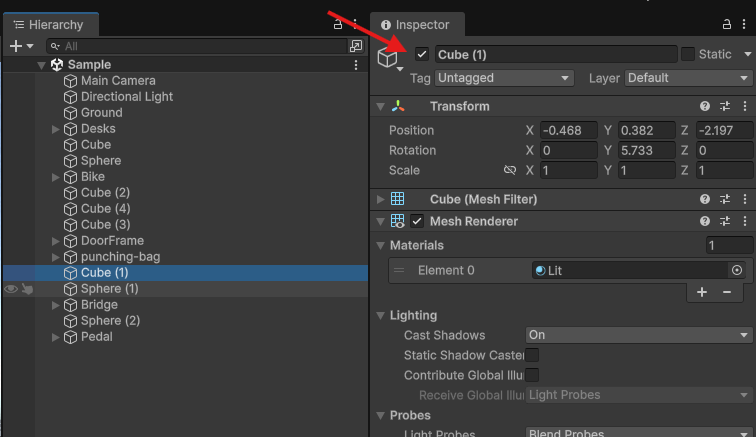
When it’s checked, the GameObject is enabled. When it’s unchecked, it’s disabled.
You can also control this from a script:
gameObject.SetActive(true);  // enables the object, this calls OnEnable()
gameObject.SetActive(false); // disables the object, this calls OnDisable()
Real example: Think of a power-up item. It spawns, a player collects it, and later it respawns somewhere else. Every time it respawns and becomes active again, you may want to restart its glow effect or its floating animation. That code belongs in OnEnable().
using UnityEngine;

public class PowerUp : MonoBehaviour
{
    void OnEnable()
    {
        // Runs every time this power-up becomes active,
        // for example, right after it respawns.
        Debug.Log("Power-up is ready to be collected!");
    }

    void OnDisable()
    {
        // Runs every time this power-up is turned off,
        // for example, right after a player collects it.
        Debug.Log("Power-up was collected and is now hidden.");
    }
}
Step 3: Start()
Unity calls Start() one time, right before the first Update(). It runs after Awake() has already finished on every object in the scene.
When to use it: Because every object’s Awake() runs first, Start() is the safer place to write code that needs to talk to other GameObjects.
using UnityEngine;

public class Enemy : MonoBehaviour
{
    private GameObject player;

    void Start()
    {
        // Safe to search for the Player here, because every Awake()
        // in the scene has already finished. The Player is fully set up.
        player = GameObject.FindWithTag("Player");
    }
}
Step 4: Update()
After Start(), Unity begins the main game loop. Update() runs once every frame, for as long as the game runs.
When to use it: Anything that needs to happen constantly — reading player input, moving objects, checking timers, everyday gameplay logic.
using UnityEngine;

public class PlayerMovement : MonoBehaviour
{
    public float speed = 5f;

    void Update()
    {
        float horizontal = Input.GetAxis("Horizontal");
        float vertical = Input.GetAxis("Vertical");

        Vector3 move = new Vector3(horizontal, 0, vertical);
        transform.Translate(move * speed * Time.deltaTime);
    }
}
We multiply by Time.deltaTime so our movement speed stays the same, no matter how fast or slow the frame rate is.
Step 5: FixedUpdate()
This is one spot where our original notes need a small fix, so let’s get it exactly right.
FixedUpdate() does not run many times inside a single frame. It runs on its own fixed timer, separate from your frame rate. By default, Unity calls it every 0.02 seconds, which equals 50 times per second.
Because your frame rate goes up and down, but this timer stays fixed, the relationship between frames and FixedUpdate() calls changes:
- On a slow frame,
FixedUpdate()may run more than once, to catch up. - On a very fast frame,
FixedUpdate()may not run at all that frame.
When to use it: All physics code. Anything using Rigidbody, like AddForce() or setting velocity, belongs here — not in Update(). This keeps physics smooth and consistent, no matter the frame rate.
using UnityEngine;

public class SimpleMover : MonoBehaviour
{
    public float force = 10f;
    private Rigidbody rb;

    void Awake()
    {
        rb = GetComponent<Rigidbody>();
    }

    void FixedUpdate()
    {
        // Physics code goes here, not in Update().
        rb.AddForce(Vector3.forward * force);
    }
}
Step 6: LateUpdate()
LateUpdate() also runs once per frame, but after every object’s Update() has already finished for that frame.
When to use it: The classic example is a camera that follows the player. If the camera moved inside its own Update(), it might move before the player finishes moving that same frame. That causes a shaky, jumpy camera. By waiting until LateUpdate(), we know the player has already reached its final position for that frame.
using UnityEngine;

public class CameraFollow : MonoBehaviour
{
    public Transform target;
    public Vector3 offset = new Vector3(0, 5, -10);

    void LateUpdate()
    {
        // Runs after the player has already moved this frame,
        // so the camera never lags behind or shakes.
        transform.position = target.position + offset;
    }
}
Putting the Order Together
Here is the full order, from the moment your game starts:
Scene Loads
    |
    v
Awake()        -> called once, on every object
    |
    v
OnEnable()     -> called once, on every active object
    |
    v
Start()        -> called once, on every object, before the first frame
    |
    v
+-------------------------------------------+
|              Every Frame:                  |
|                                             |
|   FixedUpdate()  -> 0, 1, or more times    |
|         |                                   |
|         v                                   |
|   Update()       -> exactly once            |
|         |                                   |
|         v                                   |
|   LateUpdate()   -> exactly once            |
|                                             |
+-------------------------------------------+
    | (this loop repeats every frame)
    v
OnDisable()    -> called when the object is turned off
    |
    v
OnDestroy()    -> called when the object is destroyed
OnDestroy() — Cleaning Up
Unity calls OnDestroy() one time, right when a GameObject is about to be removed from the scene. This happens when you call Destroy(gameObject) in code, when you load a new scene, or when you close the game.
When to use it: Clean-up work. For example, unsubscribing from events, stopping a sound, or saving data before the object disappears for good.
using UnityEngine;

public class Enemy : MonoBehaviour
{
    void OnDestroy()
    {
        // Runs right before this object is fully removed.
        // A good place to clean up, like stopping a sound or saving a stat.
        Debug.Log(gameObject.name + " has been destroyed.");
    }
}
OnValidate() and Reset() — Editor-Only Helpers
These two methods do not run during real gameplay on a player’s device. They only run inside the Unity Editor, to help you while you build your game.
OnValidate()
Unity calls OnValidate() in the editor whenever a value changes in the Inspector, or when the script is loaded. It’s useful for checking and fixing values before you even press Play.
using UnityEngine;

public class Health : MonoBehaviour
{
    public int maxHealth = 100;
    public int currentHealth = 100;

    void OnValidate()
    {
        // Runs automatically in the editor when a value changes.
        // Stops you from accidentally setting currentHealth above maxHealth.
        if (currentHealth > maxHealth)
        {
            currentHealth = maxHealth;
        }
    }
}
Reset()
Unity calls Reset() one time, when you first add the script to a GameObject, or when you right-click the component and choose Reset. It’s a good place to set smart default values.
using UnityEngine;

public class Health : MonoBehaviour
{
    public int maxHealth = 100;
    public int currentHealth = 100;

    void Reset()
    {
        // Runs once, right when you add this script to a GameObject.
        // Gives new users a sensible starting point.
        maxHealth = 100;
        currentHealth = 100;
    }
}
Adding a Collider Unlocks New Methods
Now let’s connect this lesson back to Lesson 4. When you add a Collider to a GameObject, you unlock a new group of lifecycle methods: collision and trigger events.
There are two families:
- Collision events — for solid objects that physically bump into each other.
- Trigger events — for zones that detect when something passes through, without blocking it.
What Each One Needs to Actually Fire
This part trips up a lot of beginners, so here is a simple table.
| Method | Needs a Rigidbody? | Collider “Is Trigger”? | Fires when… |
|---|---|---|---|
OnCollisionEnter(Collision other) |
Yes, on at least one of the two objects | Off | Two colliders start touching |
OnCollisionStay(Collision other) |
Yes, on at least one of the two objects | Off | Two colliders keep touching, every physics step |
OnCollisionExit(Collision other) |
Yes, on at least one of the two objects | Off | Two colliders stop touching |
OnTriggerEnter(Collider other) |
Yes, on at least one of the two objects | On | Something enters the trigger zone |
OnTriggerStay(Collider other) |
Yes, on at least one of the two objects | On | Something stays inside the trigger zone |
OnTriggerExit(Collider other) |
Yes, on at least one of the two objects | On | Something leaves the trigger zone |
Important rule: At least one of the two touching objects must have a Rigidbody. Without a Rigidbody on either side, Unity will not call any of these methods.
OnCollisionEnter, OnCollisionStay, OnCollisionExit
Use these for solid objects. Imagine a ball that hits a wall.
using UnityEngine;

public class Ball : MonoBehaviour
{
    void OnCollisionEnter(Collision collision)
    {
        // Runs the moment the ball touches something solid.
        Debug.Log("Hit: " + collision.gameObject.name);
    }

    void OnCollisionStay(Collision collision)
    {
        // Runs every physics step, while the ball is still touching it.
        Debug.Log("Still touching: " + collision.gameObject.name);
    }

    void OnCollisionExit(Collision collision)
    {
        // Runs the moment the ball stops touching it.
        Debug.Log("Left: " + collision.gameObject.name);
    }
}
OnTriggerEnter, OnTriggerStay, OnTriggerExit
Use these for zones you want to detect, but not physically block. For example, an invisible box that launches the player upward when they walk into it.
To make this work:
- Add a Box Collider to an empty GameObject.
- Check the Is Trigger box on that collider.
- Make sure the object passing through (for example, the Player) has a Rigidbody.
using UnityEngine;

public class LaunchZone : MonoBehaviour
{
    public float launchForce = 15f;

    void OnTriggerEnter(Collider other)
    {
        // Runs once, the moment something enters this trigger zone.
        Rigidbody otherRb = other.GetComponent<Rigidbody>();

        if (otherRb != null)
        {
            otherRb.AddForce(Vector3.up * launchForce, ForceMode.Impulse);
            Debug.Log(other.gameObject.name + " got launched!");
        }
    }

    void OnTriggerStay(Collider other)
    {
        // Runs every physics step, while something is still inside the zone.
    }

    void OnTriggerExit(Collider other)
    {
        // Runs once, the moment something leaves the zone.
        Debug.Log(other.gameObject.name + " left the launch zone.");
    }
}
Full Example Scripts
Let’s bring everything together with two complete scripts, the way we promised earlier.
Example 1: A Simple Player Controller
This script uses Awake(), Start(), Update(), and FixedUpdate() together, the way a real script normally would.
using UnityEngine;

public class SimplePlayerController : MonoBehaviour
{
    [Header("Movement Settings")]
    public float moveSpeed = 5f;
    public float jumpForce = 7f;

    private Rigidbody rb;
    private bool isGrounded;

    void Awake()
    {
        // Set up our OWN component first. Safe to do here.
        rb = GetComponent<Rigidbody>();
    }

    void Start()
    {
        // Safe to do simple setup here too.
        isGrounded = true;
        Debug.Log("Player is ready: " + gameObject.name);
    }

    void Update()
    {
        // Always read input in Update(), never in FixedUpdate().
        // FixedUpdate() can skip frames, so you might miss a key press.
        if (Input.GetKeyDown(KeyCode.Space) && isGrounded)
        {
            Jump();
        }
    }

    void FixedUpdate()
    {
        // Move the Rigidbody here, since this is physics-driven movement.
        float horizontal = Input.GetAxis("Horizontal");
        Vector3 movement = new Vector3(horizontal * moveSpeed, 0f, 0f);
        rb.MovePosition(rb.position + movement * Time.fixedDeltaTime);
    }

    void Jump()
    {
        rb.AddForce(Vector3.up * jumpForce, ForceMode.Impulse);
        isGrounded = false;
    }

    void OnCollisionEnter(Collision collision)
    {
        // A simple ground check: landing on the ground lets us jump again.
        if (collision.gameObject.CompareTag("Ground"))
        {
            isGrounded = true;
        }
    }
}
Example 2: A Collectible Coin (Trigger-Based)
This script shows a full trigger setup — a coin the player walks into, which then turns itself off.
using UnityEngine;

public class Coin : MonoBehaviour
{
    public int value = 10;
    public float rotateSpeed = 90f;

    void Awake()
    {
        // Make sure this collider is set correctly, even if someone
        // forgets to check the box by hand in the Inspector.
        Collider col = GetComponent<Collider>();
        col.isTrigger = true;
    }

    void Update()
    {
        // A simple visual spin, just to make the coin feel alive.
        transform.Rotate(Vector3.up * rotateSpeed * Time.deltaTime);
    }

    void OnTriggerEnter(Collider other)
    {
        if (other.CompareTag("Player"))
        {
            Debug.Log("Collected a coin worth " + value + " points!");
            gameObject.SetActive(false); // this will call OnDisable() below
        }
    }

    void OnEnable()
    {
        // Runs again if this coin ever respawns.
        Debug.Log(gameObject.name + " is now collectible again.");
    }

    void OnDisable()
    {
        // Runs the moment the coin is collected and turned off.
        Debug.Log(gameObject.name + " was collected.");
    }
}
Common Mistakes to Avoid
- Putting physics code inside
Update(). Always useFixedUpdate()forRigidbodyforces and velocity.Update()does not run at a fixed rate, so physics can feel inconsistent if you put it there. - Forgetting to check “Is Trigger.” If
OnTriggerEnterdoesn’t seem to fire, check this box first. - Forgetting the Rigidbody. Collision and trigger methods need a Rigidbody on at least one of the two objects. No Rigidbody means no events at all.
- Reading input inside
FixedUpdate(). SinceFixedUpdate()can skip a frame or run twice in one frame, you can miss a fast key press. Read input inUpdate(), then use that result insideFixedUpdate()if needed. - Writing heavy code inside
OnValidate(). This method runs constantly while you edit values in the Inspector. Slow code here can freeze or slow down the editor.
Your Task
Before moving on, build both example scripts above yourself:
- Create
SimplePlayerControllerand attach it to a capsule or cube with a Rigidbody. Add a plane taggedGround, then test moving and jumping. - Create
Coinand attach it to a small sphere. Set its collider to trigger, then walk your player into it and watch the Console.
Then, try building a third example of your own. A few ideas:
- A door that opens when the player enters a trigger zone.
- A trap that pushes the player back on collision.
- An object that logs a message every time it is enabled or disabled.
What’s Next
In the next lesson, we will look at reference types. You will learn how one GameObject can access and control another GameObject’s behavior, even though every GameObject is separate.
After that, we will slow down and cover the fundamentals of C# itself: data and data types, variables, conditional statements, loops, and arrays (a collection of variables). These basics are simple, but they are the foundation for everything else. If you practice them well, then even when your code is generated for you, you will still understand exactly what it’s doing.
Contracted by NextSkill a Gamestorms company, delivering this course for Isra University