In the previous lesson we learned about Data Models and why they matter. We also learned the basics of the Unity Canvas, and we generated screen pages with prompts. But that was only the frontend part. In the past, planning and building a screen took weeks. Today it can take a few minutes, if you write accurate prompts.
Now we take Unity UI to the next level. In this lesson you will learn the MVC pattern and how to use it like a professional. But before MVC, I want to show you one important detail: how to set the Canvas Scaler for your target device. Let’s start!
Big idea of this lesson: AI can draw a screen in minutes. But a screen is only a picture until it is connected to real data. That connection is the part you must understand, because you decide what the data is and how it behaves.
Part 1: Set the Right Resolution
Look at the top bar of the Game View. You can see the words Free Aspect.
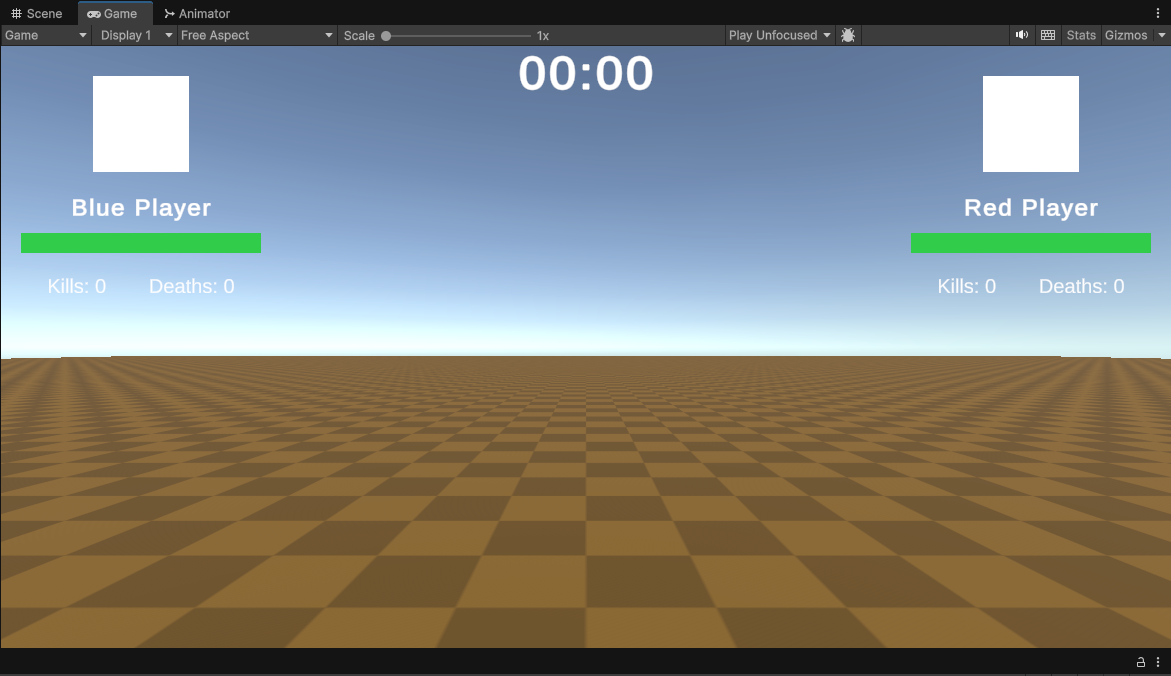
This is the resolution of your game screen, and the Canvas follows it. If you resize the window, the Canvas changes its width and height too. With Free Aspect you cannot know how your UI will look on a real device. So first, decide which screen you want to target.
I will use the standard Full HD resolution: 1920 x 1080. Follow the screenshot below.
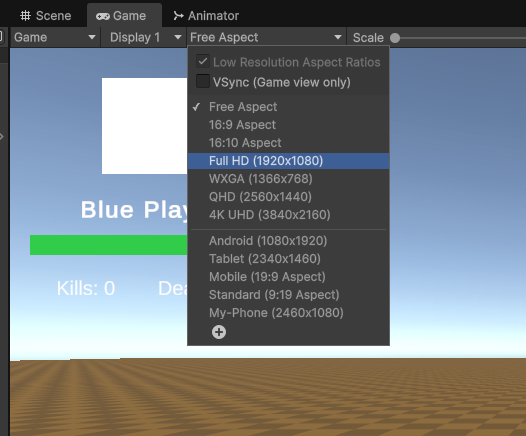
You can see Full HD (1920 x 1080) in the list. Select it. To stay consistent, use the same resolution in the Canvas Scaler. Follow the settings in the screenshot below.
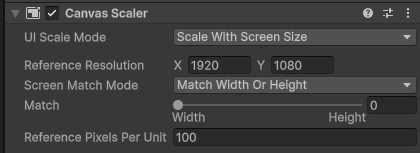
Here are the same settings in a table:
| Setting | Value | What it means |
|---|---|---|
| UI Scale Mode | Scale With Screen Size | You design the UI once. Unity scales it for other screens. |
| Reference Resolution | X 1920, Y 1080 | This is the screen size you design for. |
| Screen Match Mode | Match Width Or Height | Unity uses both width and height to decide the scale. |
| Match | 0.5 | A balance between width and height. |
Making a portrait phone game? Swap the numbers. Use 1080 x 1920 in the Game View and in the Canvas Scaler.
Once the resolution is correct, you can place your elements using anchor presets.
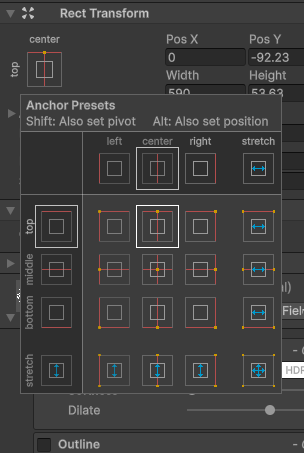
You can see a 3 x 3 grid. This gives you 9 main points: four corners, four sides, and the center. The point you click becomes the anchor of the selected object. The position of the object is then measured from that point. There are also stretch options, which make an object grow with the screen.
You can use two keys when you click a preset:
| Key | What happens |
|---|---|
| Shift + click | Sets the pivot to that point. |
| Alt + click | Moves the element to that point. |
| Shift + Alt + click | Does both. |
I will not go into too much detail here. Please search and explore this topic yourself. In short: when you set the anchor correctly, your elements stay inside the screen, and they adapt a little when the screen shape changes.
Try it: Create a TextMeshPro text and anchor it to the top-right corner. Now change the Game View aspect between 16:9, 4:3, and 21:9. The text stays in the corner every time. Now try the same with the anchor in the center and see the difference.
A short note: phones with notches
Modern phones have notches, round corners, and gesture bars. Unity gives you the safe part of the screen in Screen.safeArea. A simple way to use it: put all your screen content inside one child object (call it SafeArea), stretch it to fill the Canvas, and add this script to it.
using UnityEngine;

[RequireComponent(typeof(RectTransform))]
public class SafeAreaFitter : MonoBehaviour
{
    private void Awake()
    {
        RectTransform rectTransform = GetComponent<RectTransform>();
        Rect safe = Screen.safeArea;

        // Convert pixels to anchor values (0 to 1)
        Vector2 min = safe.position;
        Vector2 max = safe.position + safe.size;
        min.x /= Screen.width;
        min.y /= Screen.height;
        max.x /= Screen.width;
        max.y /= Screen.height;

        rectTransform.anchorMin = min;
        rectTransform.anchorMax = max;
    }
}
This version runs once at the start. It is enough for games that stay in one orientation.
Now your canvas is ready for any screen. Let’s move to the main topic.
Part 2: The MVC Pattern
MVC means Model – View – Controller. The order of the names is not random:
- First we have the Model. It is the data.
- Then we have the View. It is what the user sees and touches.
- Last we have the Controller. It connects the two.
The problem: data trapped inside the UI
Let us look at a script that many beginners write. It is a settings screen with one volume slider.
using UnityEngine;
using UnityEngine.UI;

public class SettingsScreen : MonoBehaviour
{
    public Slider musicSlider;
    public AudioSource music;

    void Start()
    {
        musicSlider.onValueChanged.AddListener(value =>
        {
            music.volume = value;                  // game logic inside the UI script
            PlayerPrefs.SetFloat("music", value);  // saving inside the UI script
        });
    }
}
It works. But think about what happens next:
- Your designer replaces the slider with a round knob. You must rewrite this script.
- A second screen wants to show the music volume. It must find this slider.
- Another script wants to know the volume. It must read
musicSlider.value. If the panel is closed or destroyed, that script breaks.
Do you see the real problem? The data lives inside the UI. When the UI changes, everything breaks. MVC fixes this by moving the data out of the UI.
A simple example: your bank account
Think about a bank account.
- The account holds your balance and a rule: “the balance cannot go below zero”. This is the Model.
- The ATM screen and the phone app both show your balance and have buttons. These are two Views of the same account.
- The system in the middle receives a button press, asks the account to take money out, and then tells the screens to refresh. This is the Controller.
If you take money from the ATM, the phone app shows the new balance a moment later. The ATM did not call the phone app. Both are connected to the same account. And if the bank redesigns the phone app, your balance does not change at all.
This is exactly what we want in Unity.
The three parts
In Lesson 11 you learned about Data Models. The Model in MVC is the same idea, but it is very specific: it holds the data of one feature or one screen.
| Part | In one sentence | It knows about | It never does |
|---|---|---|---|
| Model | Holds the data and the rules. | Nobody. | Touch UI or Unity components. |
| View | Shows the data and reports what the user did. | Only its own UI elements. | Change data or make decisions. |
| Controller | Connects the Model and the View. | Both of them. | Keep the data itself. |
For a settings screen, it looks like this:
| Part | Our class | What is inside |
|---|---|---|
| Model | SettingsModel |
Music volume, sound-effects volume, graphics quality (Low, Medium, High) |
| View | SettingsView |
Two sliders and one dropdown |
| Controller | SettingsController |
The connections between them |
The View needs a script. That script holds the references to the UI elements (for example, the Slider). It reports changes to the outside and shows new values when it is told to.
Who talks to whom
The user changes something:
User -> VIEW -> (input event) -> CONTROLLER -> (sets value) -> MODEL

The data changes:
MODEL -> (data event) -> CONTROLLER -> (Show method) -> VIEW -> User sees it
Other scripts (audio, enemies, a save system) do not talk to the View. They talk to the Model. That is the key idea. The Model is the center. Everything else is around it.
Note for curious students: Strictly speaking, this style is called MVP (Model–View–Presenter). In Unity jobs and tutorials, people usually call it MVC. The idea is the same, so we use the name MVC.
Why we keep the View separate
A dependency means: “if A changes, B breaks”. Many dependencies make a project hard to change.
With MVC:
- The Model depends on nothing.
- The View depends only on UI components.
- Only the Controller knows both.
So when the UI changes, only the View changes (and maybe two lines in the Controller). The audio script, the save system, and everything else that uses the Model are not affected. You will see a clear example of this after the first example.
Events: “Don’t ask. Get told.”
How does the View know that the Model changed? There are two ways:
- Ask again and again. Check the value in
Update()every frame. This wastes time and creates messy code. - Get told. The Model sends a message when something changes. This is called an event.
Think of a radio station. The station broadcasts. Anyone who wants to listen tunes in. The station does not know who is listening. This is exactly how a Model works.
| Code | Meaning |
|---|---|
public event Action<float> VolumeChanged; |
Create a radio channel that sends one float. |
VolumeChanged?.Invoke(0.5f); |
Broadcast. The ? means “only if someone is listening”. |
model.VolumeChanged += MyMethod; |
Start listening (subscribe). |
model.VolumeChanged -= MyMethod; |
Stop listening (unsubscribe). |
Important: Always unsubscribe with
-=when your script is destroyed. If a destroyed script is still subscribed, the next broadcast causes errors.
Connecting the Model to the View with events is called binding. It is useful because:
- The View updates only when needed, not 60 times per second.
- The Model does not know who is listening. You can add a second View later without touching the Model.
- Any script can listen. Audio, effects, and saving can all react to the same change.
The four golden rules
- The Model is a plain C# class. No
Slider, noText, noGameObject. - The View only shows and reports. It never decides and never stores data.
- Data changes only through the Model (its properties or methods).
- News travels by events. We do not refresh the UI in
Update().
Before you code: the MVC worksheet
Here is the most important part of this lesson. When you build any screen, do not start with the UI. Start with three questions:
| Question | Part | You write |
|---|---|---|
| 1. What is the data? | Model | Each value and its type |
| 2. What is the reasoning? | Model + Controller | The rules (“never below 0”) and the reactions (“when X changes, do Y”) |
| 3. What does the user see and do? | View | The UI elements |
Everything in your screen revolves around these three things: data, reasoning, and UI. Let us fill in the worksheet for the three screens in this lesson:
| Settings screen | Player health HUD | Coin wallet (your task) | |
|---|---|---|---|
| 1. Data | Music volume, SFX volume, quality | Current health, max health | Coins |
| 2. Reasoning | Volume stays between 0 and 1. When music volume changes, the music gets louder or quieter. When quality changes, Unity changes the quality level. | Health never goes below 0 or above max. When health changes, the bar updates. At 0, the player dies. | Coins never go below 0. Buying needs enough coins. A pickup adds coins. |
| 3. UI | 2 sliders, 1 dropdown | A bar and a text | A coin text and a Buy button |
Look at the worksheet again. Row 1 and row 2 have no UI words in them. That is on purpose. If your data and reasoning are clear, the UI is easy, and AI can build it for you. If your data and reasoning are unclear, no tool can save you.
When you are stuck, ask three questions: What is the data? Who can change it? Who needs to know when it changes?
Part 3: Example 1 — Settings Screen
In this example the user changes the data with the UI, and other scripts use the data.
Slider moved -> View -> Controller -> Model -> music script, SFX script, graphics script
Set up the scene
Use the settings screen you generated in Lesson 11, or make a simple one. You need:
- A panel called
SettingsPanelwith two Sliders (MusicSlider,SfxSlider) and one TextMeshPro Dropdown (QualityDropdown). - On both sliders: Min Value = 0, Max Value = 1, and Whole Numbers off.
- On the dropdown: in the Options list, write three options: Low, Medium, High.
- Check that your scene has an EventSystem object. Without it, no UI element can be clicked. Unity adds it for you when you create a Canvas.
Create a folder Scripts/Settings. We will build four things in order: Model, View, Controller, and the scripts that use the Model.
Step 1: The Model
Remember: the Model comes first. Let us start with only the music volume.
using System;
using UnityEngine;

public class SettingsModel
{
    public event Action<float> MusicVolumeChanged;

    private float musicVolume = 0.8f;

    public float MusicVolume
    {
        get => musicVolume;
        set
        {
            value = Mathf.Clamp01(value);                         // rule: only 0 to 1
            if (Mathf.Approximately(musicVolume, value)) return;  // no change, no news
            musicVolume = value;
            MusicVolumeChanged?.Invoke(musicVolume);              // broadcast
        }
    }
}
Let us read it slowly:
- There is no
: MonoBehaviour. This is a plain C# class. We create it withnew. It does not need a GameObject. musicVolumeis private. Nobody outside can change it directly.- The property
MusicVolumehas agetand aset. Reading is free. Writing must pass through our rules. Mathf.Clamp01is our rule: the volume is always between 0 and 1. It does not matter who sets it. A slider, a cheat code, or a bug: the rule always works.- If the new value is the same as the old value, we
return. No change means no news. This also stops endless loops (you will see why soon). Invokebroadcasts the new value to everyone who is listening.
SFX volume follows the same pattern. Graphics quality also follows it, but we use an enum. An enum is a list of named choices, so we can write GraphicsQuality.High instead of the number 2. You will find the complete Model at the end of this example.
Step 2: The View
The View holds the UI references. It does two jobs:
- Report what the user did (with events).
- Show the values it is given (with
Show...methods).
First, the references and the events:
using System;
using UnityEngine;
using UnityEngine.UI;

public class SettingsView : MonoBehaviour
{
    [SerializeField] private Slider musicSlider;

    // The View reports what the user did. It does not decide anything.
    public event Action<float> MusicSliderMoved;

    private void Awake()
    {
        musicSlider.onValueChanged.AddListener(OnMusicSliderChanged);
    }

    private void OnDestroy()
    {
        musicSlider.onValueChanged.RemoveListener(OnMusicSliderChanged);
    }

    private void OnMusicSliderChanged(float value)
    {
        MusicSliderMoved?.Invoke(value);
    }
}
Look carefully: the View has no Model field. It does not know the Model exists. It only says “the user moved the music slider to this value”.
Now the second job, showing a value:
public void ShowMusicVolume(float value)
{
    musicSlider.SetValueWithoutNotify(value);
}
Why SetValueWithoutNotify and not musicSlider.value = value? Because setting .value makes the slider send its own onValueChanged event. That would start a loop:
User moves slider -> View event -> Model changes -> Model event -> View sets slider -> slider event -> ...
SetValueWithoutNotify changes the slider silently, so the loop stops. Remember this: when code sets a Slider, Toggle, or Dropdown, use SetValueWithoutNotify.
Try it: Later, change
SetValueWithoutNotify(value)to.value = valueand watch what happens. Then change it back. Breaking things on purpose is a great way to learn.
Step 3: The Controller
The Controller creates the Model and connects everything. It is the only script that knows both sides.
using UnityEngine;

public class SettingsController : MonoBehaviour
{
    [SerializeField] private SettingsView view;

    public SettingsModel Model { get; private set; }

    private void Awake()
    {
        Model = new SettingsModel();                       // 1. create
    }

    private void Start()
    {
        view.MusicSliderMoved += OnMusicSliderMoved;       // View  -> Model
        Model.MusicVolumeChanged += view.ShowMusicVolume;  // Model -> View

        view.ShowMusicVolume(Model.MusicVolume);           // show the first value
    }

    private void OnDestroy()
    {
        view.MusicSliderMoved -= OnMusicSliderMoved;
        Model.MusicVolumeChanged -= view.ShowMusicVolume;
    }

    private void OnMusicSliderMoved(float value)
    {
        Model.MusicVolume = value;
    }
}
We follow one simple rule in all our scripts:
| Method | Its job |
|---|---|
Awake |
Create things (the Model). |
Start |
Connect to other objects (subscribe), and show the first values. |
OnDestroy |
Disconnect (unsubscribe). |
Why? Unity runs every Awake before any Start. So when a script runs Start, the Model already exists. This avoids many NullReferenceException errors.
Also see the line view.ShowMusicVolume(Model.MusicVolume); at the end of Start. Events tell us about future changes. They do not tell us the current value. So after we connect, we show the current value once.
Here is the full journey when the user moves the slider:
- The user moves the slider.
- The View raises
MusicSliderMoved. - The Controller sets
Model.MusicVolume. - The Model checks the rule, saves the value, and raises
MusicVolumeChanged. - The Controller (and any other listener) receives the news.
- The View shows the value silently. The loop stops.
Step 4: Other scripts use the Model
Now the best part. Any script can use the settings, and none of them touches the UI. There are two ways to use a Model:
| Way | When to use it | Example in our game |
|---|---|---|
| Listen (subscribe) | You must react the moment the data changes. | MusicPlayer changes the music volume at once. |
| Read (get the value) | You only need the value at one moment. | SfxPlayer reads the volume when it plays a sound. |
Listen: the music player.
using UnityEngine;

public class MusicPlayer : MonoBehaviour
{
    [SerializeField] private SettingsController settings;
    [SerializeField] private AudioSource musicSource;

    private void Start()
    {
        settings.Model.MusicVolumeChanged += ApplyVolume;   // listen
        ApplyVolume(settings.Model.MusicVolume);            // first value
    }

    private void OnDestroy()
    {
        settings.Model.MusicVolumeChanged -= ApplyVolume;
    }

    private void ApplyVolume(float volume)
    {
        musicSource.volume = volume;
    }
}
Read: the sound-effects player.
using UnityEngine;

public class SfxPlayer : MonoBehaviour
{
    [SerializeField] private SettingsController settings;
    [SerializeField] private AudioSource sfxSource;

    public void Play(AudioClip clip)
    {
        float volume = settings.Model.SfxVolume;   // just read the value now
        sfxSource.PlayOneShot(clip, volume);
    }
}
Listen: the graphics applier.
using UnityEngine;

public class GraphicsApplier : MonoBehaviour
{
    [SerializeField] private SettingsController settings;

    private void Start()
    {
        settings.Model.QualityChanged += Apply;
        Apply(settings.Model.Quality);
    }

    private void OnDestroy()
    {
        settings.Model.QualityChanged -= Apply;
    }

    private void Apply(GraphicsQuality quality)
    {
        // Your project may have fewer than 3 quality levels, so we stay safe.
        int level = Mathf.Min((int)quality, QualitySettings.names.Length - 1);
        QualitySettings.SetQualityLevel(level);
    }
}
Rule of thumb: if the script has something to update, listen. If it only needs a number right now, read.
Notice what these scripts do not have: no Slider, no Dropdown, no using UnityEngine.UI. They do not care if the user changes the volume with a slider, a knob, or a voice command.
Put it together in Unity
- Create an empty GameObject named
GameSettings. AddSettingsController. Do not put it inside the settings panel. The panel may be hidden, and a hidden object does not runAwake. Then the Model would not exist, and other scripts would fail. - Add
SettingsViewtoSettingsPanel. Drag inMusicSlider,SfxSlider, andQualityDropdown. - On
GameSettings, dragSettingsPanelinto the View field of the controller. - On your music object (with an
AudioSourcethat plays a looping clip), addMusicPlayer. Assign the settings object and the AudioSource. - Add
GraphicsApplierto any always-active object, for exampleGameSettings. Assign the settings object. - Add
SfxPlayerto an object with its own AudioSource.
Press Play. Move the music slider and listen. Change the dropdown. Stop the game and press Play again: your values come back, because the Controller saves and loads the Model.
Mobile tip: on phones, the system can close your game without calling
OnDestroy. That is why the complete Controller below also saves inOnApplicationPause.
The complete scripts
SettingsModel.cs
using System;
using UnityEngine;

public enum GraphicsQuality
{
    Low,
    Medium,
    High
}

public class SettingsModel
{
    // Events: the Model broadcasts when its data changes.
    public event Action<float> MusicVolumeChanged;
    public event Action<float> SfxVolumeChanged;
    public event Action<GraphicsQuality> QualityChanged;

    private float musicVolume = 0.8f;
    private float sfxVolume = 0.8f;
    private GraphicsQuality quality = GraphicsQuality.Medium;

    public float MusicVolume
    {
        get => musicVolume;
        set
        {
            value = Mathf.Clamp01(value);
            if (Mathf.Approximately(musicVolume, value)) return;
            musicVolume = value;
            MusicVolumeChanged?.Invoke(musicVolume);
        }
    }

    public float SfxVolume
    {
        get => sfxVolume;
        set
        {
            value = Mathf.Clamp01(value);
            if (Mathf.Approximately(sfxVolume, value)) return;
            sfxVolume = value;
            SfxVolumeChanged?.Invoke(sfxVolume);
        }
    }

    public GraphicsQuality Quality
    {
        get => quality;
        set
        {
            if (quality == value) return;
            quality = value;
            QualityChanged?.Invoke(quality);
        }
    }
}
SettingsView.cs
using System;
using TMPro;
using UnityEngine;
using UnityEngine.UI;

public class SettingsView : MonoBehaviour
{
    [Header("UI References")]
    [SerializeField] private Slider musicSlider;
    [SerializeField] private Slider sfxSlider;
    [SerializeField] private TMP_Dropdown qualityDropdown;

    // The View reports what the user did.
    public event Action<float> MusicSliderMoved;
    public event Action<float> SfxSliderMoved;
    public event Action<int> QualityPicked;

    private void Awake()
    {
        musicSlider.onValueChanged.AddListener(OnMusicSliderChanged);
        sfxSlider.onValueChanged.AddListener(OnSfxSliderChanged);
        qualityDropdown.onValueChanged.AddListener(OnQualityDropdownChanged);
    }

    private void OnDestroy()
    {
        musicSlider.onValueChanged.RemoveListener(OnMusicSliderChanged);
        sfxSlider.onValueChanged.RemoveListener(OnSfxSliderChanged);
        qualityDropdown.onValueChanged.RemoveListener(OnQualityDropdownChanged);
    }

    private void OnMusicSliderChanged(float value) => MusicSliderMoved?.Invoke(value);
    private void OnSfxSliderChanged(float value) => SfxSliderMoved?.Invoke(value);
    private void OnQualityDropdownChanged(int index) => QualityPicked?.Invoke(index);

    // The Controller calls these to update what the user sees.
    public void ShowMusicVolume(float value) => musicSlider.SetValueWithoutNotify(value);
    public void ShowSfxVolume(float value) => sfxSlider.SetValueWithoutNotify(value);
    public void ShowQuality(int index) => qualityDropdown.SetValueWithoutNotify(index);
}
SettingsController.cs
using UnityEngine;

public class SettingsController : MonoBehaviour
{
    [SerializeField] private SettingsView view;

    public SettingsModel Model { get; private set; }

    private void Awake()
    {
        Model = new SettingsModel();
        Load();
    }

    private void Start()
    {
        // View -> Model (the user did something)
        view.MusicSliderMoved += OnMusicSliderMoved;
        view.SfxSliderMoved += OnSfxSliderMoved;
        view.QualityPicked += OnQualityPicked;

        // Model -> View (the data changed)
        // Volume: the Model sends a float and the View wants a float,
        // so we can connect them directly.
        Model.MusicVolumeChanged += view.ShowMusicVolume;
        Model.SfxVolumeChanged += view.ShowSfxVolume;
        // Quality: the Model sends an enum and the View wants a number,
        // so the Controller translates.
        Model.QualityChanged += OnQualityChanged;

        // Show the first values
        view.ShowMusicVolume(Model.MusicVolume);
        view.ShowSfxVolume(Model.SfxVolume);
        view.ShowQuality((int)Model.Quality);
    }

    private void OnDestroy()
    {
        view.MusicSliderMoved -= OnMusicSliderMoved;
        view.SfxSliderMoved -= OnSfxSliderMoved;
        view.QualityPicked -= OnQualityPicked;

        Model.MusicVolumeChanged -= view.ShowMusicVolume;
        Model.SfxVolumeChanged -= view.ShowSfxVolume;
        Model.QualityChanged -= OnQualityChanged;

        Save();
    }

    private void OnApplicationPause(bool paused)
    {
        if (paused) Save();
    }

    // View -> Model
    private void OnMusicSliderMoved(float value) => Model.MusicVolume = value;
    private void OnSfxSliderMoved(float value) => Model.SfxVolume = value;
    private void OnQualityPicked(int index) => Model.Quality = (GraphicsQuality)index;

    // Model -> View (with translation)
    private void OnQualityChanged(GraphicsQuality quality) => view.ShowQuality((int)quality);

    // Saving is easy because all the data is in one place.
    private void Load()
    {
        Model.MusicVolume = PlayerPrefs.GetFloat("music", Model.MusicVolume);
        Model.SfxVolume = PlayerPrefs.GetFloat("sfx", Model.SfxVolume);
        Model.Quality = (GraphicsQuality)PlayerPrefs.GetInt("quality", (int)Model.Quality);
    }

    private void Save()
    {
        PlayerPrefs.SetFloat("music", Model.MusicVolume);
        PlayerPrefs.SetFloat("sfx", Model.SfxVolume);
        PlayerPrefs.SetInt("quality", (int)Model.Quality);
        PlayerPrefs.Save();
    }
}
Look at Load() and Save(). They are tiny. Because the data lives in one Model, saving it takes three lines. In the first all-in-one script, the data was spread around the UI, and saving would be a mess.
Try it: Add a small
TMP_Textnext to the music slider that shows80%. You only need to change one script and one method. Which one? (Hint: it is the part that shows things.)
The change test
Here is how we measure a good design: when someone asks for a change, how many files do you touch?
| Change request | What you change |
|---|---|
| Replace the Slider with a round knob or +/- buttons | View only. If the new View has the same events and Show methods, the Controller stays the same too. |
| Show the volume as “80%” text | View only. |
| New rule: music volume can never go below 0.1 | Model only. Every screen and script follows it automatically. |
Save in the cloud instead of PlayerPrefs |
Controller only (Load and Save). |
| Add a second place that shows the volume | A new View, and one more line in the Controller. |
| Another script needs to know the volume | Nothing. It listens to or reads the Model. |
In the all-in-one script from the start of this lesson, every row would mean rewriting that script. This is why professionals use MVC.
Part 4: Example 2 — Player Health
In Example 1 the user changed the data. In Example 2 the user changes nothing. The game changes the data, and the UI follows.
Spike touches player -> Model -> Controller -> View (the health bar)
There are no buttons here. The View only shows. This is normal: not every View has user input.
Set up the HUD
- In your Canvas, create an empty object
HealthHUD. Anchor it to the top-left corner. - Inside it, create a Slider called
HealthBar. Delete itsHandle Slide Areachild. Uncheck Interactable, set Transition to None, and set Min 0, Max 1. - Inside it, create a TextMeshPro text called
HealthText.
Step 1: The Model
Health is not a free number. It has meaning: you take damage, you heal. So this Model has methods instead of public setters.
using System;
using UnityEngine;

public class HealthModel
{
    public event Action<int, int> HealthChanged;   // current, max
    public event Action Died;

    public int Max { get; }
    public int Current { get; private set; }
    public bool IsDead => Current <= 0;

    public HealthModel(int max)
    {
        Max = max;
        Current = max;
    }

    public void TakeDamage(int amount)
    {
        if (IsDead || amount <= 0) return;

        Current = Mathf.Max(0, Current - amount);
        HealthChanged?.Invoke(Current, Max);

        if (IsDead) Died?.Invoke();
    }

    public void Heal(int amount)
    {
        if (IsDead || amount <= 0) return;

        Current = Mathf.Min(Max, Current + amount);
        HealthChanged?.Invoke(Current, Max);
    }
}
Look at private set. Nobody can write model.Current = 5000. They must ask with TakeDamage or Heal, and the Model protects its own rules: no healing the dead, no negative damage, no health above max.
| When to use | Example |
|---|---|
| A property with a setter | Any value is fine inside a range (volume). |
| Methods with names | Actions have meaning (damage, heal, spend coins). |
Step 2: The View
This View is very small. It has no events, because the user cannot change anything here.
using TMPro;
using UnityEngine;
using UnityEngine.UI;

public class HealthView : MonoBehaviour
{
    [SerializeField] private Slider healthBar;
    [SerializeField] private TMP_Text healthText;

    public void ShowHealth(int current, int max)
    {
        healthBar.value = (float)current / max;
        healthText.text = $"{current} / {max}";
    }

    public void ShowDead()
    {
        healthText.text = "DEAD";
    }
}
Notice (float)current / max. If you write current / max with two integers, C# gives you 0 for any health below max. The (float) makes it a real division.
Step 3: The Controller
Put this script on the player.
using UnityEngine;

public class PlayerHealthController : MonoBehaviour
{
    [SerializeField] private HealthView view;
    [SerializeField] private int maxHealth = 100;

    public HealthModel Model { get; private set; }

    private void Awake()
    {
        Model = new HealthModel(maxHealth);
    }

    private void Start()
    {
        Model.HealthChanged += view.ShowHealth;
        Model.Died += OnDied;

        view.ShowHealth(Model.Current, Model.Max);
    }

    private void OnDestroy()
    {
        Model.HealthChanged -= view.ShowHealth;
        Model.Died -= OnDied;
    }

    private void OnDied()
    {
        view.ShowDead();
        // Decide what death means in YOUR game:
        // stop the movement, show a Game Over panel, restart the level...
        Debug.Log("Player died");
    }
}
The Controller is also the best place for game decisions, like what happens when the player dies. The Model only says “I died”. The Controller decides what to do about it.
Step 4: The thing that hurts the player
using UnityEngine;

public class DamageZone : MonoBehaviour
{
    [SerializeField] private int damage = 10;

    private void OnTriggerEnter(Collider other)
    {
        PlayerHealthController health = other.GetComponentInParent<PlayerHealthController>();
        if (health == null) return;

        health.Model.TakeDamage(damage);
    }
}
Set it up: create a Cube, check Is Trigger on its Collider, and add DamageZone. Your player needs a Collider and a Rigidbody (or a CharacterController), plus PlayerHealthController. Drag the HealthHUD object into the controller’s View field.
Press Play and walk into the cube. The bar goes down, the text changes, and at 0 the player is dead.
Now think about this: DamageZone does not know that the health bar exists. Tomorrow you can delete the bar, change its design, or add a second one. The spike code stays the same. This is the power of the Model in the center.
Try it: Change
maxHealthto 50 in the Inspector. The bar and the text follow without any code change. Then create aHealPickupscript that callshealth.Model.Heal(25).
Compare the two examples
| Example 1: Settings | Example 2: Health | |
|---|---|---|
| Who changes the data? | The user, with the UI | The game (a spike, an enemy) |
| Direction | View → Controller → Model → other scripts | Gameplay → Model → Controller → View |
| Does the View send events? | Yes | No |
| How does the Model change? | Properties with rules | Methods with meaning |
| How do other scripts use it? | Listen or read | Call TakeDamage or Heal |
| What is the same? | The Model is in the center, the View only shows, and events carry the news. |
Part 5: Common Mistakes
Every student makes these mistakes. Check this table when something does not work.
| Mistake | What you see | Fix |
|---|---|---|
Other scripts read slider.value |
They break when the panel closes or changes | Read from the Model |
Setting slider.value from code |
The slider jumps, or events fire in a loop | Use SetValueWithoutNotify |
Forgetting -= |
MissingReferenceException after a scene reload |
Unsubscribe in OnDestroy |
Model uses Slider, Text, or GameObject |
You cannot reuse or test the Model | Keep the Model a plain class |
Subscribing in Awake |
NullReferenceException (the Model is not created yet) |
Awake creates, Start connects |
| Controller sits on a hidden panel | Model is null in other scripts |
Put it on an always-active object |
Using Update() to refresh the UI |
Wasted time, hidden bugs | Use events |
| The View changes data itself | The same data lives in two places | Only the Model changes data |
| UI shows old values at the start | The first values are wrong | Call Show... once after connecting |
current / max gives 0 |
The bar is always empty | Use (float)current / max |
| Buttons and sliders do nothing | No reaction at all | Check that the scene has an EventSystem |
Part 6: Check Your Understanding
Try to answer without looking at the lesson.
- What is the one job of the Model? What can it never contain?
- Why must the View not change data?
- In Example 1, why do we use
SetValueWithoutNotify? - What is the difference between listen and read? Give one example of each from Example 1.
- Why do we write
-=inOnDestroy? - Your designer asks you to replace the Slider with a round knob. Which scripts change?
- In Example 2, why can
DamageZonework without knowing the health bar exists? - What are the three questions on the MVC worksheet?
Answers
- The Model holds the data and its rules, and it announces changes with events. It can never contain UI types like
SliderorText. - If the View also changes data, the same data lives in two places, and they can disagree. The Model must be the single source of truth.
- Setting
.valuefrom code makes the slider send its own event. That starts a loop between the View and the Model.SetValueWithoutNotifychanges the slider silently. - Listen means you subscribe to an event and react at once, like
MusicPlayer. Read means you get the value when you need it, likeSfxPlayer. - If a destroyed script is still subscribed, the next broadcast tries to call it and causes errors.
- Only the View (and the Controller only if the new View has different events or
Showmethods). The Model and all other scripts stay the same. DamageZonetalks to the Model (TakeDamage), not to the UI. The View only listens to the Model.- What is the data? What is the reasoning? What does the user see and do?
Part 7: Practice Tasks
Easy
- Percent label. Add a text next to the music slider that shows
80%. Change only the View. - Heal pickup. Create a
HealPickupobject that heals the player by 25 and then disappears. It should talk to the Model only.
Medium
Mute toggle. Add a Mute option to the settings screen.
- First, fill the worksheet on paper: what is the new data, what is the reasoning, and what is the UI?
- Add
IsMutedand aMuteChangedevent to the Model. - Add a Toggle to the View, with an input event and a
ShowMutedmethod. - Connect them in the Controller.
- Change
MusicPlayerso that it reacts to both events. Hint: write one method calledRefresh()that decides the volume:muted ? 0 : MusicVolume.
Hard: Screen 3 — Coin Wallet and Shop
This is your third screen. You will build it without a full example, using what you learned.
What the player sees and does
- A HUD text always shows the coins, for example
Coins: 120. - Coin pickups in the world add coins.
- A shop panel has a button: Buy Potion (30 coins).
- When the player does not have 30 coins, the Buy button is not interactable.
Worksheet (fill it first!)
| Your answer | |
|---|---|
| 1. Data | ? |
| 2. Reasoning | Coins never below 0. Buying needs enough coins. A pickup adds coins. |
| 3. UI | ? |
Hints
| Part | What it needs |
|---|---|
WalletModel |
Coins, Add(int amount), bool TrySpend(int amount), and an event CoinsChanged |
WalletView |
ShowCoins(int), ShowCanBuy(bool), and an event BuyPressed |
WalletController |
On BuyPressed, call Model.TrySpend(price). After every change, call view.ShowCoins and view.ShowCanBuy(Model.Coins >= price). |
CoinPickup |
Calls Add on the Model. It knows nothing about the UI. |
Definition of done (check every item):
- The Model is a plain C# class with no UI types.
- The View has no Model field.
- You use
Awaketo create,Startto connect, andOnDestroyto disconnect. - There is no
Update()for the UI. - The HUD shows the right coins when the game starts.
- You can add a second coin text somewhere else by creating a new View and adding one line in the Controller.
Bonus: make the potion heal the player by connecting this screen to HealthModel from Example 2. Which script should know about both Models?
Part 8: Build Faster with AI
Now you understand MVC. Let us use AI the professional way. First, let us split the work:
| You | AI |
|---|---|
| Decide the data and the reasoning (the worksheet) | Types the boring code |
| Write the rules in simple words | Builds the View and the connections |
| Review every result | Fixes things when you ask clearly |
AI is fast, but it does not know your game. If you give it a weak idea, you get weak code fast. So the worksheet always comes first.
Step A: Paste the system prompt once
Paste this at the start of a chat, or save it in your AI tool’s custom instructions. It is short, so you can change it for your own style.
You are a Unity 6 C# assistant. Write UI code with the MVC pattern.

Rules:
1. Model = plain C# class. No MonoBehaviour, no UI types. It holds data, checks rules, and raises C# events when data changes.
2. View = MonoBehaviour. It holds UI references only (Slider, TMP_Text, Button). It has Show...() methods and events for user input. It never reads or changes the Model.
3. Controller = MonoBehaviour. It creates the Model in Awake, connects Model and View in Start, and disconnects (-=) in OnDestroy.
4. Do not use Update() for UI. Use events.
5. Use SetValueWithoutNotify when code sets a Slider, Toggle, or Dropdown.
6. Use TextMeshPro. One class per file. Short comments.

Reply with the code files, then a short Inspector setup list.
Step B: Fill the task template
This is your worksheet in prompt form. Replace the words in [brackets].
Feature: [name]

Model data: [each value and its type]
Model rules: [limits and what is not allowed]
User actions: [what the user does in the UI]
Reactions: [what the UI or other scripts do when data changes]
Other scripts that use the Model: [who reads or listens]
Here is the template filled in for the Coin Wallet:
Feature: Coin Wallet and Shop

Model data: Coins (int)
Model rules: Coins never below 0. TrySpend(amount) returns false if there are not enough coins.
User actions: Press the "Buy Potion" button (cost 30).
Reactions: The coin text shows the new total. The Buy button is disabled when coins < 30.
Other scripts that use the Model: CoinPickup adds coins.
Try it: Do the Hard task by hand first. Then do it again with the prompts above and compare. Which one is faster? Which one has bugs? What did the AI forget?
Step C: Review the result
Never paste AI code into your project without checking it. Use this list:
| Check | Red flag |
|---|---|
| Open the Model file | Any Slider, Text, GameObject, or using UnityEngine.UI; |
| Open the View file | A Model field, or code that changes data |
| Look at the Controller | A += without a matching -= |
Search for Update |
Any Update() that refreshes UI |
Look at Start |
No first Show... call after connecting |
| Look at slider code | .value = instead of SetValueWithoutNotify |
| Look at health or percent math | current / max with two integers |
Step D: Fix with short prompts
When you find a problem, ask for one small fix at a time:
Remove Update(). Use events instead.
Add the missing -= lines in OnDestroy.
Move this logic from the View to the Controller.
Add a new rule to the Model: [your rule]. Do not change the View.
Notice that every fix prompt is about where the code lives. You now have the words to talk to AI like a professional.
Key Takeaways
- Everything revolves around three things: data, reasoning, and UI. Always start with the data.
- The Model holds the data and the rules. It is a plain C# class and it never knows the UI.
- The View only shows and reports. It never decides.
- The Controller connects them. Awake creates, Start connects, OnDestroy disconnects.
- Other scripts use the Model in two ways: listen when they must react, read when they need a value.
- A good design passes the change test: a small change touches a small number of files.
- With AI: you write the worksheet and review the result. AI writes the boring code.
Contracted by NextSkill a Gamestorms company, delivering this course for Isra University