What You Will Learn
By the end of this lesson, you should be able to:
- Explain what a “mechanic” is, in your own words.
- List the main types of player mechanics.
- Build a player that moves, turns toward the mouse, and dashes.
- Add gravity to a
CharacterController. - Make the player push other objects when it dashes into them.
1. What Is a Mechanic?
A mechanic is a small building block of gameplay. It is one piece of “what the player can do” or “what happens in the game.” You put mechanics together to make a full game.
Here are some simple examples:
- Jump — has rules like height, gravity, and control while in the air.
- Shooting — has rules like ammo, reload time, and bullet speed.
- Explosion — has rules like damage, radius, and force.
Each mechanic is really just: input → rule → result. The player presses a button (input), the game checks some rules (like cooldown or speed), and something happens (result).
Player Mechanics
Player mechanics are the mechanics that control the player character. They decide what the player can do, and how the character reacts to input.
Player mechanics usually fall into four groups:
| Group | Examples |
|---|---|
| Movement | Walking, running, jumping, swimming, climbing |
| Actions | Attacking, dashing, dodging, using items, interacting |
| State management | Health, stamina, cooldowns, invincibility frames |
| Physics interactions | Collisions, pushing objects, gravity |
Keep this table in mind. Today, you will build one mechanic from almost every group: movement (walk + rotate), an action (dash), a state (dash cooldown), and a physics interaction (pushing a box).
2. What We Are Building Today
We are making a small top-down game. The player will have two mechanics:
- Movement — walking with
_moveInput, and rotating to always face the mouse cursor. - Dashing — a quick burst of movement in the direction the player is facing. If the player dashes into an object with a
Rigidbody, that object gets pushed.
We will build this in small steps, so you understand every line before you move to the next one. Please type each step yourself — do not copy and paste the whole script at once.
3. Prepare the Scene
First, set up the world and the player’s look.
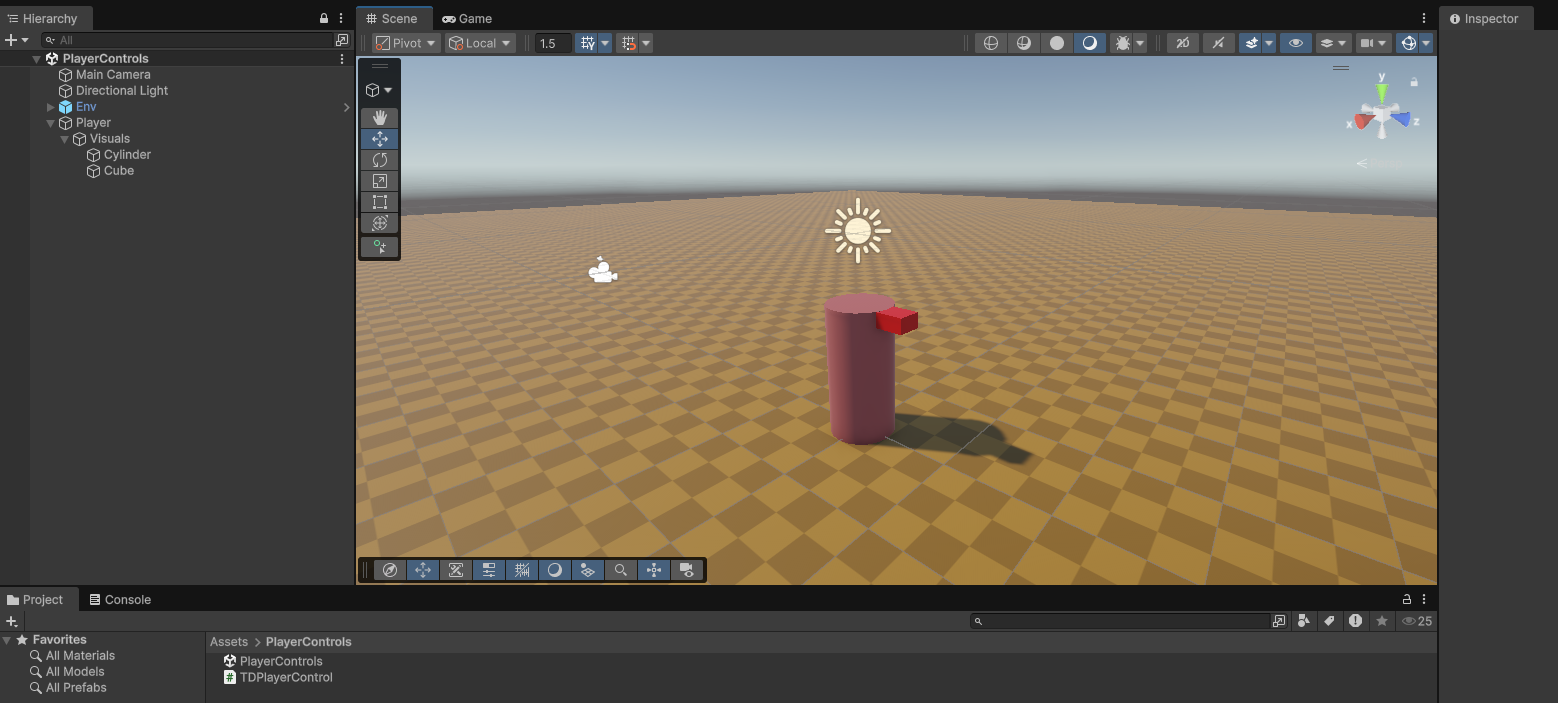
- Build your environment (floor, walls) and your player’s visual model. Here is the example setup — feel free to copy it, or design your own:
- Add a Character Controller component to your player GameObject. We will use this component to move the player.
- Open the player’s visual model (the child object with the mesh) and remove any Colliders on it. A Character Controller already has its own built-in collider, so an extra collider on the model will conflict with it.
4. Give the Player Input
The player needs a way to “hear” the keyboard and mouse. We already covered this script in detail in an earlier lesson, so here it is in full. Read through it again, since we will use every part of it today.
using UnityEngine;
using UnityEngine.Events;
using UnityEngine.InputSystem;

public class TPUserInput : MonoBehaviour
{
    [Header("References")]
    public InputActionAsset inputActions;

    [Header("Events")]
    public UnityEvent<Vector2> onMove;
    public UnityEvent<Vector2> onCursorMove;
    public UnityEvent<bool> onDash;

    [Header("Runtime Debug")]
    public Vector2 moveInput;
    public Vector2 cursorPosition;
    public bool dashInput;

    private Vector2 _lastMousePosition;

    private void OnEnable()
    {
        inputActions.Enable();

        // Subscribe to the dash action
        inputActions.FindAction("Dash").performed += OnDashPerformed;
        inputActions.FindAction("Dash").canceled += OnDashCanceled;
    }

    private void OnDisable()
    {
        inputActions.Disable();

        // Unsubscribe from the dash action
        inputActions.FindAction("Dash").performed -= OnDashPerformed;
        inputActions.FindAction("Dash").canceled -= OnDashCanceled;
    }

    void Update()
    {
        Vector2 moveInput = inputActions.FindAction("Move").ReadValue<Vector2>();
        onMove.Invoke(moveInput);
        this.moveInput = moveInput;

        // use mouse position for cursor movement
        Mouse mouse = Mouse.current;
        if (mouse != null)
        {
            Vector2 cursorPosition = mouse.position.ReadValue();

            if (cursorPosition != _lastMousePosition)
            {
                onCursorMove.Invoke(cursorPosition);
                this.cursorPosition = cursorPosition;
                _lastMousePosition = cursorPosition;
            }
        }
    }

    private void OnDashPerformed(InputAction.CallbackContext context)
    {
        onDash.Invoke(true);
        this.dashInput = true;
    }

    private void OnDashCanceled(InputAction.CallbackContext context)
    {
        onDash.Invoke(false);
        this.dashInput = false;
    }

    public static Vector3 ThreeDWorldPositionFromScreen(Vector2 screenPosition, Camera camera)
    {
        Ray ray = camera.ScreenPointToRay(screenPosition);
        Plane groundPlane = new Plane(Vector3.up, Vector3.zero);
        if (groundPlane.Raycast(ray, out float enter))
        {
            return ray.GetPoint(enter);
        }
        return Vector3.zero;
    }
}
What each part does, in simple words:
onMove,onCursorMove,onDashare UnityEvents. Think of them as messengers. When something happens (the player moves, the mouse moves, the dash button is pressed), this script shouts the message out. Any other script can listen for that shout.Update()reads theMoveaction every frame, and also reads the raw mouse pixel position (mouse.position.ReadValue()). This mouse position is only a flat, 2D screen position — it is not a 3D world position yet.OnDashPerformedandOnDashCanceledare called by Unity’s Input System the moment the dash button goes down, and the moment it comes back up.ThreeDWorldPositionFromScreenis a small tool (a static method, meaning you can call it without an object, likeTPUserInput.ThreeDWorldPositionFromScreen(...)). It shoots an invisible ray from the camera, through the mouse point on the screen, out into the 3D world. Then it finds where that ray touches a flat, invisible ground plane at height 0. That touch point is our 3D “cursor position.” We will use this in a moment to make the player look at the mouse.
Connect the Input Script to Your Player (Step by Step)
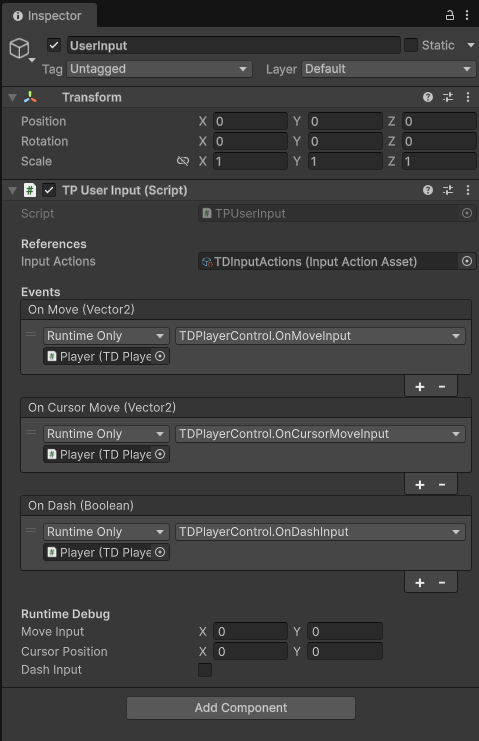
Right now, the TPUserInput script only shouts events. Nobody is listening yet. Let’s connect it in the Inspector.
- Select your UserInput GameObject in the Hierarchy.
- In the Inspector, make sure the
Input Actionsfield has your Input Action Asset assigned. - Find the On Move event list. Click the + button under it. This adds one empty listener slot.
- Drag your Player GameObject from the Hierarchy into the empty Object field of that new listener.
- Click the function dropdown next to it (it says “No Function”). Choose TDPlayerControl → OnMoveInput. (We will write this method soon — for now, just remember the name.)
- Repeat steps 3–5 for On Cursor Move, choosing
OnCursorMoveInput. - Repeat once more for On Dash, choosing
OnDashInput.
When you are done, your Inspector should look like this:
5. Give the Player a Camera
We studied Cinemachine in an earlier lesson, so we will move quickly here.
- Create an empty GameObject and add a Cinemachine Camera component to it.
- Make sure your Main Camera has a Cinemachine Brain component on it.
- Create another empty GameObject called
CameraFollow(orCameraPlayerTarget). - Add a Position Constraint component to it, and set the Constraint Source to your Player’s transform.
- Point the Cinemachine Camera’s Follow target at this
CameraFollowobject, and set the camera to look straight down for a top-down view.
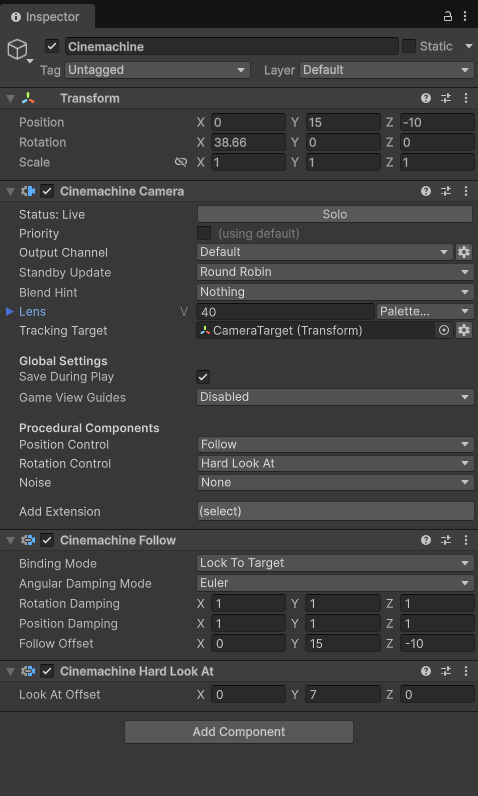
Here is an example setup — feel free to try your own numbers:
6. Build the Player Script, Step by Step
Now for the main part of the lesson. We will build TDPlayerControl in this order: move → rotate → dash → gravity → hit and push objects.
Please type each step into your own script and test it before moving to the next one.
Step 6.1 — Basic Setup
Create a new script called TDPlayerControl and add it to your Player GameObject. Start with just this:
using UnityEngine;

public class TDPlayerControl : MonoBehaviour
{
    [Header("References")]
    public CharacterController controller;

    void Awake()
    {
        if (controller == null)
        {
            controller = GetComponent<CharacterController>();
        }
    }
}
Why this works: Awake() runs one time, as soon as the GameObject wakes up — before the first frame. We use it to grab the CharacterController automatically, in case you forget to drag it into the Inspector by hand.
Step 6.2 — Move
Now let’s make the player walk. Add these fields and a FixedUpdate method:
[Header("Movement Settings")]
public float moveSpeed = 5f;

private Vector2 _moveInput;

public void FixedUpdate()
{
    // move the player based on the input
    Vector3 move = new Vector3(_moveInput.x, 0, _moveInput.y);
    controller.Move(move * moveSpeed * Time.fixedDeltaTime);
}

public void OnMoveInput(Vector2 moveInput)
{
    _moveInput = moveInput;
}
Why this works:
_moveInputis aVector2— it only has an X and a Y value, like a joystick.- We turn it into a
Vector3for the 3D world: the joystick’s X becomes world X (left/right), and the joystick’s Y becomes world Z (forward/back), since our player walks on a flat, top-down ground. controller.Move(...)moves the Character Controller, and handles collisions with walls for us.Time.fixedDeltaTimekeeps the speed steady, no matter how fast or slow the game runs.
Test it now: press your move keys and check that the player slides around.
Step 6.3 — Rotate Toward the Cursor
Next, make the player always face the mouse. Add this:
[Header("Movement Settings")]
public float rotateSpeed = 10f;

private Vector2 _cursorPosition;

public void FixedUpdate()
{
    // move the player based on the input
    Vector3 move = new Vector3(_moveInput.x, 0, _moveInput.y);
    controller.Move(move * moveSpeed * Time.fixedDeltaTime);

    // rotate the player to face the cursor position
    Vector3 point = TPUserInput.ThreeDWorldPositionFromScreen(_cursorPosition, Camera.main);
    Vector3 direction = point - transform.position;
    direction.y = 0; // keep the player upright
    if (direction.sqrMagnitude > 0.01f)
    {
        transform.rotation = Quaternion.LookRotation(direction);
    }
}

public void OnCursorMoveInput(Vector2 cursorPosition)
{
    _cursorPosition = cursorPosition;
}
Why this works:
ThreeDWorldPositionFromScreenturns the flat mouse position into a real 3D point on the ground, right under the cursor.directionis simply “the point I want to look at” minus “where I am now.” We zero outdirection.yso the player does not tilt up or down — it should only spin flat, like a top-down character.- We check
direction.sqrMagnitude > 0.01fbefore rotating. This stops an error: if the mouse point is exactly on top of the player,directionbecomes a zero vector, andQuaternion.LookRotationdoes not know which way to point a zero-length direction. Quaternion.LookRotation(direction)snaps the player instantly to face that direction.
You may notice rotateSpeed is declared, but never actually used — the player currently snaps instantly, with no smoothing. That is on purpose! You will get a chance to fix that yourself in the Practice Tasks at the end of this lesson.
Checkpoint: run your game. Your player should walk with the move keys, and always turn to face your mouse cursor.
Step 6.4 — Dash
A good dash should not feel like “a speed boost for a bit.” A good dash feels like “I was pulled from point A to point B.” We will build it that way: a fixed distance, covered over a fixed time, with an easing curve for a smooth start and a smooth stop.
6.4.1 — Add the dash settings
[Header("Dash Settings")]
public float dashDistance = 5f;      // how far the dash travels, total
public float dashDuration = 0.25f;   // how long it takes to cover that distance
public float dashCooldown = 1f;      // time after dash ends before another can start
public LayerMask dashObstacleMask;   // walls/obstacles the dash should not pass through
public AnimationCurve dashCurve = AnimationCurve.EaseInOut(0f, 0f, 1f, 1f);
AnimationCurve lets you draw the “feel” of the dash right in the Inspector, with your mouse, instead of only with numbers.
6.4.2 — Add the dash’s memory (state variables)
private bool _isDashing;
private Vector3 _dashStartPosition;
private Vector3 _dashTargetPosition;
private float _dashStartTime;
private float _dashCooldownEndTime;
We need to remember where the dash started, where it should end, when it started, and when the cooldown will be over.
6.4.3 — Write the method that starts a dash
private void TryStartDash()
{
    if (_isDashing || Time.time < _dashCooldownEndTime)
    {
        return; // still dashing, or still on cooldown — do nothing
    }

    Vector3 direction = transform.forward;
    float travelDistance = dashDistance;

    // prevent dashing through walls/obstacles
    float castRadius = controller.radius * 0.9f; // slightly smaller, to avoid false hits
    if (Physics.CapsuleCast(
            GetCapsuleTop(), GetCapsuleBottom(), castRadius,
            direction, out RaycastHit hit, dashDistance, dashObstacleMask))
    {
        travelDistance = Mathf.Max(0f, hit.distance - 0.1f); // small buffer from the wall
    }

    _dashStartPosition = transform.position;
    _dashTargetPosition = _dashStartPosition + direction * travelDistance;
    _dashStartTime = Time.time;
    _isDashing = true;
}
Why this works:
- We dash in
transform.forward— the exact direction the player is facing at the moment the button is pressed. Since Step 6.3 keeps the player facing the mouse, this is also “toward the cursor.” - Before we commit to the dash, we cast a capsule shape forward, to check for walls. If we would hit something, we shorten
travelDistanceto stop just short of it, so the player does not pass through walls. - We only start a new dash if we are not already dashing, and the cooldown time has passed.
6.4.4 — Add two small helper methods
The capsule cast above needs the top and bottom points of the player’s capsule shape:
private Vector3 GetCapsuleTop()
{
    return transform.position + Vector3.up * (controller.height - controller.radius);
}

private Vector3 GetCapsuleBottom()
{
    return transform.position + Vector3.up * controller.radius;
}
6.4.5 — Write the method that runs during the dash
private void UpdateDash()
{
    float elapsed = Time.time - _dashStartTime;
    float t = Mathf.Clamp01(elapsed / dashDuration);
    float easedT = dashCurve.Evaluate(t);

    Vector3 desiredPosition = Vector3.Lerp(_dashStartPosition, _dashTargetPosition, easedT);
    Vector3 delta = desiredPosition - transform.position;
    controller.Move(delta);

    if (t >= 1f)
    {
        _isDashing = false;
        _dashCooldownEndTime = Time.time + dashCooldown;
    }
}
Why this works:
tgoes from 0 to 1 as time passes during the dash.dashCurve.Evaluate(t)bends that progress — for example, fast at the start, slower near the end — instead of a flat, robotic straight line. This is what gives the dash a “snappy” feel.- We always know exactly where the dash should be right now (
desiredPosition), so we movecontrollerby the small difference (delta) each frame. This guarantees the total dash distance is always exactly what you set — no drifting. - When
treaches 1, the dash is over. We turn off_isDashingand start the cooldown timer from this moment — not from when the dash started.
6.4.6 — Hook it up to input
private bool _dashInput;

public void OnDashInput(bool dashInput)
{
    _dashInput = dashInput;

    if (dashInput)
    {
        TryStartDash();
    }
}
6.4.7 — Update FixedUpdate to run the dash
public void FixedUpdate()
{
    // rotate the player to face the cursor position
    Vector3 point = TPUserInput.ThreeDWorldPositionFromScreen(_cursorPosition, Camera.main);
    Vector3 lookDirection = point - transform.position;
    lookDirection.y = 0;
    if (lookDirection.sqrMagnitude > 0.01f)
    {
        transform.rotation = Quaternion.LookRotation(lookDirection);
    }

    if (_isDashing)
    {
        UpdateDash();
    }
    else
    {
        // normal movement only happens when not dashing
        Vector3 move = new Vector3(_moveInput.x, 0, _moveInput.y);
        controller.Move(move * moveSpeed * Time.fixedDeltaTime);
    }
}
Notice that walking (_moveInput) is now inside the else branch. This means the dash takes over movement completely while it is happening, instead of adding on top of your walk speed. That is what makes it feel like a real dash, not a speed boost.
Checkpoint: run your game. Press dash, and your player should shoot forward a fixed distance, then stop, and be unable to dash again until the cooldown ends.
Step 6.5 — Gravity
CharacterController does not apply gravity by itself. Without this step, your player would ignore gravity completely (fine on flat ground, but a problem near ledges or slopes). Add this inside FixedUpdate, right after the rotation code:
// apply gravity
if (!controller.isGrounded)
{
    controller.Move(Physics.gravity * Time.fixedDeltaTime);
}
Why this works: controller.isGrounded is true when the Character Controller is touching the ground. When it is not grounded — for example, falling off a ledge — we manually push the player down using Physics.gravity.
Step 6.6 — Hit Other Objects, and Push Them
This is the fun part: when the player dashes into a box, the box should fly away.
6.6.1 — Create the object to be pushed
- Create a Cube in your scene.
- Add a Rigidbody component to it.
6.6.2 — Create a trigger zone on the player
- Create an empty GameObject as a child of the Player. Name it something like
DashHitBox. - Move it slightly forward on the Z axis, so it sits just in front of the player’s body.
- Add a Box Collider (or Capsule Collider) to it, and check Is Trigger.
6.6.3 — Set up a Layer, so we only react to the right objects
We do not want the trigger to react to everything — just to objects we choose. Layers let us filter this.
- Select your Cube. In the top-right corner of the Inspector, find the Layer dropdown (it probably says “Default”).
- Click it, then choose Add Layer….
- In the Tags and Layers window, find an empty User Layer slot and type a name, for example
Hittable. - Select the Cube again, open the Layer dropdown, and this time choose your new
Hittablelayer.
6.6.4 — Write the trigger script
Add this new script to the DashHitBox object you made in 6.6.2:
using UnityEngine.Events;

public class TriggerEvent : MonoBehaviour
{
    public LayerMask triggerLayerMask; // Layer mask to filter which objects can trigger the event
    public UnityEvent<GameObject> onTriggerEnter; // Event to invoke when an object enters the trigger

    private void OnTriggerEnter(Collider other)
    {
        if ((triggerLayerMask.value & (1 << other.gameObject.layer)) != 0)
        {
            onTriggerEnter?.Invoke(other.gameObject);
        }
    }
}
Why this works: think of triggerLayerMask as a checklist of allowed layers. The line inside the if is just a technical way of asking, “is the other object’s layer checked on my list?” You do not need to fully understand the math symbols yet — just remember: it only fires for layers you picked.
Now, in the Inspector, select your DashHitBox object:
- In the Trigger Layer Mask field, check the
Hittablelayer. - Under On Trigger Enter, click +, drag your Player GameObject into the Object field, and choose TDPlayerControl → OnTriggeredByEvent (we will write this method next).
6.6.5 — React to the hit, and push the object
Back in TDPlayerControl, add:
public float dashForce = 10f; // force applied to objects when dashing through them

public void OnTriggeredByEvent(GameObject other)
{
    if (_isDashing)
    {
        Rigidbody otherRb = other.GetComponent<Rigidbody>();

        if (otherRb != null)
        {
            Vector3 dashDirection = transform.forward;
            otherRb.AddForce(dashDirection * dashForce, ForceMode.Impulse);
        }
    }
}
Why this works:
- We check
_isDashingfirst, so the player only pushes objects while actually dashing — bumping into the cube while just walking does nothing. GetComponent<Rigidbody>()checks if the object we hit even has a Rigidbody. If it does not,otherRbisnull, and we safely skip it.AddForce(..., ForceMode.Impulse)applies one instant, strong push — this fits a fast, one-moment hit like a dash, instead of a slow, ongoing push.
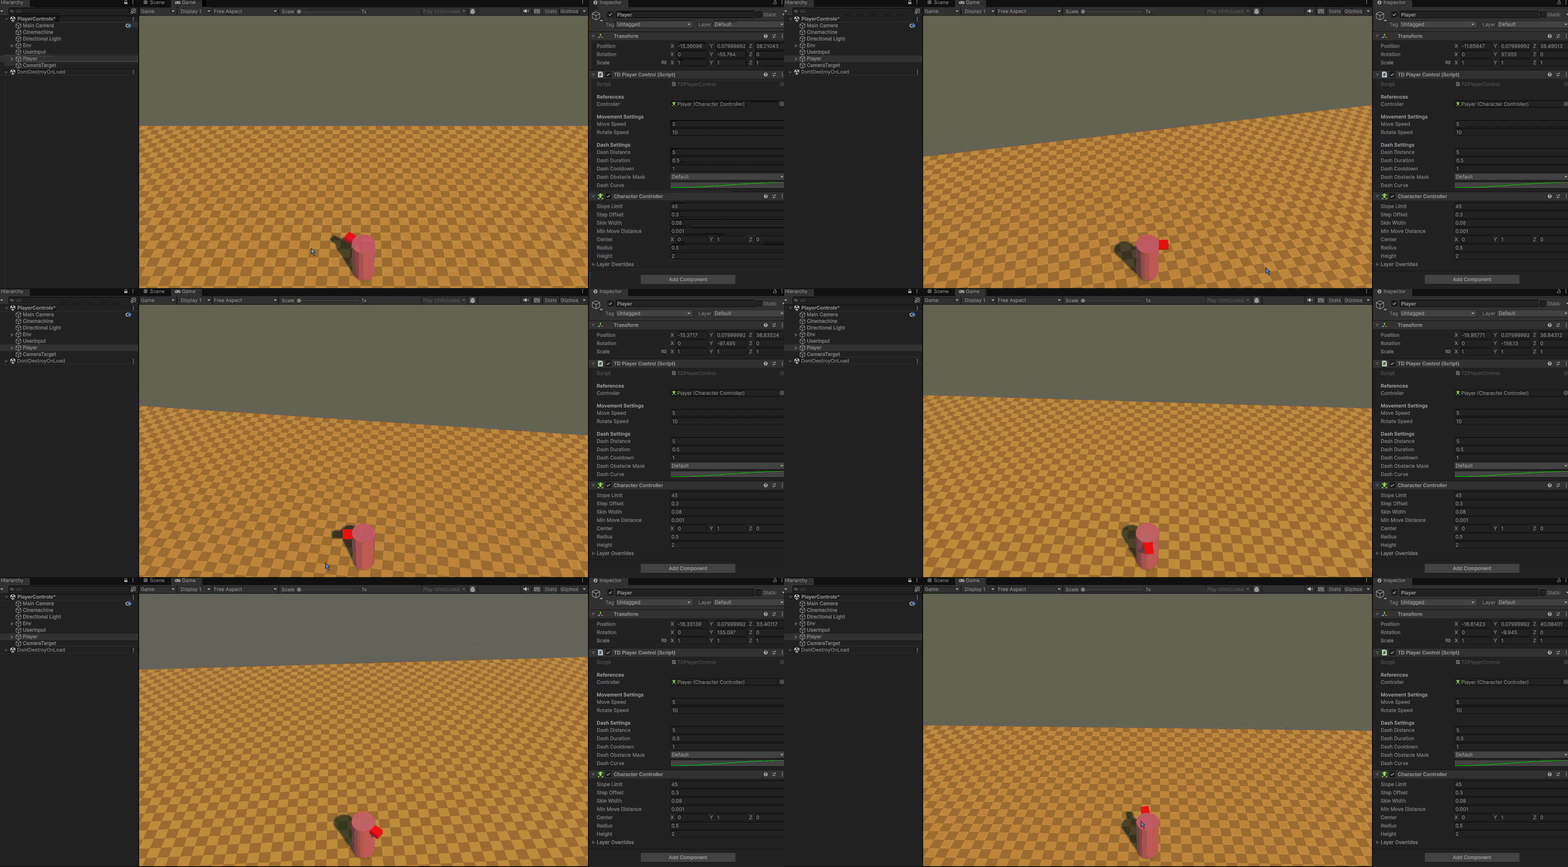
Here is what this looks like once it’s all working:
7. The Complete Script
Once you have followed every step above, your TDPlayerControl.cs should look like this. Use it to check your own work.
using UnityEngine;

public class TDPlayerControl : MonoBehaviour
{
    [Header("References")]
    public CharacterController controller;

    [Header("Movement Settings")]
    public float moveSpeed = 5f;
    public float rotateSpeed = 10f;

    [Header("Dash Settings")]
    public float dashDistance = 5f;      // how far the dash travels, total
    public float dashDuration = 0.25f;   // how long it takes to cover that distance
    public float dashCooldown = 1f;      // time after dash ends before another can start
    public LayerMask dashObstacleMask;   // walls/obstacles the dash should not pass through
    public AnimationCurve dashCurve = AnimationCurve.EaseInOut(0f, 0f, 1f, 1f);

    public float dashForce = 10f; // force applied to objects when dashing through them

    private Vector2 _moveInput;
    private Vector2 _cursorPosition;
    private bool _dashInput;

    private bool _isDashing;
    private Vector3 _dashStartPosition;
    private Vector3 _dashTargetPosition;
    private float _dashStartTime;
    private float _dashCooldownEndTime;

    void Awake()
    {
        if (controller == null)
        {
            controller = GetComponent<CharacterController>();
        }
    }

    public void FixedUpdate()
    {
        // rotate the player to face the cursor position
        Vector3 point = TPUserInput.ThreeDWorldPositionFromScreen(_cursorPosition, Camera.main);
        Vector3 lookDirection = point - transform.position;
        lookDirection.y = 0;
        if (lookDirection.sqrMagnitude > 0.01f)
        {
            transform.rotation = Quaternion.LookRotation(lookDirection);
        }

        // apply gravity
        if (!controller.isGrounded)
        {
            controller.Move(Physics.gravity * Time.fixedDeltaTime);
        }

        if (_isDashing)
        {
            UpdateDash();
        }
        else
        {
            // normal movement only happens when not dashing
            Vector3 move = new Vector3(_moveInput.x, 0, _moveInput.y);
            controller.Move(move * moveSpeed * Time.fixedDeltaTime);
        }
    }

    private void UpdateDash()
    {
        float elapsed = Time.time - _dashStartTime;
        float t = Mathf.Clamp01(elapsed / dashDuration);
        float easedT = dashCurve.Evaluate(t);

        Vector3 desiredPosition = Vector3.Lerp(_dashStartPosition, _dashTargetPosition, easedT);
        Vector3 delta = desiredPosition - transform.position;
        controller.Move(delta);

        if (t >= 1f)
        {
            _isDashing = false;
            _dashCooldownEndTime = Time.time + dashCooldown;
        }
    }

    private void TryStartDash()
    {
        if (_isDashing || Time.time < _dashCooldownEndTime)
        {
            return;
        }

        Vector3 direction = transform.forward;
        float travelDistance = dashDistance;

        // prevent dashing through walls/obstacles
        float castRadius = controller.radius * 0.9f; // slightly smaller to avoid false hits
        if (Physics.CapsuleCast(
                GetCapsuleTop(), GetCapsuleBottom(), castRadius,
                direction, out RaycastHit hit, dashDistance, dashObstacleMask))
        {
            travelDistance = Mathf.Max(0f, hit.distance - 0.1f); // small buffer from the wall
        }

        _dashStartPosition = transform.position;
        _dashTargetPosition = _dashStartPosition + direction * travelDistance;
        _dashStartTime = Time.time;
        _isDashing = true;
    }

    private Vector3 GetCapsuleTop()
    {
        return transform.position + Vector3.up * (controller.height - controller.radius);
    }

    private Vector3 GetCapsuleBottom()
    {
        return transform.position + Vector3.up * controller.radius;
    }

    public void OnMoveInput(Vector2 moveInput)
    {
        _moveInput = moveInput;
    }

    public void OnCursorMoveInput(Vector2 cursorPosition)
    {
        _cursorPosition = cursorPosition;
    }

    public void OnDashInput(bool dashInput)
    {
        _dashInput = dashInput;

        if (dashInput)
        {
            TryStartDash();
        }
    }

    public void OnTriggeredByEvent(GameObject other)
    {
        if (_isDashing)
        {
            Rigidbody otherRb = other.GetComponent<Rigidbody>();

            if (otherRb != null)
            {
                Vector3 dashDirection = transform.forward;
                otherRb.AddForce(dashDirection * dashForce, ForceMode.Impulse);
            }
        }
    }
}
8. Check Your Understanding
Before moving on, try to answer these questions in your own words. Do not look back at the lesson while you write — this helps you check what you really remember.
- What is a mechanic? Give one example that is not from this lesson.
- How do you define “player mechanics”? Name the four groups they usually fall into, and give one example of each from the script you just built.
If you can answer both without help, you understand the goal of this lesson.
9. Practice Tasks
Try these on your own. They all build on the script you just wrote.
Easy
- Use the unused
rotateSpeedfield. Replace the instantQuaternion.LookRotationwithQuaternion.Slerp, so the player turns smoothly instead of snapping. - Change
dashCurvein the Inspector to a different shape, and feel how the dash changes.
Medium
- Add a
dashStaminaMaxanddashStaminaCost. Let the player dash only if they have enough stamina, and let stamina recharge slowly over time. (This is a state management mechanic, from the table in Section 1.) - Add a short window of invincibility while
_isDashingistrue, so the player cannot take damage mid-dash. You will need a simple health or damage script to test this.
Hard
- Add a
UnityEventcalledonDashStartandonDashEndtoTDPlayerControl, and use them to trigger a trail effect or a small camera shake during the dash. - Add a second layer, like
Wall, that fully blocks the dash (the player stops completely) — separate fromHittableobjects, which get pushed instead of blocking. - Add a basic jump mechanic to this same script, using the ideas from Section 1: height, gravity, and air control.
Contracted by NextSkill a Gamestorms company, delivering this course for Isra University