In the last lesson, you learned how to build shapes using Unity’s primitives — cubes, spheres, capsules. Those shapes looked real, but they didn’t act real. You could walk a camera right through them like a ghost.
Today, that changes. You’re going to learn Unity’s physics system — the set of components that let objects fall, collide, swing, bounce, and roll, just like things do in real life. By the end of this lesson, you’ll have built three physics projects with your own hands, and you won’t write a single line of code to do it.
Let’s start with the most basic physics idea in Unity: the collider.
What Is a Collider?
Whenever you drop a Cube, Sphere, or Capsule into your scene, Unity quietly adds a collider component to it. You’ve probably seen these already — Box Collider on a cube, Sphere Collider on a sphere, Capsule Collider on a capsule.
A collider is an invisible physical shape. It’s not something your camera renders. It’s something Unity’s physics engine uses to know “this space is occupied.” Think about your own body for a second — you can touch a table, walk on the ground, and pick up a cup, all because your body physically takes up space. A collider gives your GameObjects that same ability. Without one, an object would be a ghost — things would pass straight through it.
You can actually see colliders in the Scene view as green outlines, called gizmos:
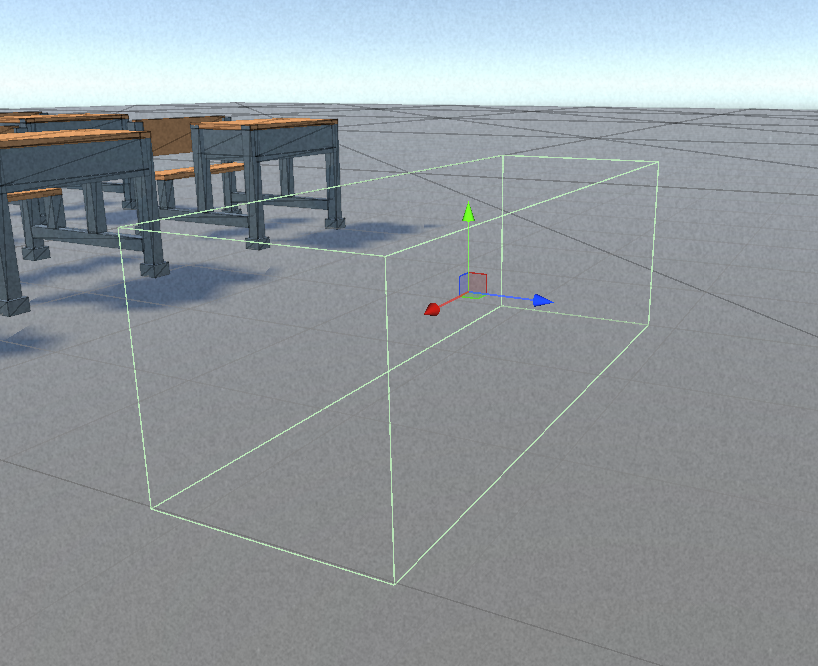
Tip: If you have a Mesh Renderer on the object and want to see only the collider shape, try disabling the Mesh Renderer component for a moment. The green outline is the collider — it stays even when the visible mesh disappears.
The Basic Collider Shapes
You already know these shapes from building primitives:
- Box Collider — a simple box shape. Fast and cheap, great for cubes, walls, and crates.
- Sphere Collider — a round shape. Fast and cheap, great for balls.
- Capsule Collider — a pill shape. Common for characters, since it moves smoothly over bumps and edges.
- Mesh Collider — follows the exact shape of your model instead of a simple box, sphere, or capsule. It’s more accurate but costs more performance, so it’s usually saved for detailed static objects like terrain or level geometry.
Trigger vs. Non-Trigger: A Very Important Switch
Every collider has a property called Is Trigger. By default, it’s turned off.
- Is Trigger = false (normal collider): the object physically blocks other objects. They bump into it, like a wall.
- Is Trigger = true: the object no longer blocks anything. Things pass straight through it — but Unity still knows when something entered that space.
Why is that useful? Think of the glowing checkpoint markers in racing or open-world games — you drive through them, you don’t crash into them, but the game still knows you reached that point and starts the next mission. That’s a trigger at work. It’s not solid, but it’s aware.
Right now, without any scripting, just remember this: a trigger detects, a normal collider blocks. When you learn scripting in a future lesson, you’ll write a small method that runs automatically the moment something enters a trigger. For today, just understanding the difference is enough.
Rigidbody: The Component That Brings Physics to Life
A collider gives an object shape. A Rigidbody gives it behavior — gravity, momentum, and the ability to react to forces and collisions. Add a Rigidbody to any object, and Unity’s physics engine takes full control of how it moves.
Here’s what each setting does, explained in plain terms:
- Mass — how heavy the object is. Just like real life, a heavier object needs more force to push around.
- Linear Damping (used to be called “Drag”) — resistance to movement, like air pushing back against you when you run. Higher damping slows the object down faster.
- Angular Damping — the same idea, but for spinning. Think of a spinning top gradually losing speed and stopping.
- Use Gravity — turns real-world gravity on or off for this object.
- Is Kinematic — this is a fun one. Picture holding a glass of water in your hand — you’re controlling it directly, gravity isn’t really “acting” on it because you’re holding it up. That’s kinematic: you (or a script) move the object directly. Now imagine you let go — gravity takes over immediately, and it falls. That’s non-kinematic, the normal physics-driven state.
- Automatic Center of Mass — the “center of mass” is an object’s balance point, like a person’s center of gravity. Leave this on and Unity calculates it automatically from the collider’s shape. Turn it off, and you can place that balance point yourself — you’ll actually use this trick later, in the bike project, to stop it from tipping over.
- Automatic Tensor — a more advanced setting related to how the object resists spinning forces. In almost all cases, leave this on and let Unity handle the math.
- Interpolate — smooths out the visual movement of a physics object between physics updates, so fast motion doesn’t look jittery.
- Collision Detection — controls how carefully Unity checks for collisions. “Discrete” is the default and works for most objects, but very fast-moving objects (like a thrown ball) can sometimes pass straight through thin walls if the check isn’t careful enough — “Continuous” mode fixes that.
- Constraints — lets you lock specific movement or rotation axes. For example, you might freeze rotation on the X and Z axes so an object can only spin upright, never tip sideways.
That’s a lot of settings — don’t worry about memorizing them all right now. You’ll see the important ones in action across today’s three projects.
Your First Experiment: Pushing a Ball With Constant Force
Let’s see Rigidbody do something, right now, with zero code.
- Add a Sphere to your scene and color it red.
- Add a Rigidbody component to it.
- Add one more component: Constant Force.
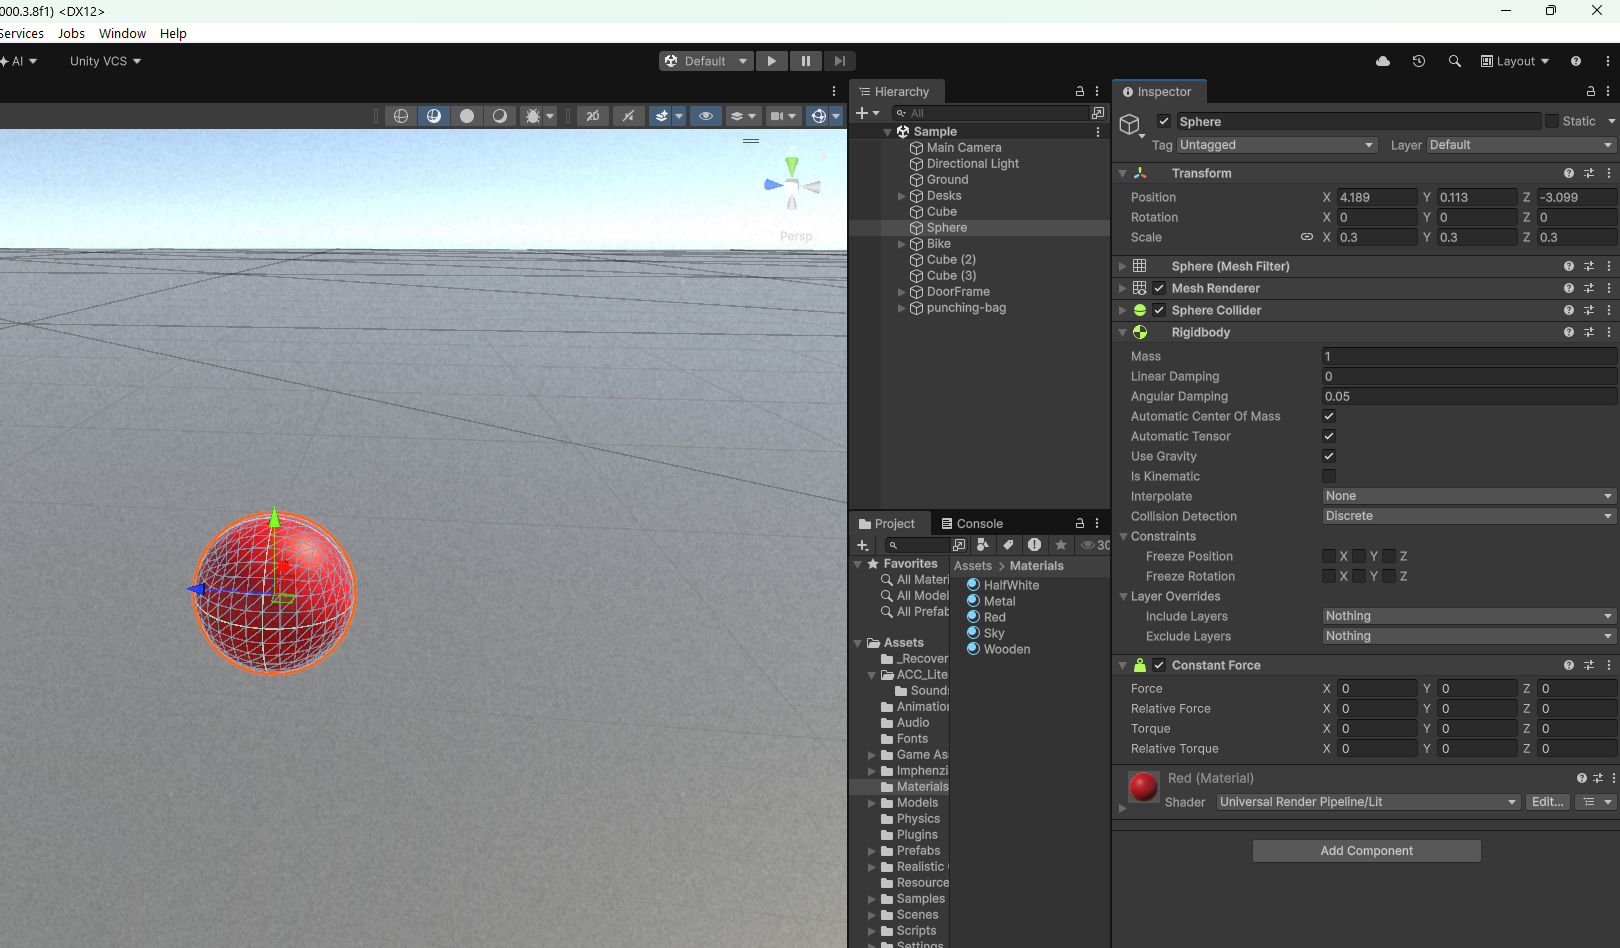
The Constant Force component applies a steady push every frame, without needing any script. It has four fields:
- Force — a constant push in world space (the scene’s fixed directions).
- Relative Force — the same push, but relative to the object’s own facing direction.
- Torque — a constant spin in world space.
- Relative Torque — the same spin, relative to the object’s own rotation.
Set the Force → Z value to 2, hit Play, and watch:
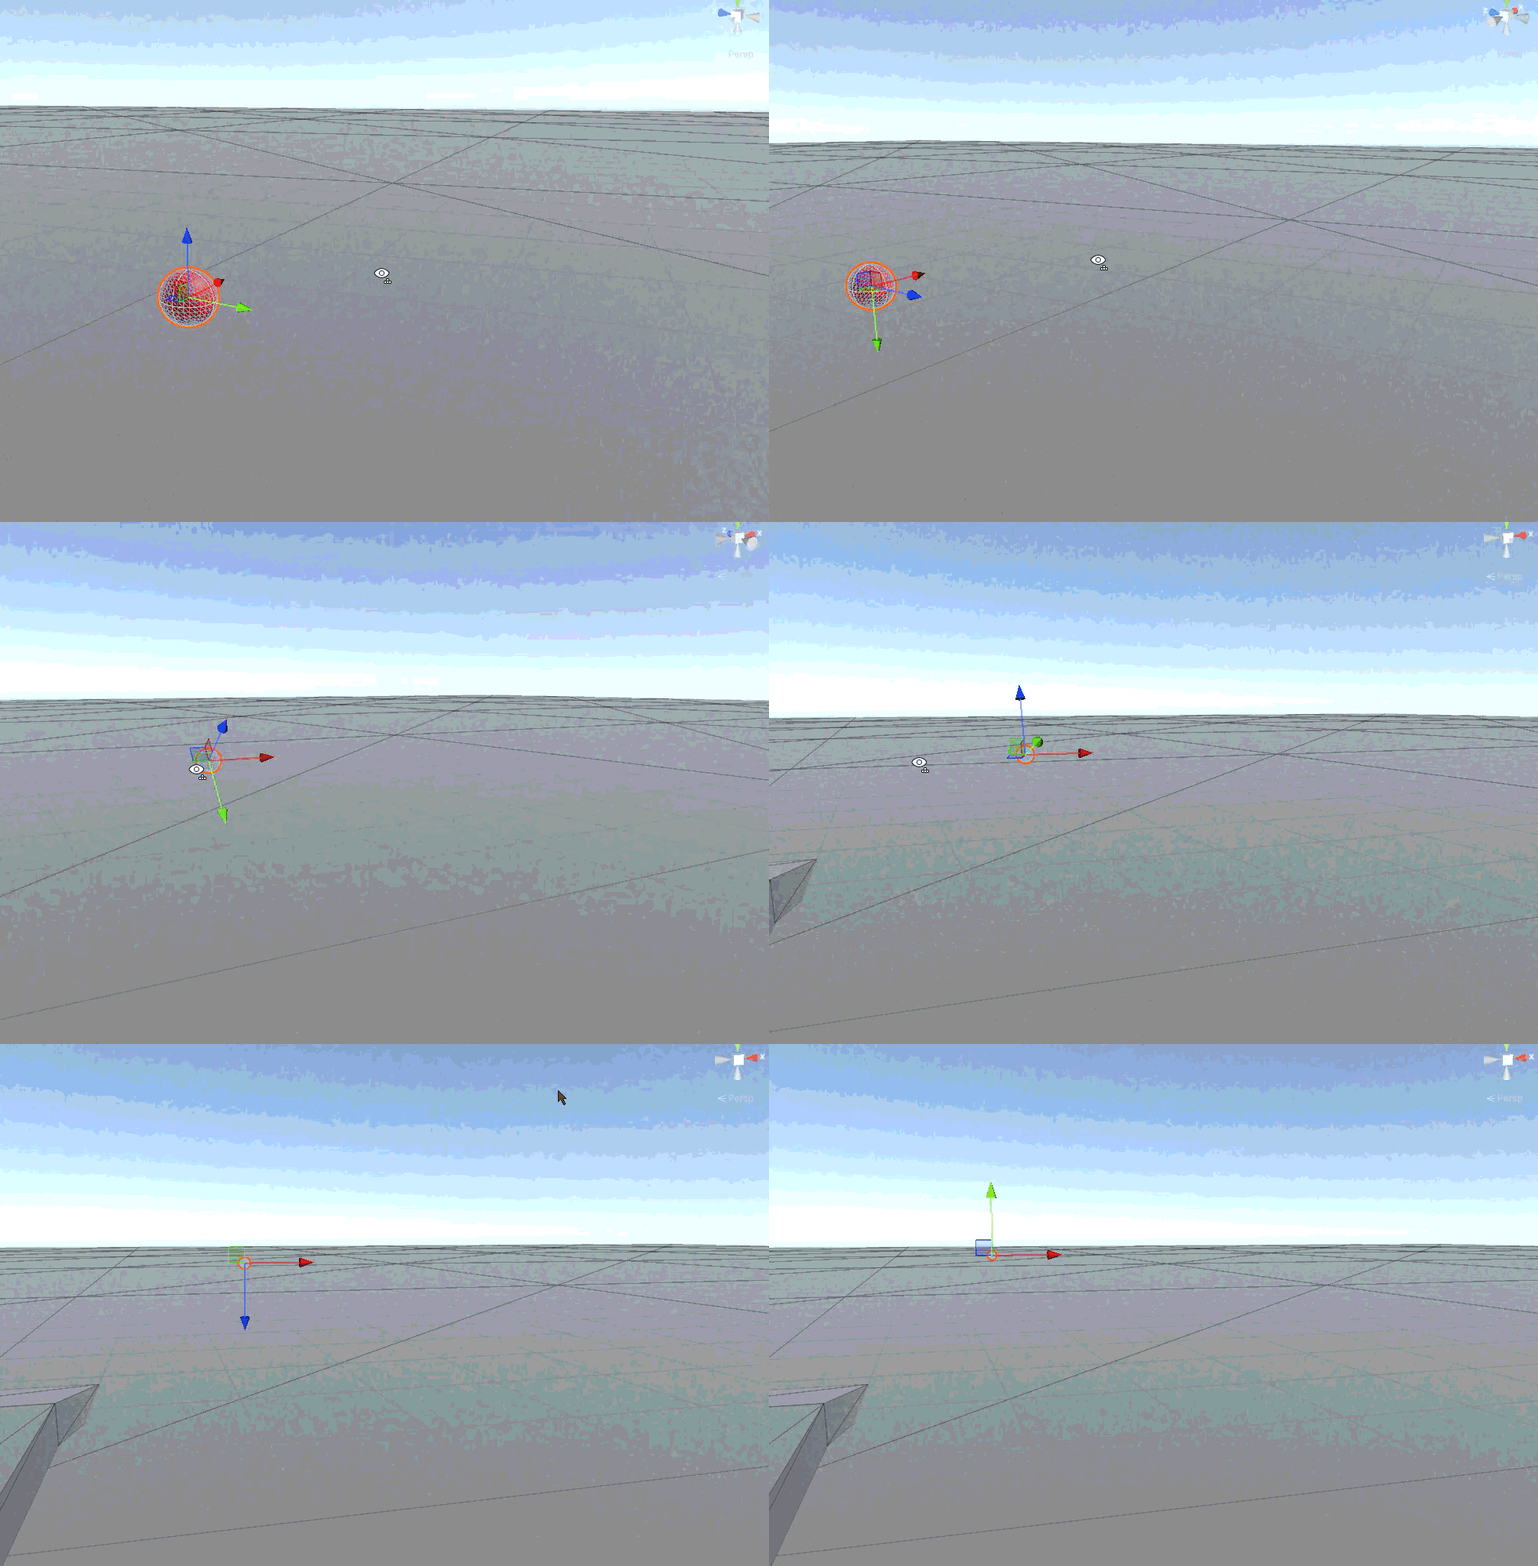
That’s it. No script. Just a Rigidbody reacting to a force component.
💡 Two ways to push things, no code needed: Keep this ball around — you’ll reuse it later. But you’ll also learn a second trick soon: physically dragging a plain sphere with your mouse in the Scene view during Play mode. Both methods let you test physics without writing anything.
Now try lowering that Z force to 0.25 and press Play again. Notice how much gentler the push is — this is a great moment to pause and just play with numbers for a minute before moving on.
Project 1: Build a Door That Opens With Physics
Time for your first real build. You’re going to make a door that swings open on impact — and closes itself afterward, just like a spring-loaded door in real life.
Step 1 — Set up the frame.
Create an empty GameObject and name it DoorFrame.
Step 2 — Build the door shape. Create a Cube, and set:
- Scale:
0.35, 0.7, 0.02 - Position:
-0.17, 0.35, 0
Give it any color you like — a wood tone works nicely for a real door look.
Step 3 — Add the Hinge Joint. Add a Hinge Joint component to the door. Unity will automatically add a Rigidbody too — a Hinge Joint always needs one to function.
Step 4 — Set the pivot point.
Set Anchor to 0.5, 0, 0. This is the point the door rotates around — exactly like the physical hinge pins on a real door. Get this wrong, and your “door” will spin around its own center like a fan blade instead of swinging open from one edge.
Step 5 — Set the rotation axis.
Set Axis to 0, 1, 0 — the Y axis. This tells Unity “rotate around the vertical axis,” which is how a normal door swings.
Step 6 — Limit how far it opens.
Enable Use Limits, then set Min to 0 and Max to 90. Without this, your door would spin forever in a full circle — not exactly realistic.
Step 7 — Make it close on its own.
Enable Use Spring, then set Spring to 10 and Damper to 5. This acts like a real automatic door closer — a gentle force always pulling the door back toward its closed position, with the damper keeping it from swinging shut too hard.
Now bring back your Constant Force ball from earlier. Because the door’s spring is actively resisting being pushed open, a gentle nudge won’t be enough this time — you need real force behind it. Set the ball’s Mass to 150 and its Constant Force Z value to 80. That’s enough to overpower the spring and swing the door open:
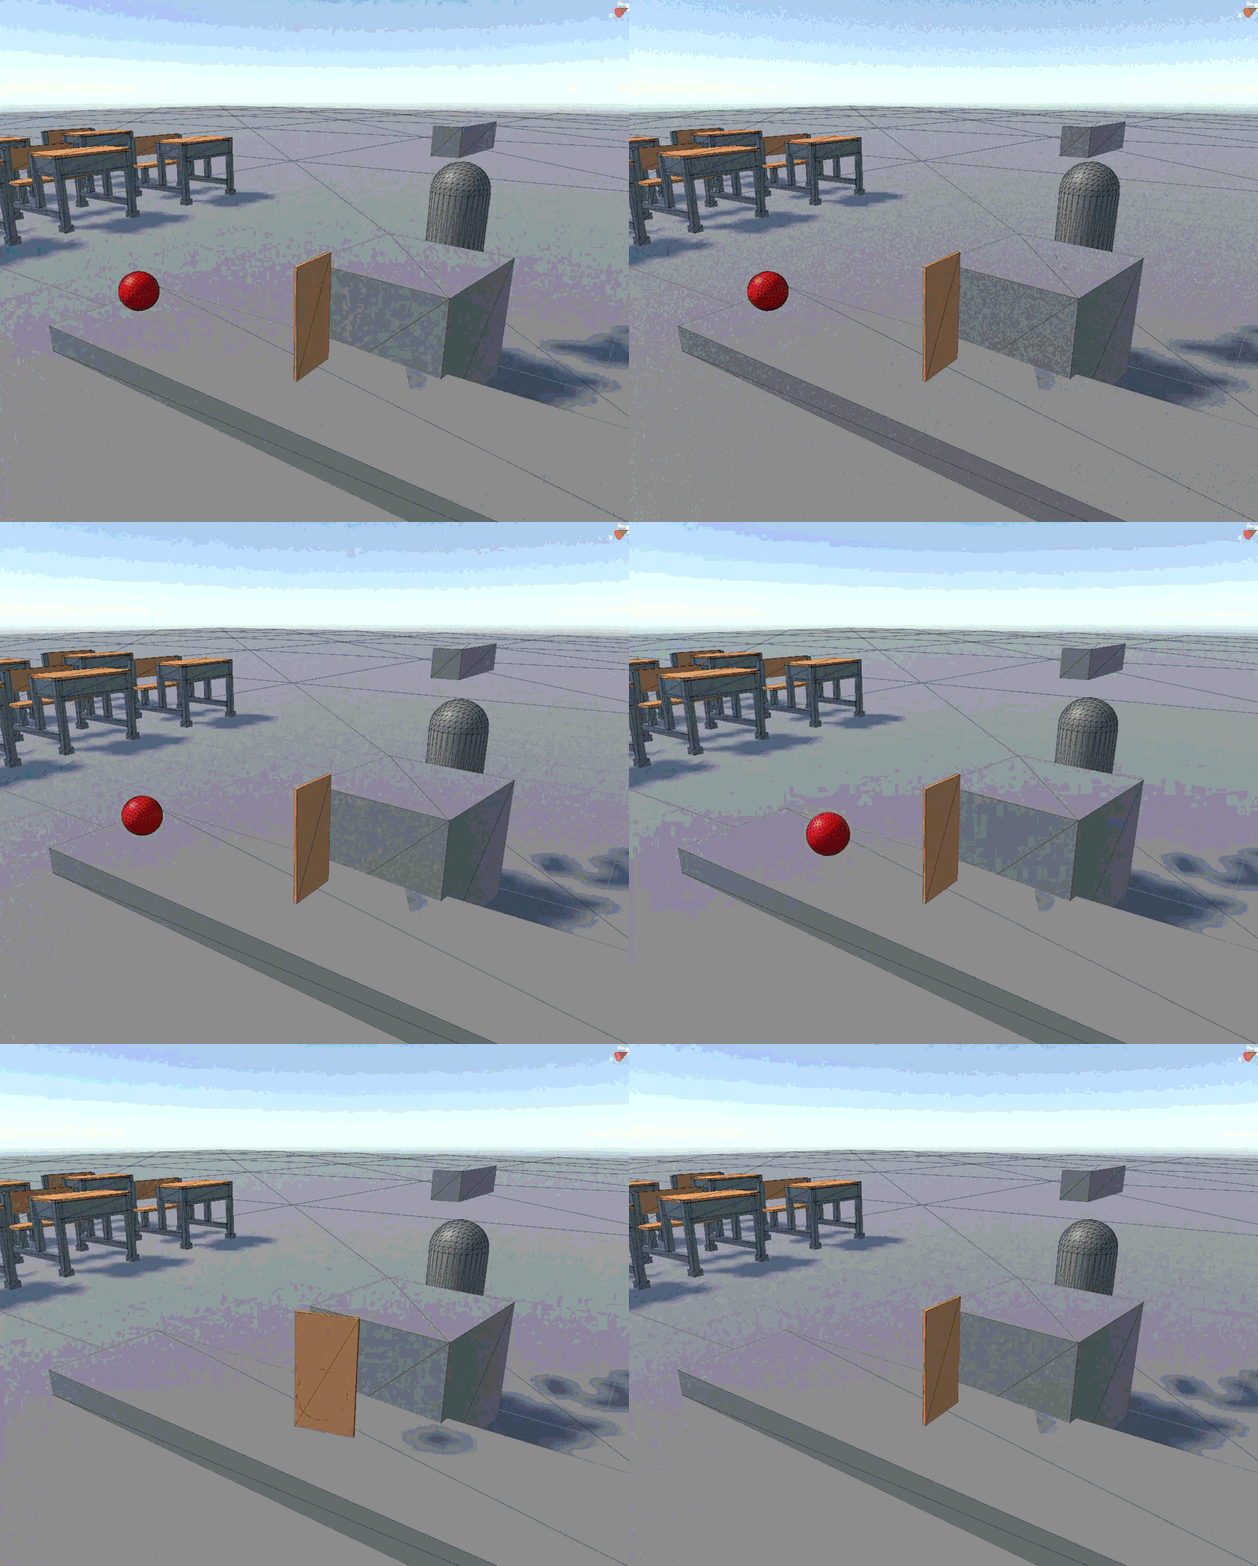
Here’s the same interaction from a different camera angle, so you can see the hinge rotation clearly:
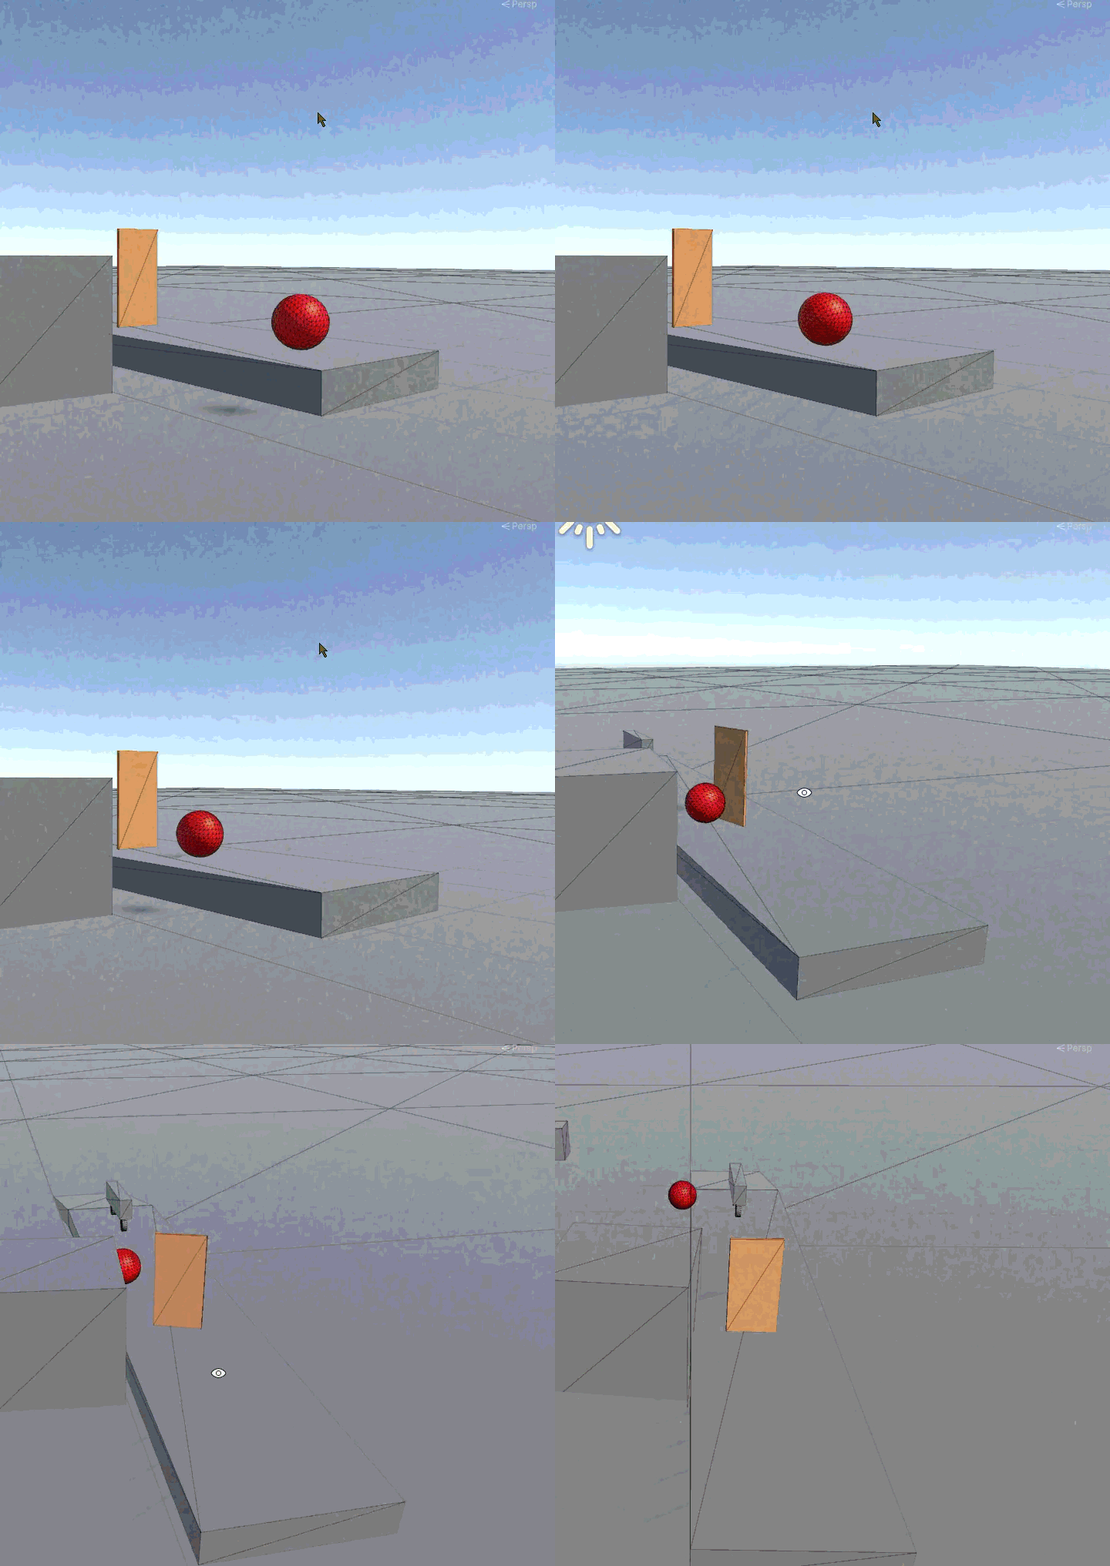
Try it yourself: Lower the spring value to
3and see how much easier the door is to push open. Then raise the damper to15and notice how much smoother — and slower — the closing motion becomes.
You just combined a Rigidbody, a Hinge Joint, and a Constant Force component to build a real interactive object. That’s the whole idea behind learning components — the more of them you understand, the more problems you can solve just by combining a few of them.
Project 2: Build a Hanging Punching Bag
Next up: a bag that hangs, swings, and stretches on impact — powered by a Spring Joint.
Before building, here’s what each Spring Joint setting actually does:
- Spring — how stiff the connection is, like the strength of a rubber band. Higher values pull back harder.
- Damper — how quickly the bouncing settles down, instead of oscillating forever.
- Min Distance / Max Distance — how much “slack” the connection has before the spring force kicks in at all — like the length of a loose rope before it goes taut.
- Connected Body — the object this spring is attached to.
- Connected Mass Scale — adjusts how strongly the connected object’s mass affects the pull.
Step 1 — Set up the root.
Create an empty GameObject and name it PunchingBag.
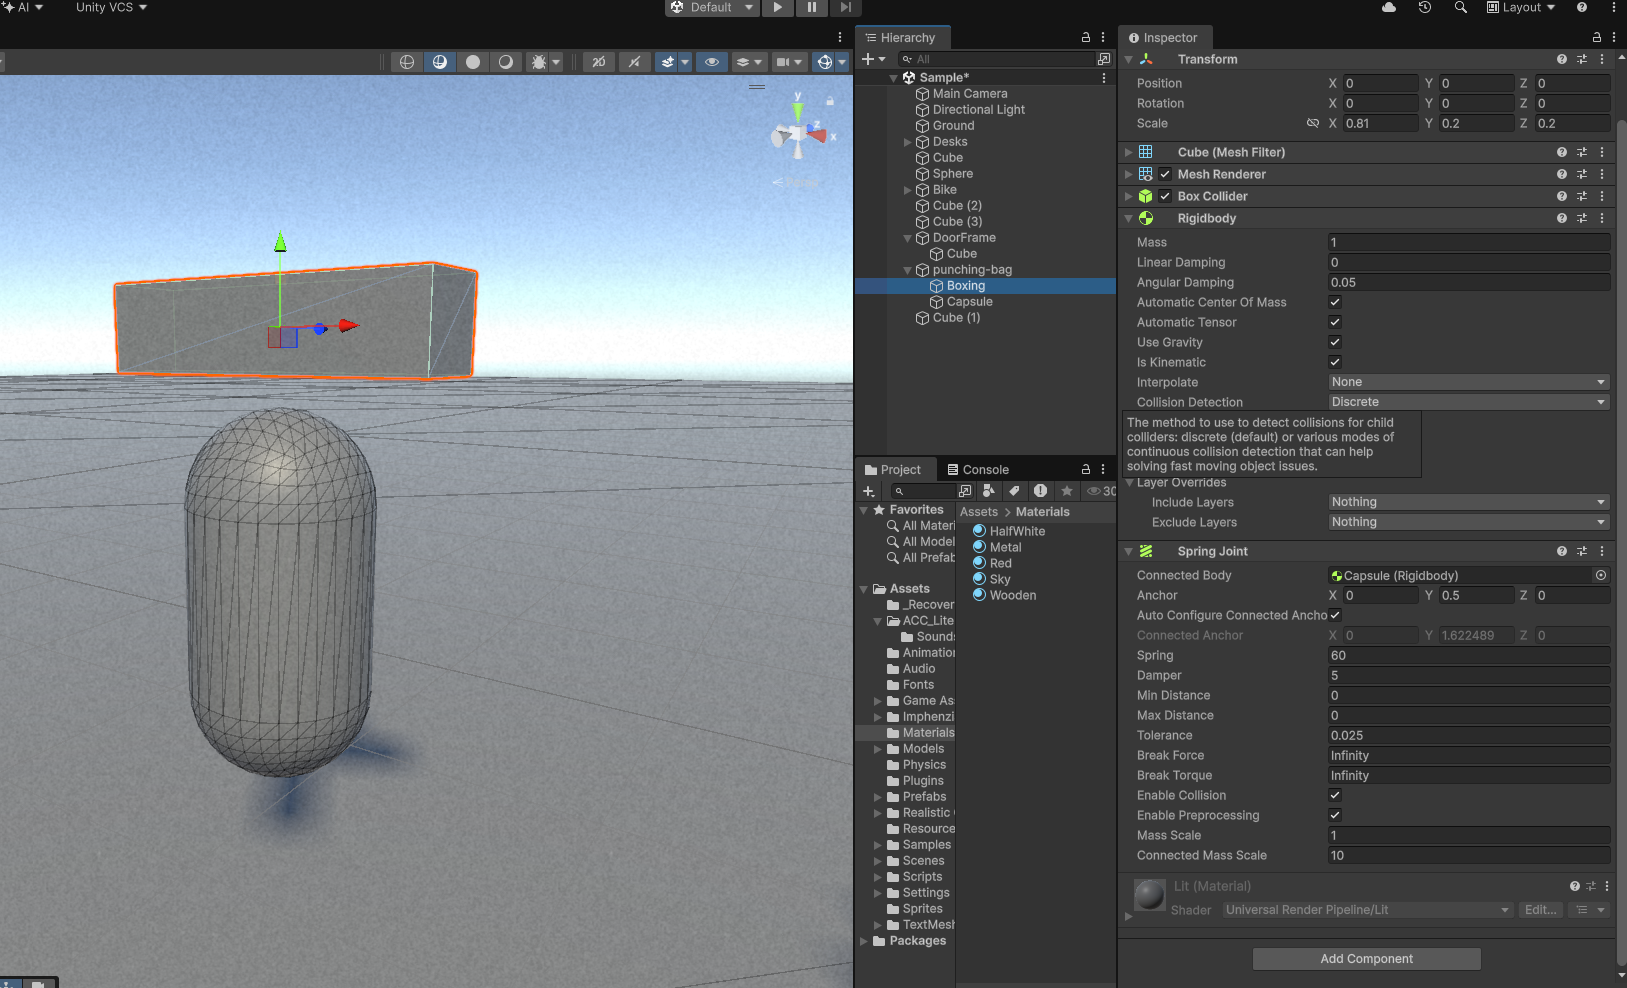
Step 2 — Build the hanger. Inside it, create a Cube — this is just the visual “rod” the bag hangs from. Add a Spring Joint component directly to this rod, and set:
- Spring:
60 - Damper:
5 - Anchor:
0, 0.5, 0 - Connected Mass Scale:
10
Note: Normally you’d expect the Spring Joint to sit on the object that moves (the bag), connected back to a fixed point. Here it’s set up the other way — the joint lives on the rod, and it reaches down to grab the bag. Unity doesn’t care which object holds the joint component, only that the two Rigidbodies are correctly connected. Both setups work — this is a good example of how flexible these components really are.
Step 3 — Build the bag.
Create a Capsule and name it Bag. Give it a Rigidbody with:
- Mass:
5 - Linear Damping:
0.5 - Angular Damping:
0.5
Step 4 — Connect them. Select the Rod object, and on its Spring Joint, drag the Bag into the Connected Body field. This links the two Rigidbodies through the spring.
Here’s the setup once it’s all in place:
Now for the fun part — testing it. Create one more plain sphere. This one doesn’t need a Constant Force component at all. Just give it a Collider, enter Play mode, and drag it directly with your mouse in the Scene view straight into the bag. Because it’s still a physical collider, Unity calculates a real collision the instant it touches the bag:
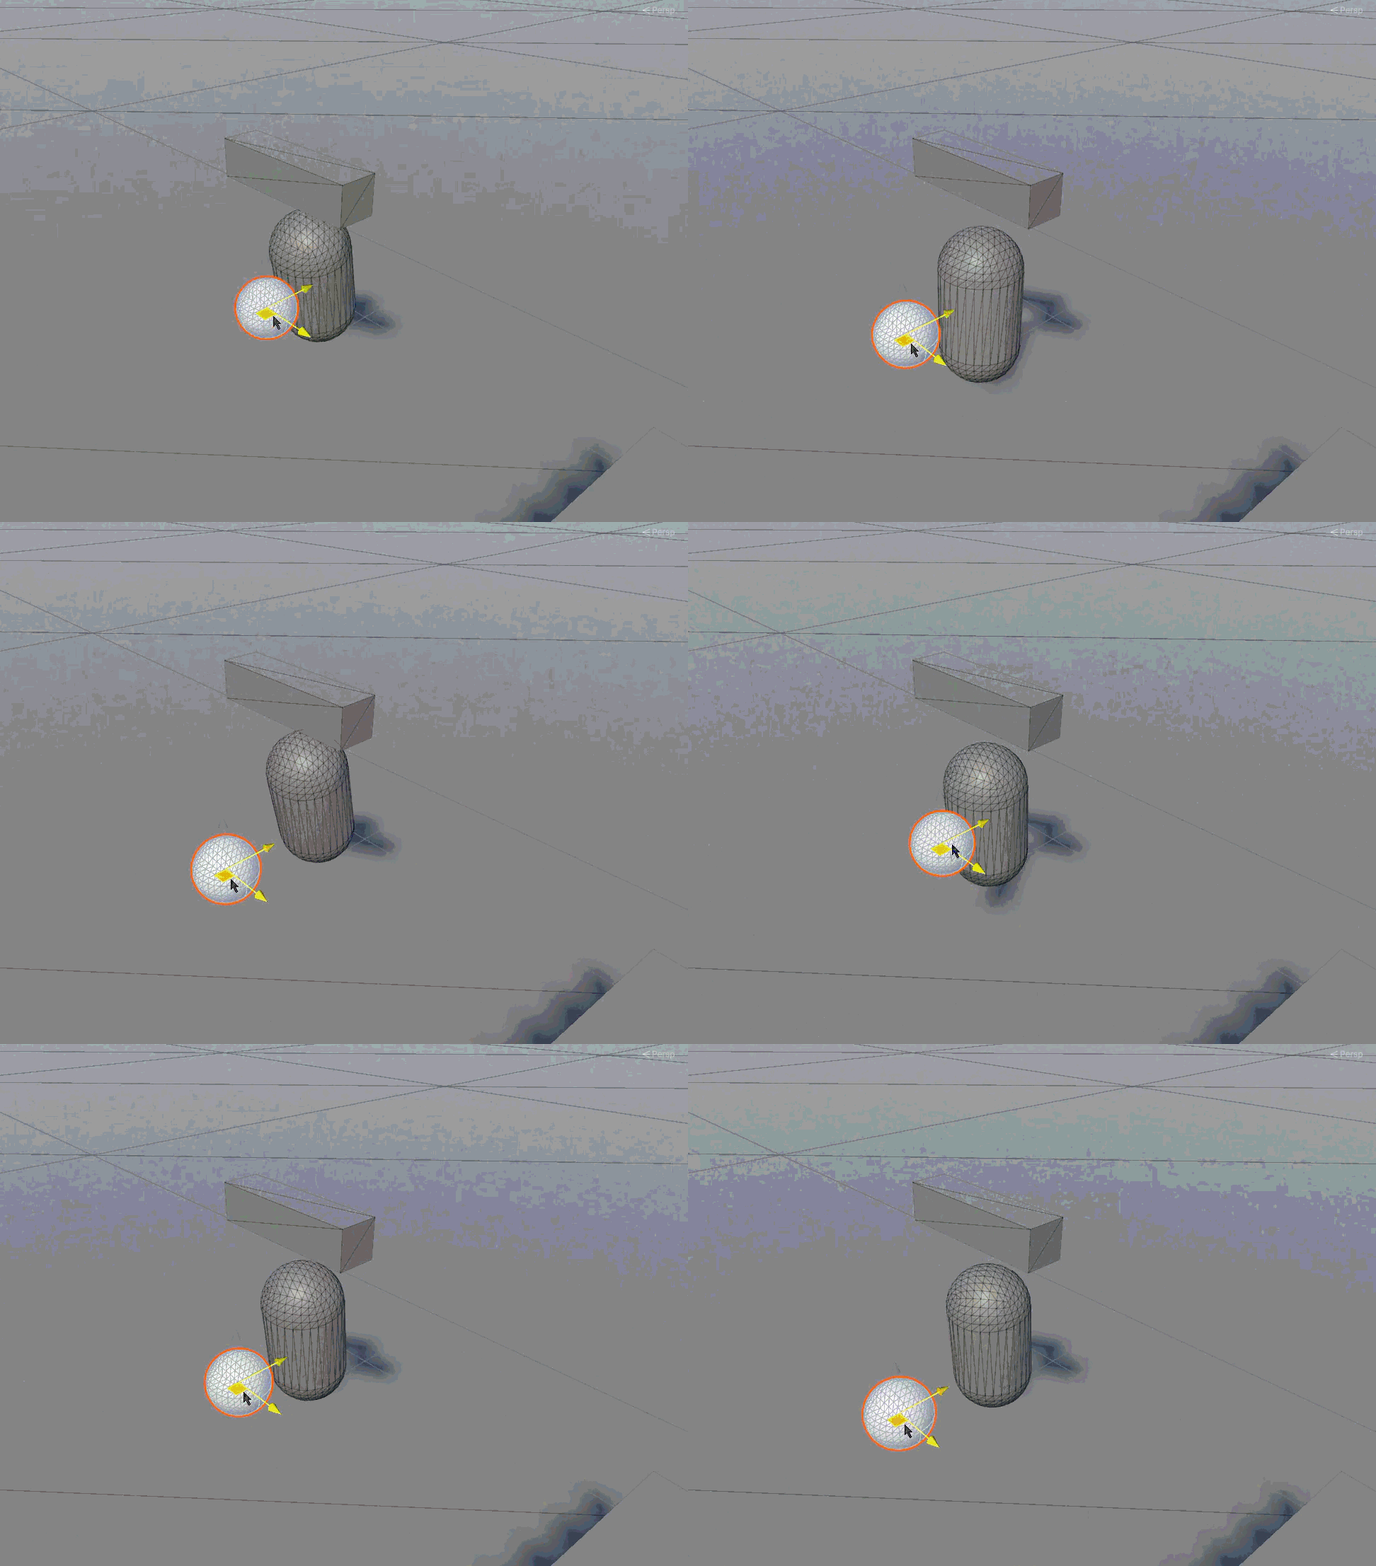
No code. No force component. Just a mouse-dragged collider hitting another object — and Unity’s physics engine handles the rest.
Project 3: Build a Simple Two-Wheeler Bike
Last project, and the most ambitious one: a bike that actually rolls, reacts to slopes, and can be pushed like a real vehicle. This uses a special component you haven’t seen yet — the Wheel Collider.
Step 1 — Build the shape. This part is up to you — you’ve got the primitive-building skills from your last lesson. Here’s what worked well for this example: an empty root GameObject, a Cube for the body, and two Cylinders shaped and rotated to look like wheels. Keep every visual piece inside the root object.
Step 2 — Add Wheel Colliders. On each wheel position, add a Wheel Collider component. Unlike a normal collider, a Wheel Collider isn’t just a shape — it simulates an entire wheel with its own built-in suspension, similar to a real shock absorber.
Here’s what a finished setup looks like in the Inspector:
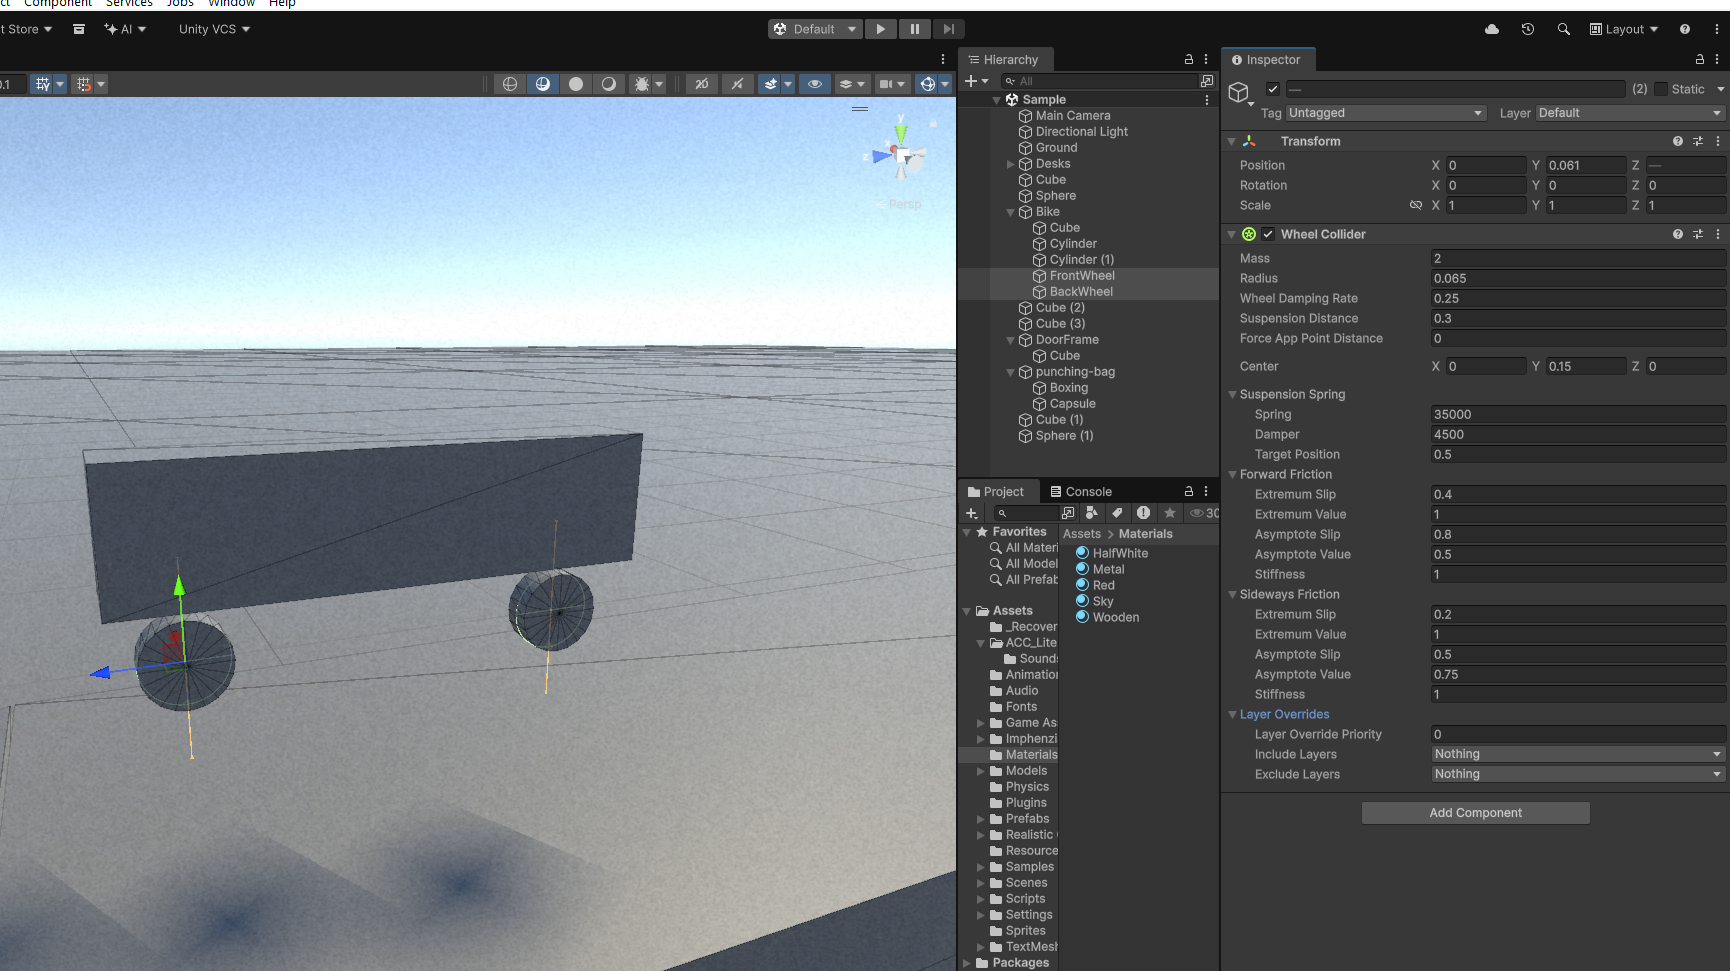
Wheel Collider has more settings than a normal collider — here’s each one in plain terms:
- Mass — the wheel’s own weight, separate from the vehicle body’s weight.
- Radius — the wheel’s size. This should roughly match your visible wheel mesh, or the physics and visuals won’t line up.
- Wheel Damping Rate — resistance to sudden changes in wheel spin speed, so wheels don’t unrealistically snap from stopped to spinning instantly.
- Suspension Distance — how far the wheel can travel up and down, exactly like the travel range on a real shock absorber.
- Force App Point Distance — where suspension force is applied on the wheel. This affects how easily the vehicle tips.
- Center — a local position offset for the wheel’s contact point.
- Spring (inside Suspension Spring) — how stiff or bouncy the suspension feels.
- Forward Friction / Sideways Friction — how much grip the tire has moving forward versus sliding sideways, similar to real tire tread grip.
For this example, radius was set to 0.065, positioned to match the visual wheel mesh exactly.
A Wheel Collider requires a Rigidbody on the root object — because wheels bounce and absorb their own forces, that Rigidbody needs to be tuned carefully, or the whole bike becomes wobbly and unstable. Here’s what worked:
- Wheel mass:
2(on each wheel) - Root Rigidbody mass:
90 - Linear Damping:
0.05 - Angular Damping:
0.5 - Automatic Center of Mass: turned off
- Center of Mass (manual):
0, -0.3, 0
That last setting matters a lot for a two-wheeler. Lowering the center of mass is exactly why real motorcycles keep their engine mounted low — it’s what keeps a two-wheeled vehicle from tipping over the instant it starts moving.
Time to test it. First, using the same mouse-dragged sphere trick from the punching bag project, give the bike a nudge on a downhill slope:
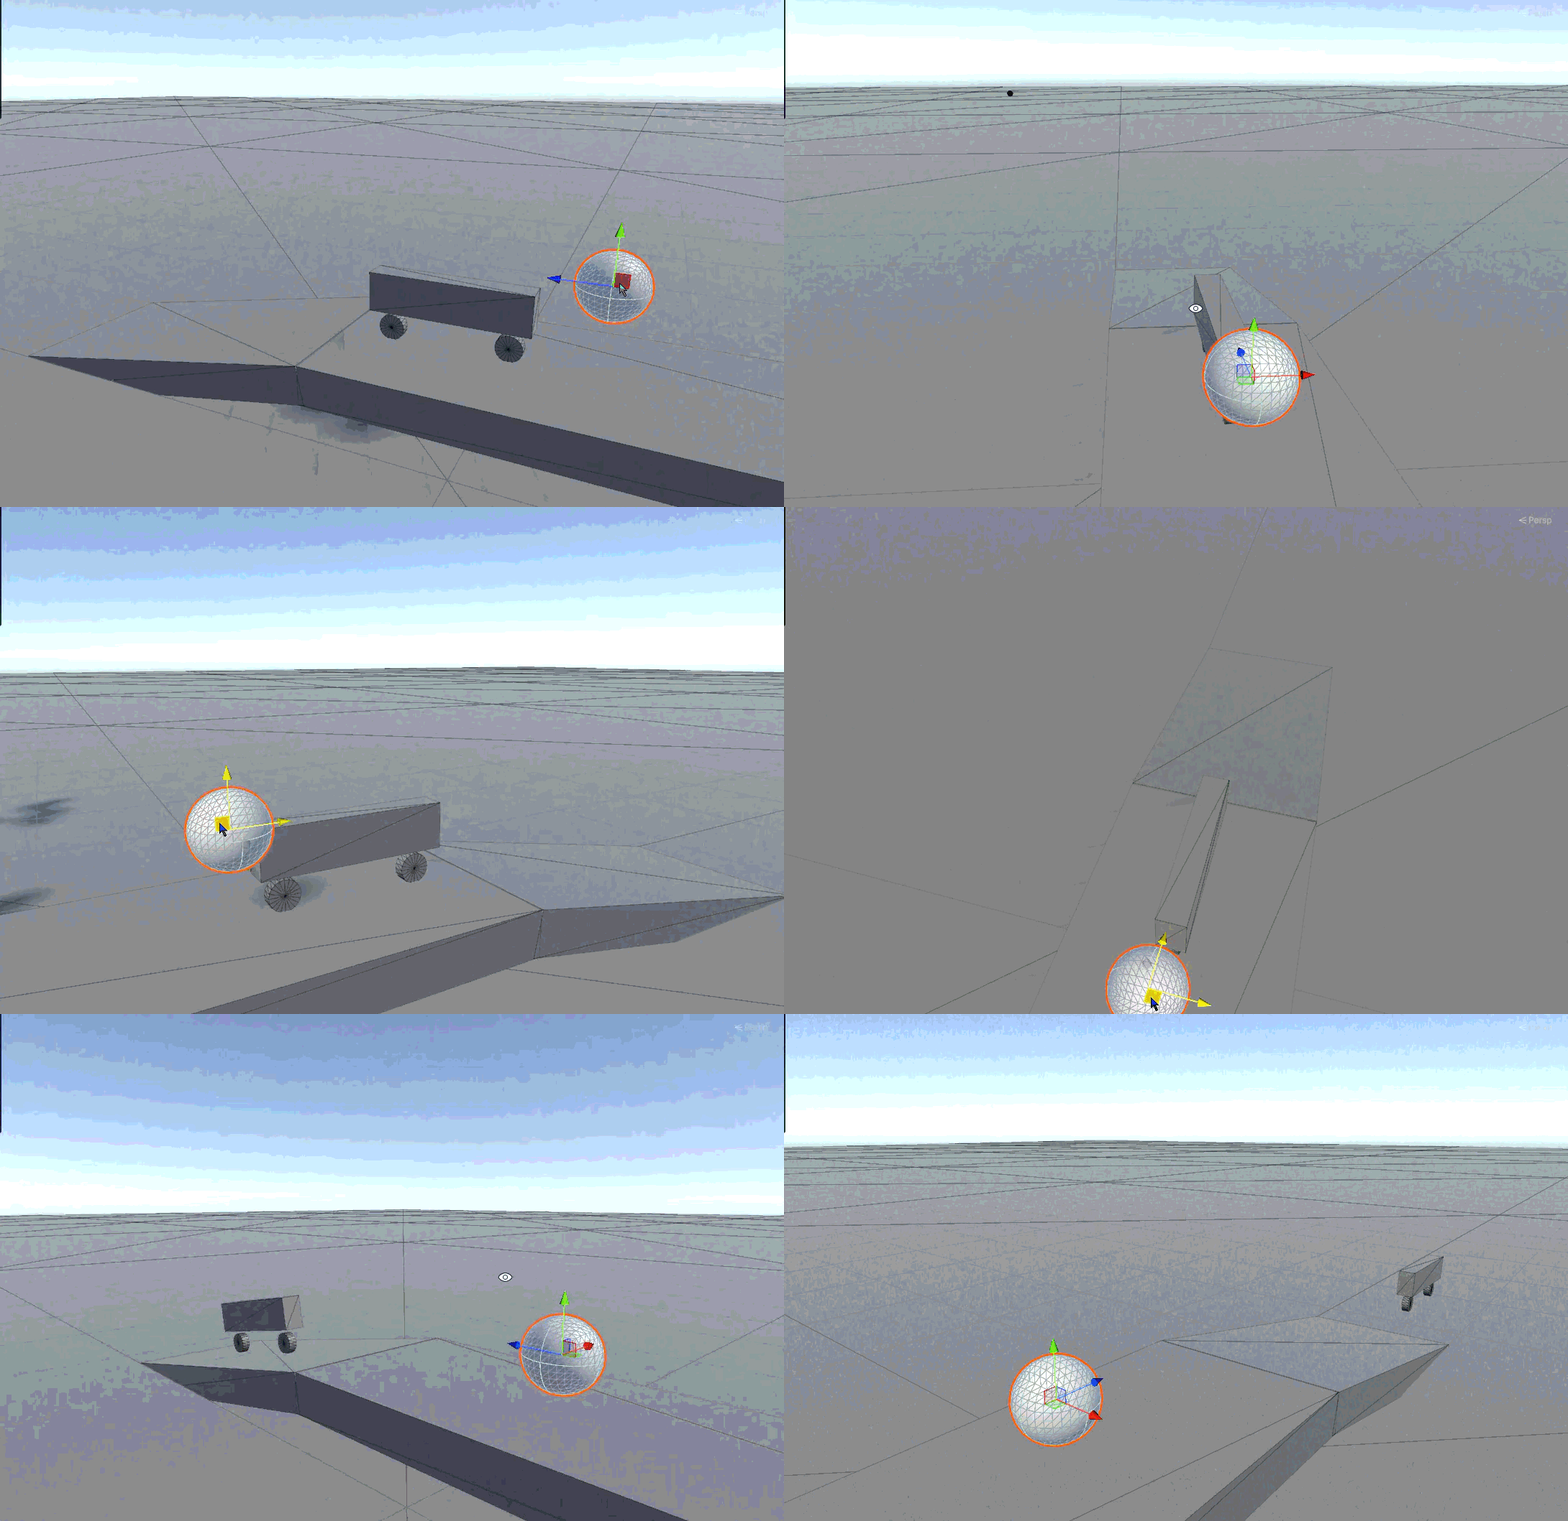
Notice the wheels already reacting to the slope’s surface and rolling naturally — that’s the Wheel Collider’s suspension and friction doing their job, with zero scripting involved.
For a second test, bring back the original Constant Force ball — the same one from the door project. Since the bike is much heavier (mass 90) than the door, it needs an even bigger push. Increase the ball’s mass and Z force significantly, and it’s strong enough to shove the bike forward:
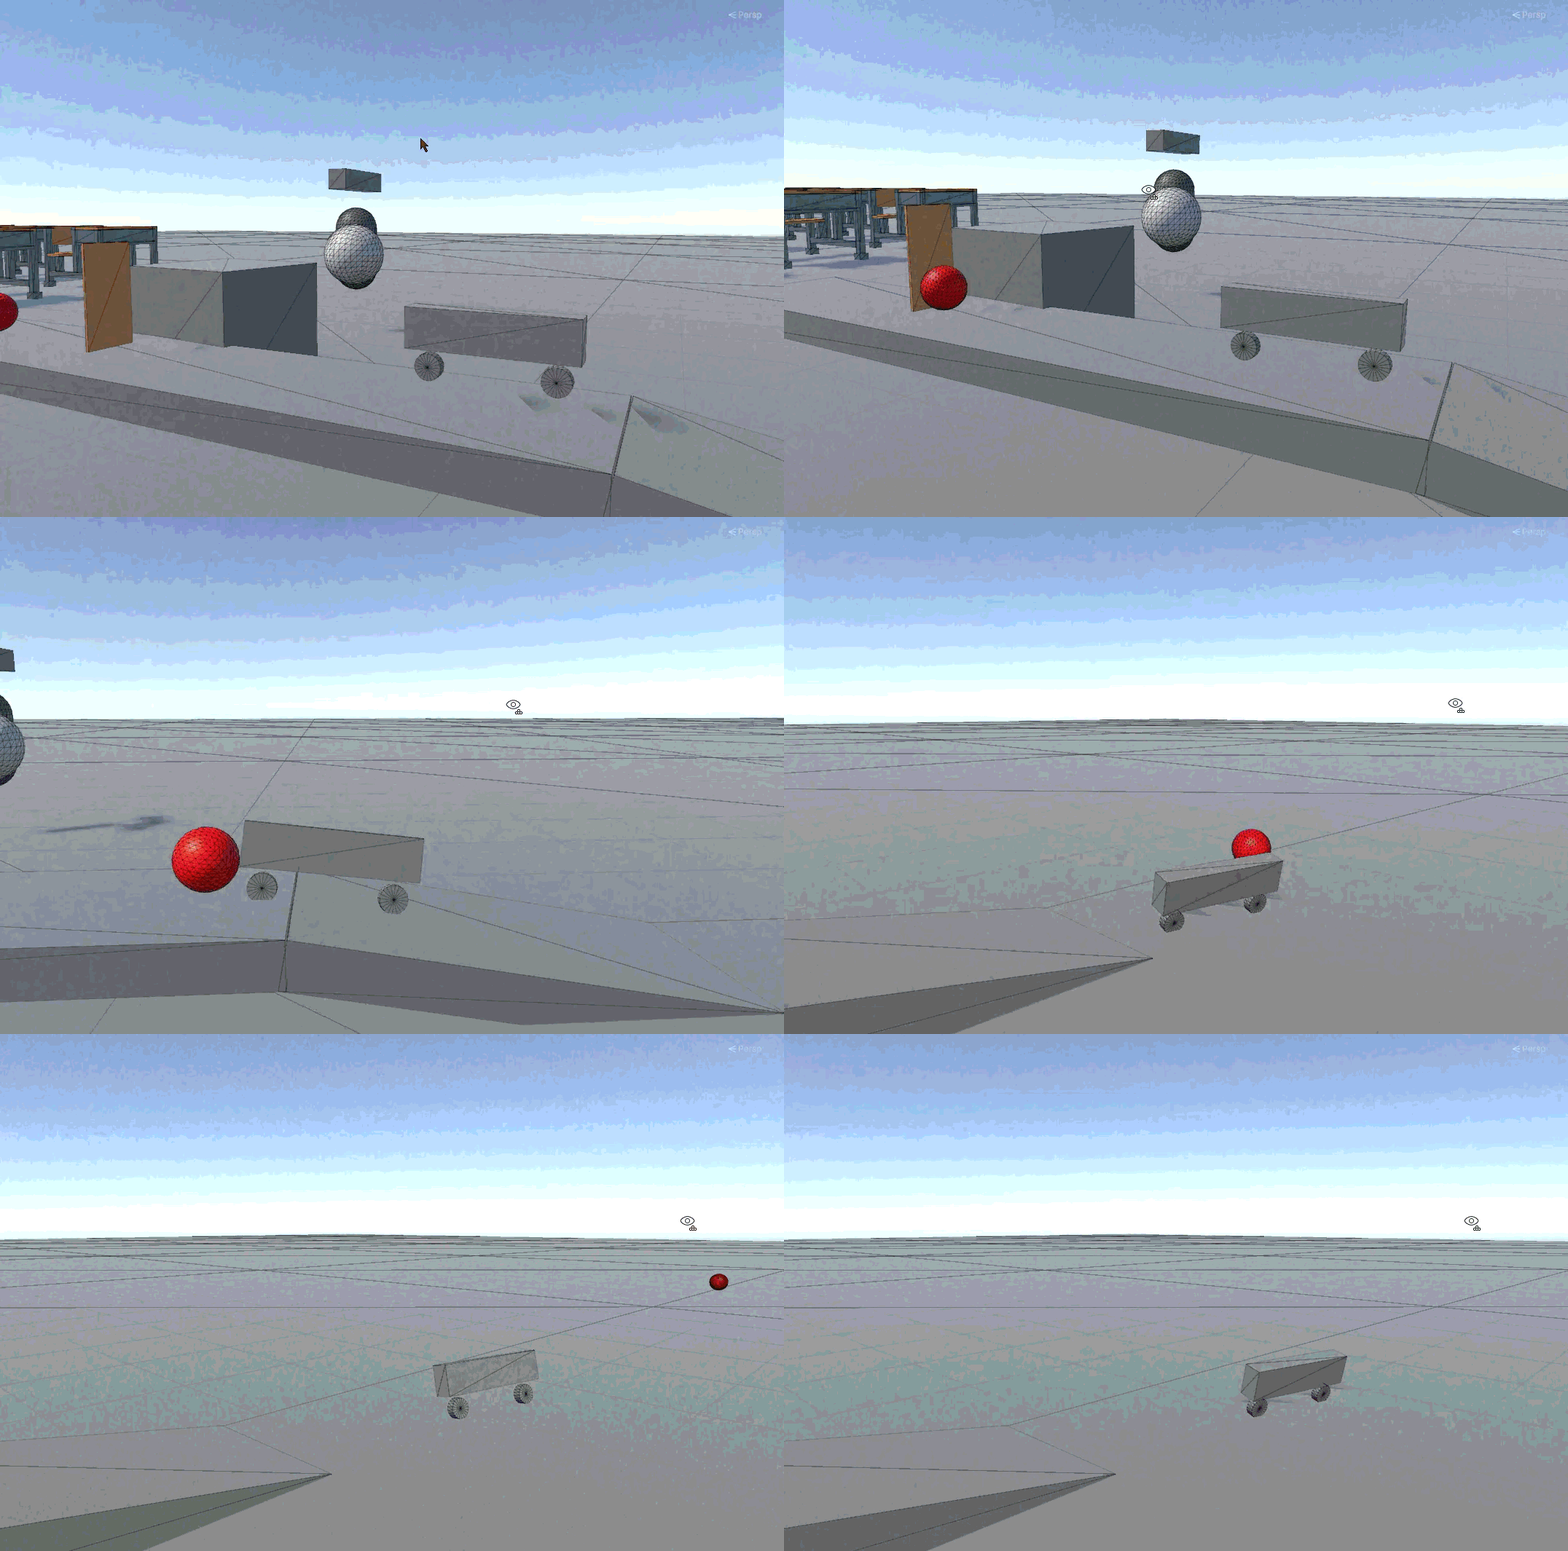
You might notice the ball rolls straight past the door this time without opening it — that’s not a bug. The door’s collider was deliberately turned off for this test, to isolate the bike interaction. Remember what you learned earlier: turn off a collider, and the object becomes a ghost again — that’s exactly what’s happening here.
If you ever get stuck experimenting with values, it’s completely fine to ask an AI assistant to help explain a concept. Just make sure you’re the one testing and adjusting the numbers — that hands-on experimenting is what actually builds real understanding, and it’ll make you far more capable down the line.
Bonus Round: Physics Materials — Making Things Bounce or Slide
One more component, and it’s a fun one to end on. Right-click inside your Asset folder, then choose Create → Physics Material:
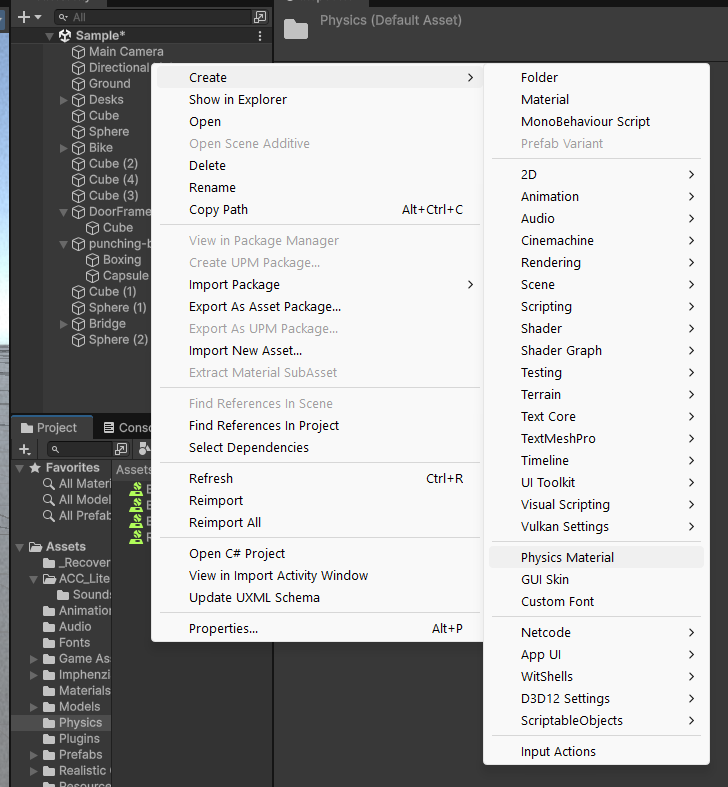
A Physics Material controls how a surface feels when other objects touch it — sticky, slippery, bouncy, or dead-on-impact. Here’s what each property means:
- Dynamic Friction — resistance while an object is already sliding.
- Static Friction — resistance to start sliding from a complete stop. This is usually higher than dynamic friction — think about how much harder it is to get a heavy box moving than it is to keep it sliding once it’s going.
- Bounciness — how much energy is kept after an impact.
0means no bounce at all, like a lump of clay. Close to1means a near-perfect bounce, like a rubber ball. - Friction Combine / Bounce Combine — when two different materials touch each other, Unity needs a rule to decide whose value “wins.” These combine modes — Average, Minimum, Maximum, or Multiply — control that decision.
Here’s the configuration used for a nice, bouncy ball:
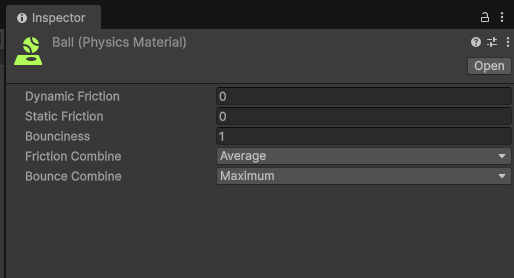
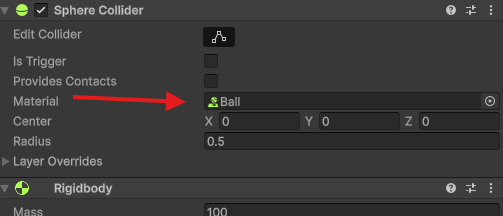
To use it, assign the material to your Sphere Collider’s Material slot:
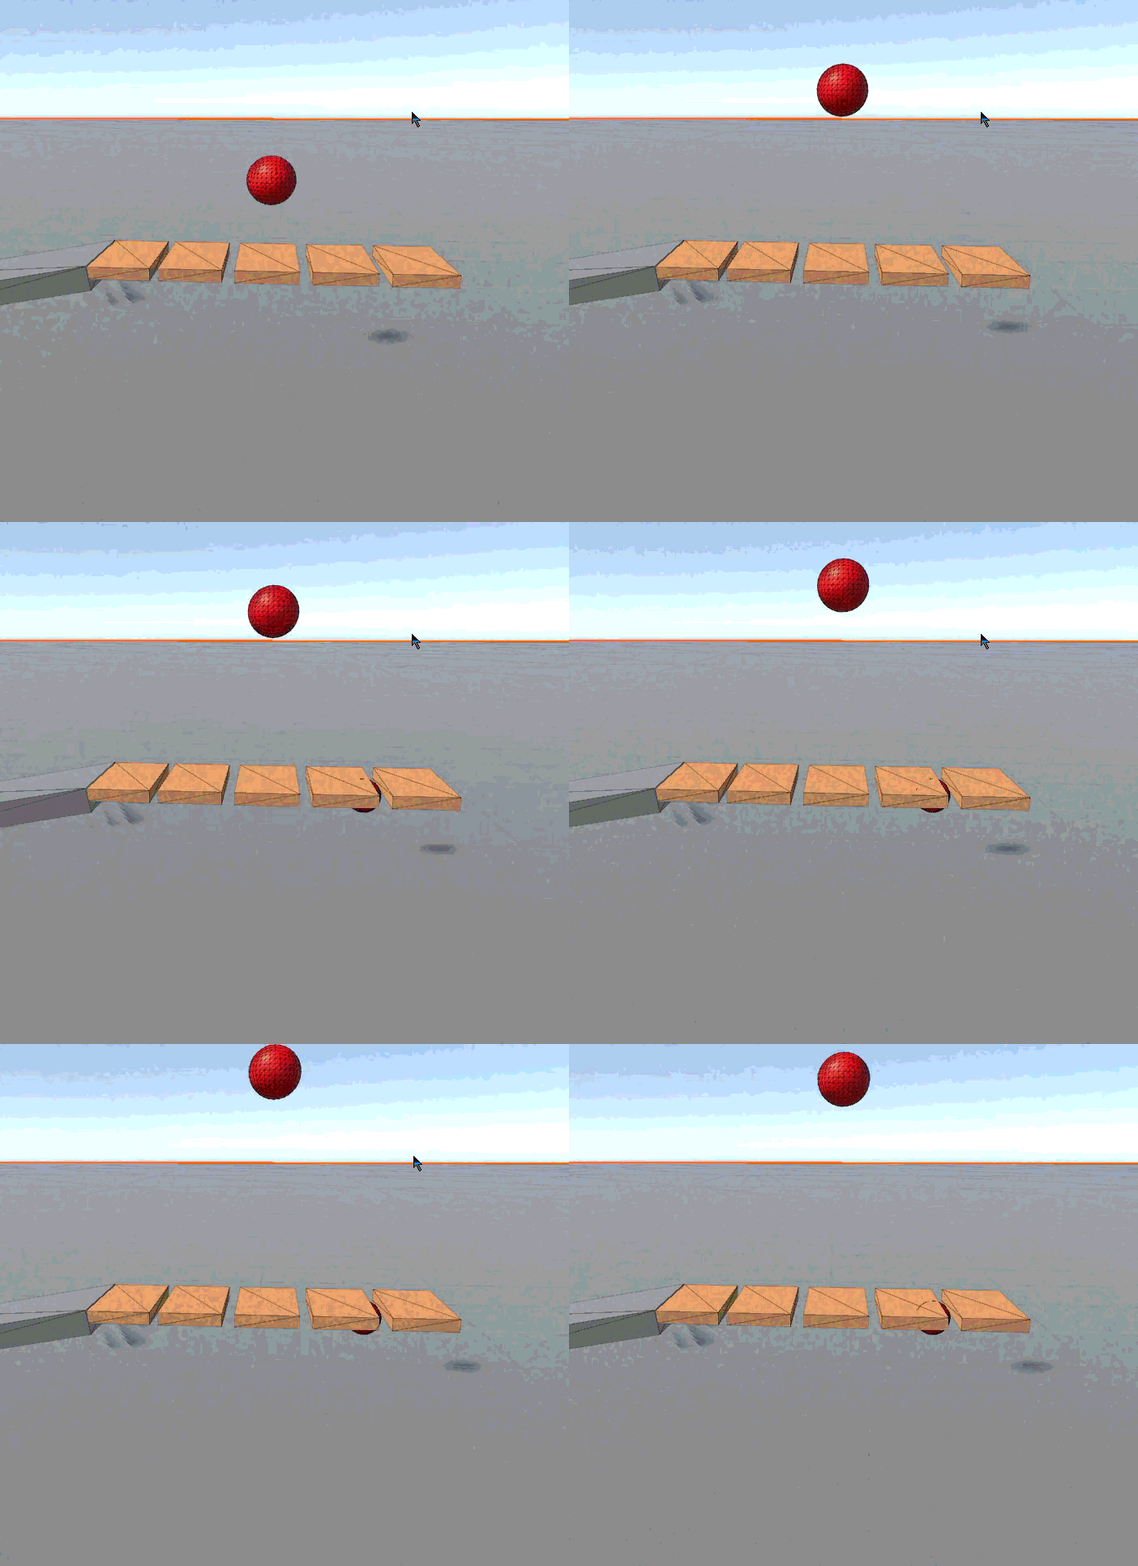
Press Play, and watch it go:
What You Learned Today
Take a moment — you covered a lot of ground in this lesson:
- Colliders give objects a physical shape, and Is Trigger switches between blocking and simply detecting.
- Rigidbody is what makes an object obey gravity, forces, and collisions.
- Constant Force lets you push or spin an object with no scripting at all.
- Hinge Joint creates rotation around a fixed pivot — perfect for doors, and anything else that swings on an axis.
- Spring Joint creates a stretchy, elastic connection between two objects — great for hanging or bouncing behavior.
- Wheel Collider simulates a full wheel with suspension and grip, and needs a carefully tuned Rigidbody to feel stable.
- Physics Materials control how surfaces feel on contact — friction and bounciness.
One quick word on performance: physics components aren’t free — every Rigidbody and collider adds a small computing cost. That’s usually fine for a PC or console game, but on mobile, it’s worth being more careful about where you use them. We’ll cover that properly in a dedicated optimization lesson later on.
For now, the best thing you can do is keep experimenting. Change the numbers. Break things. Rebuild them. That’s genuinely the fastest way to understand what each setting is really doing.
Next lesson, you’ll take your first step into scripting — writing your very first C# script, and learning how Unity’s MonoBehaviour lifecycle actually works behind the scenes.
Contracted by NextSkill a Gamestorms company, delivering this course for Isra University