In the last lesson, you used Cinemachine to move your camera. Now it’s time to bring your world to life with animation. In this lesson, you will build a simple spinning fan by hand. Then you will bring real animations onto your 3D character using Mixamo. By the end, you will know how to build an Animator Controller and control it from your own code.
What Is Animation?
Animation means changing something over time. In Unity, this could mean moving an object, spinning it, or making it bigger or smaller.
Think about a flipbook. Each page has a small change. When you flip the pages fast, it looks like the picture is moving. Unity animation works the same way. You set a value at one point in time. You set a different value at another point in time. Unity fills in every frame in between. This makes smooth movement.
Each point you set is called a keyframe. A keyframe saves the value of one property, like position or rotation, at one exact moment. Between two keyframes, Unity blends the values so the object moves smoothly from one to the other.
Opening the Animation Window
To start animating, open the Animation window. Go to Window > Animation > Animation. Or press Ctrl + 6 on your keyboard. This window is where you will build every animation in this lesson.
Setting Up the Fan Object
Before you animate anything, it helps to set up your object the right way. Here is an example: a simple fan made from basic shapes.
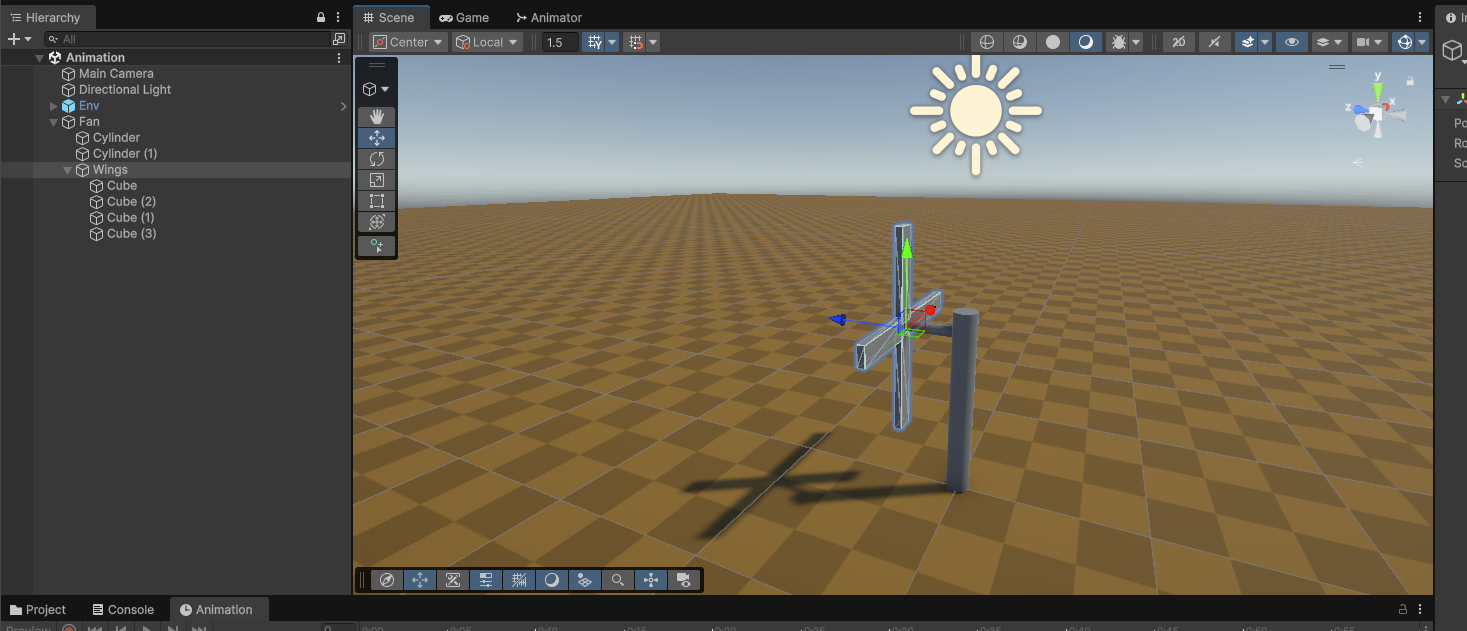
Look at the Hierarchy in the picture above. The fan has three parts:
- Fan — an empty parent object. This is the root.
- Stand — a cylinder. This is the base of the fan.
- Wings — an empty object, placed exactly where the blades connect.
Why use an empty Wings object instead of just rotating the blades directly? Because it gives you one clean point to spin around. If you rotate the blades themselves, they might spin around the wrong spot and look wrong. An empty object placed at the center gives you a perfect spin every time.
This trick is useful any time you need to rotate part of a model — a door on its hinge, or a wheel on its axle, for example.
Creating Your First Animation Clip
Now let’s build the animation.
- Select the Fan root object in the Hierarchy.
- Open the Animation window.
- Click the Create button in the middle of the window.
- Save the file. Name it Fan Animation (or a name that fits what you’re building).
What Unity Creates For You
When you click Create, Unity builds three things at once. Each one has its own job:
| What Unity Creates | What It Does | Why It Matters |
|---|---|---|
| Animator (a component on your object) | Plays animations on the GameObject it’s attached to. | Without it, your object cannot play any animation at all. |
| Animator Controller (a file in your Project window, called an asset) | Holds your animation states and the rules for switching between them. | This is the “brain” that decides which animation plays, and when. |
| Animation Clip (also an asset) | Stores your actual keyframes — the recorded movement. | This is the raw animation data, like “Fan Animation.” |
Think of it this way: the Animator plays the show, the Animator Controller is the script for the show, and the Animation Clip is one scene inside that script.
Getting to Know the Animation Window
The Animation window has a few key tools. Look at the picture, then check the list below it.
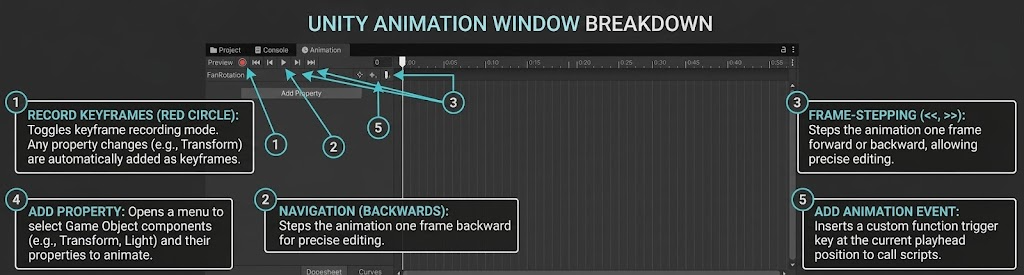
- Record (the red circle): Turns on recording mode. While this is on, any change you make to a property — like moving or rotating an object — is saved as a keyframe automatically.
- Add Property: Opens a menu so you can pick a component, like Transform, and a property, like Rotation, to start animating it.
- Navigation arrows: Jump backward or forward between keyframes.
- Add Animation Event: Places a marker at the current point in time. This marker can call a function in your script the moment the animation reaches that point. More on this below.
Recording Your First Keyframes
Now let’s record the fan’s spin.
- Click the Record button to turn it on.
- Select the Wings object.
- Make sure the time slider is set to 0.
- In the Inspector, right-click the Rotation field under Transform and choose Add Key. This locks in your starting keyframe.
- Move the time slider to 1 second.
- Change the Z rotation value to 360.
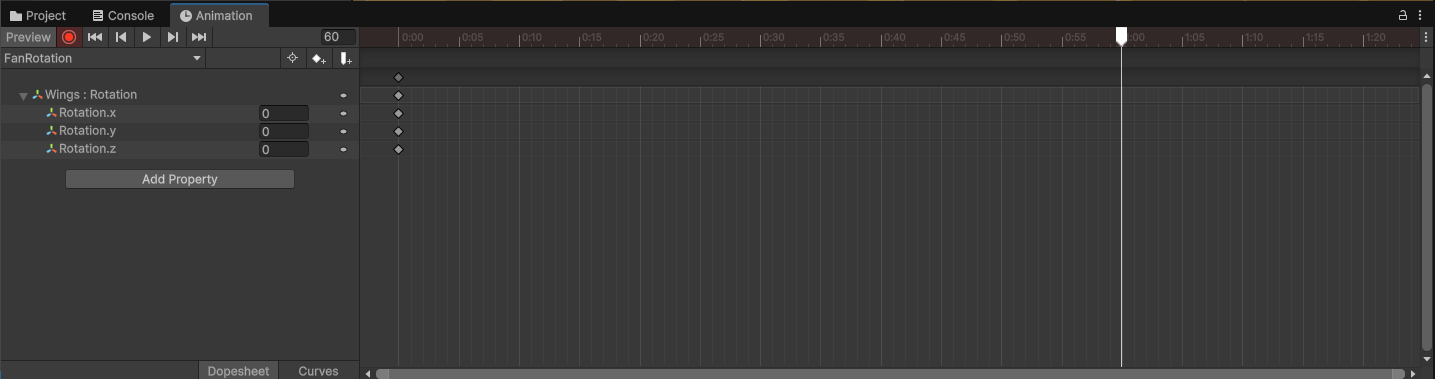
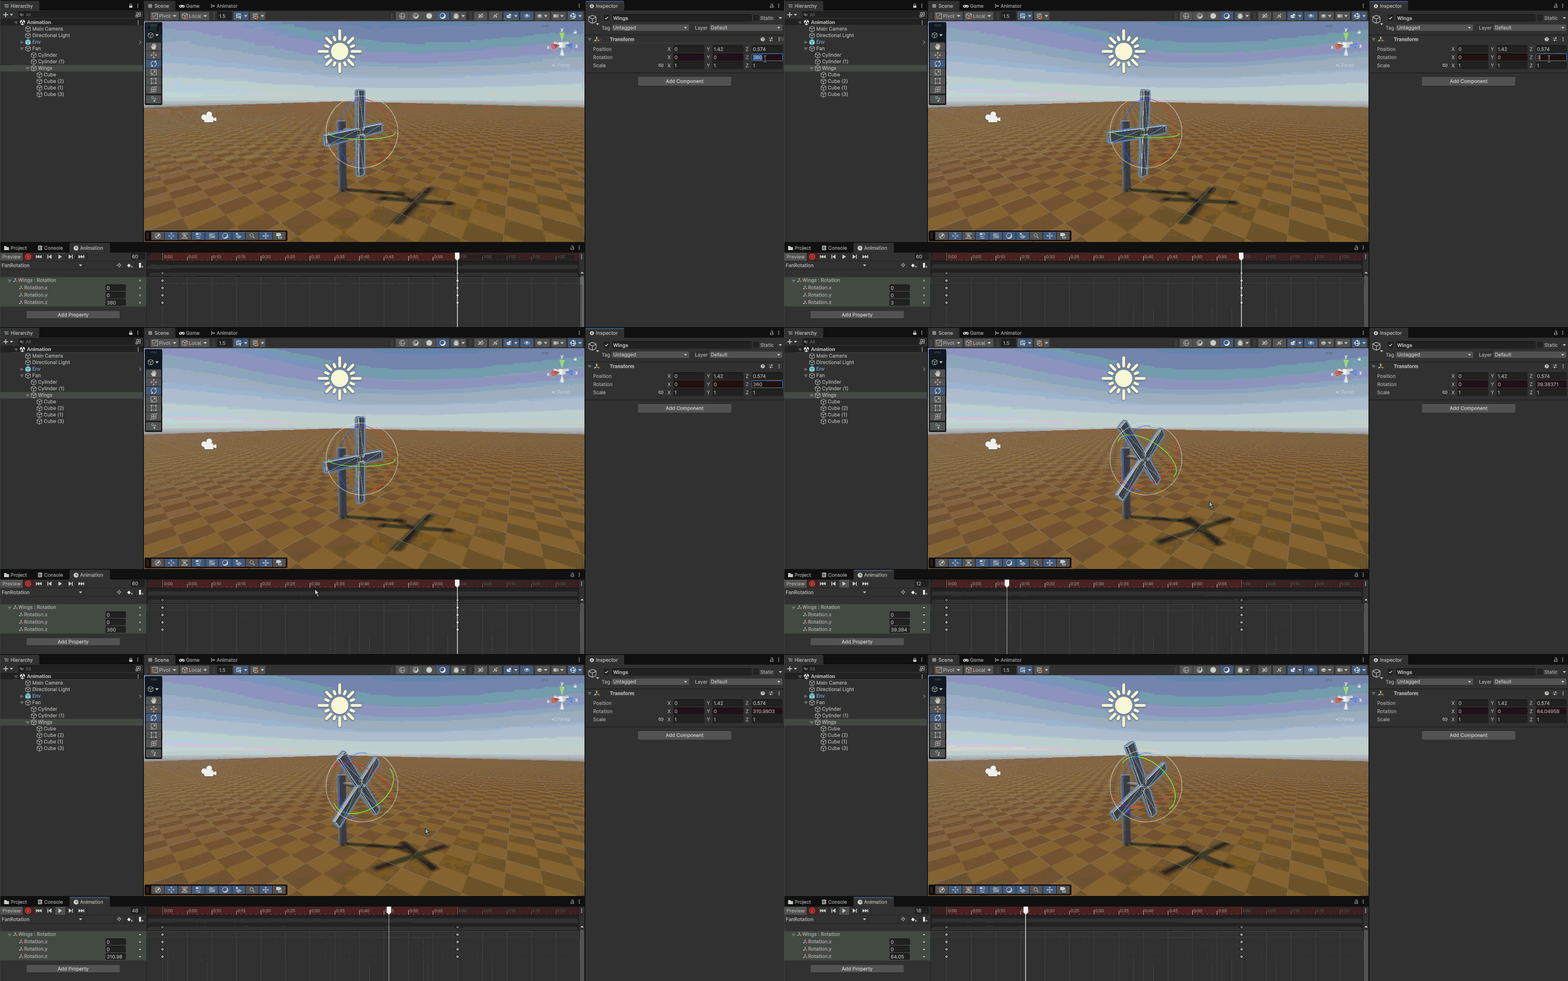
Unity now has two keyframes: one at 0 seconds, with rotation at 0, and one at 1 second, with rotation at 360. Press Play. Watch the wings spin one full turn in one second.
Try It: Change the Z rotation value at the 1 second mark to 720 instead of 360. What happens to the spin speed? Then try adding a third keyframe at 2 seconds so the fan slows down at the end.
A Few Things to Remember
This kind of animation moves the Transform directly. It does not use physics or a Rigidbody. That means your spinning fan will not push other objects out of the way on its own. But if another object does have a Rigidbody and it touches your fan, that object’s own physics will still react normally.
Also, not every property can become a keyframe. Properties that hold a reference to something else — like a link to another GameObject, a script, or an asset — usually cannot be animated. Unity can only smoothly blend simple values, like numbers, colors, or on/off switches. So if a property looks grayed out in the Animation window, this is usually why.
Animation Events
Sometimes you want an animation to trigger a piece of code at one exact moment. That is what an Animation Event is for.
For example, picture a walking animation. You want a footstep sound to play the exact instant the foot touches the ground. Here’s how:
- Move the playhead to that exact frame.
- Click Add Animation Event.
- Choose which function in your script should run at that point.
This links your animation timing directly to your game logic, with no guessing involved.
Try It: Add an Animation Event to your Fan Animation clip. Make it call a simple function that prints a message to the Console every time the fan finishes one full spin.
Bringing In Animations From Mixamo
You already added a 3D character and a Third Person Controller in an earlier lesson. Now you will download real animations for that character from Mixamo.com.
On Mixamo, pick an animation, then click Download. A menu will pop up with a few choices:
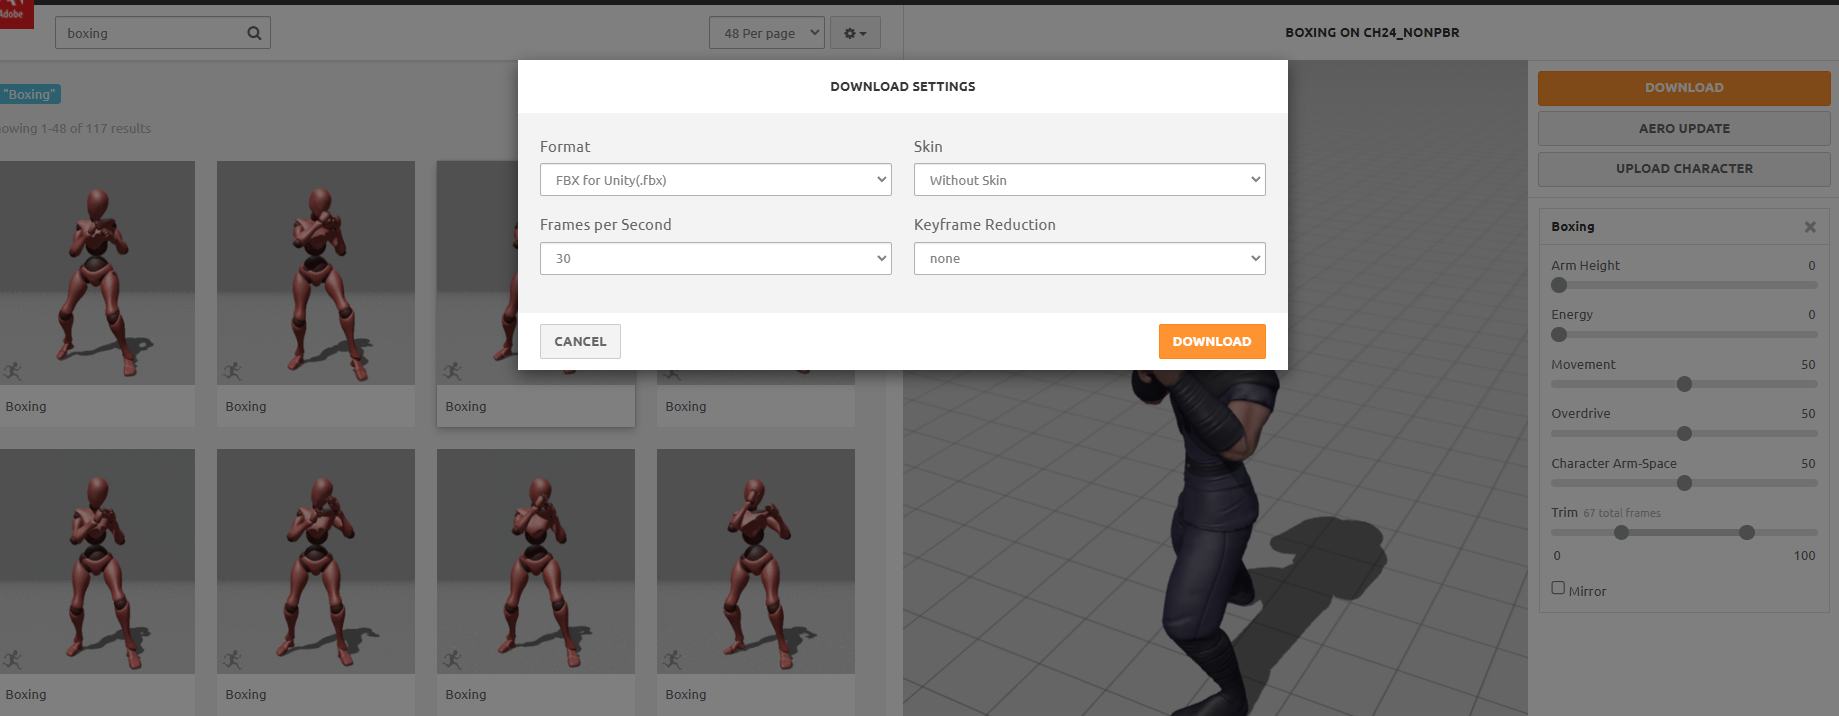
| Setting | What To Pick | Why |
|---|---|---|
| Format | FBX for Unity | This is the file type Unity understands. |
| Skin | Without Skin (if you already have an avatar in Unity) | You only need the movement data, not another copy of the character model. |
| Frames Per Second (FPS) | 30 (the default) | FPS is how many snapshots of the movement are saved every second. More FPS means smoother motion, but a bigger file. 30 looks smooth enough for most games. |
| Keyframe Reduction | None | Explained below. |
About Keyframe Reduction: this setting decides how many keyframes to keep in the final file.
- None keeps every single keyframe exactly as it was recorded. Biggest file size, best accuracy.
- Uniform removes keyframes at even, regular gaps to save space. It’s simple, but it might accidentally cut something important.
- Non-Uniform is smarter. It removes keyframes from calm, steady movement, and keeps more keyframes where the motion changes quickly.
As a beginner, choose None first. You get the cleanest, most reliable animation data while you’re still learning how everything fits together. Once your project grows and file size actually matters, you can come back and experiment with reduction settings.
Once your download is ready, drag the FBX file into your Assets folder in Unity.
Building an Animator Controller
Now build a new Animator Controller for your character.
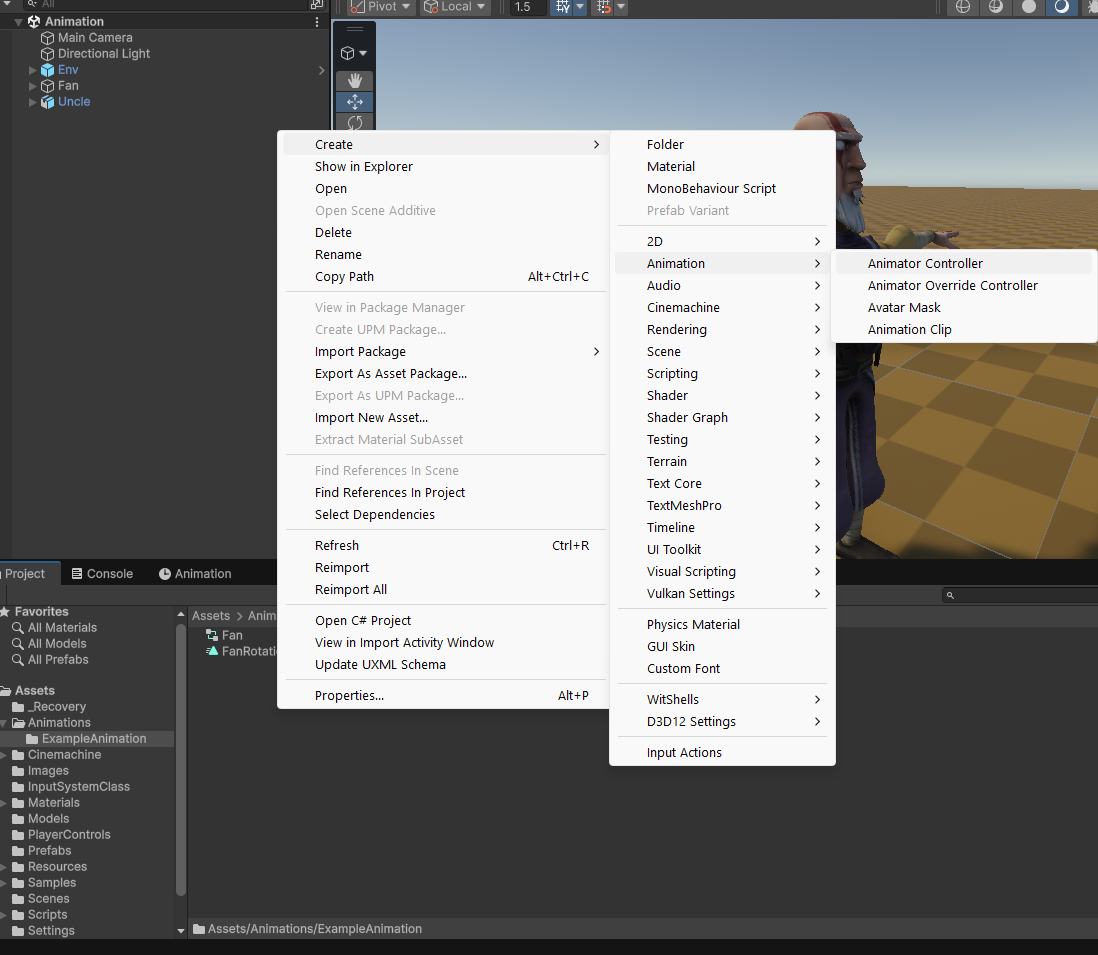
- Right-click inside your Assets folder.
- Choose Create > Animation > Animator Controller.
- Give it a clear name, like PlayerAnimator.
- Double-click it to open the Animator window.
Adding Animation Clips and Setting the Entry State
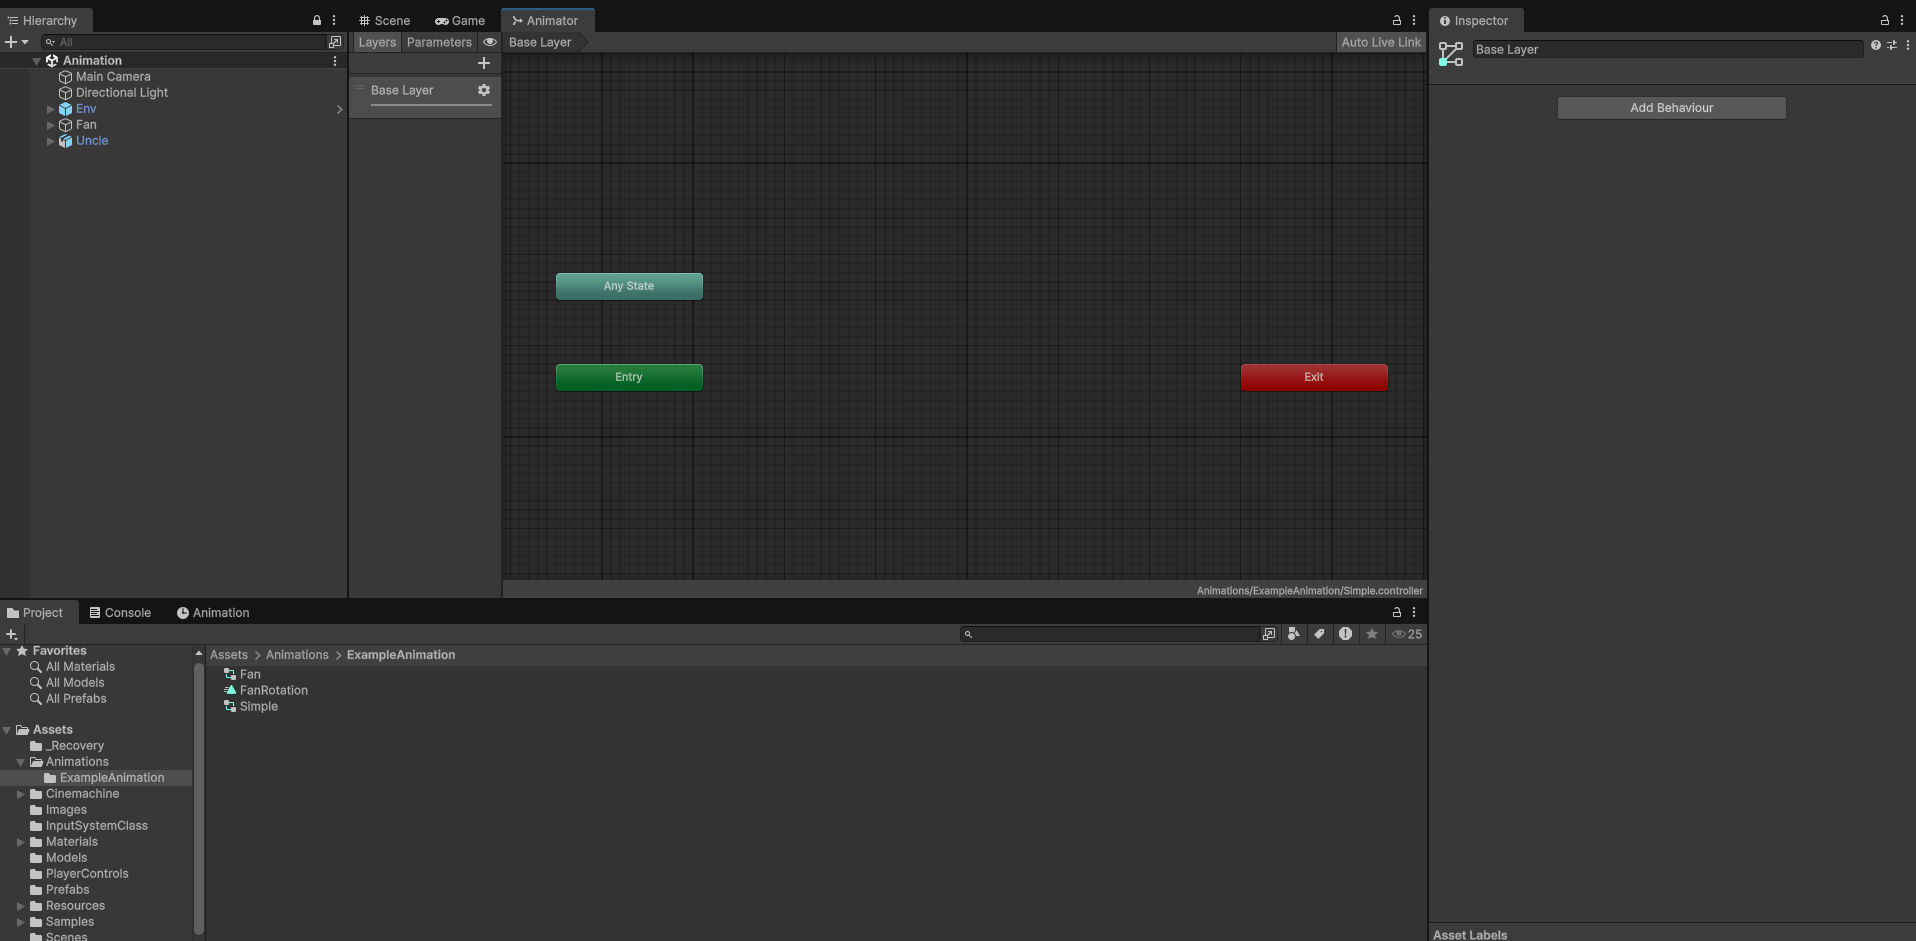
Drag your downloaded animation clips — for example, Idle, Walk, and Run — into the Animator window.
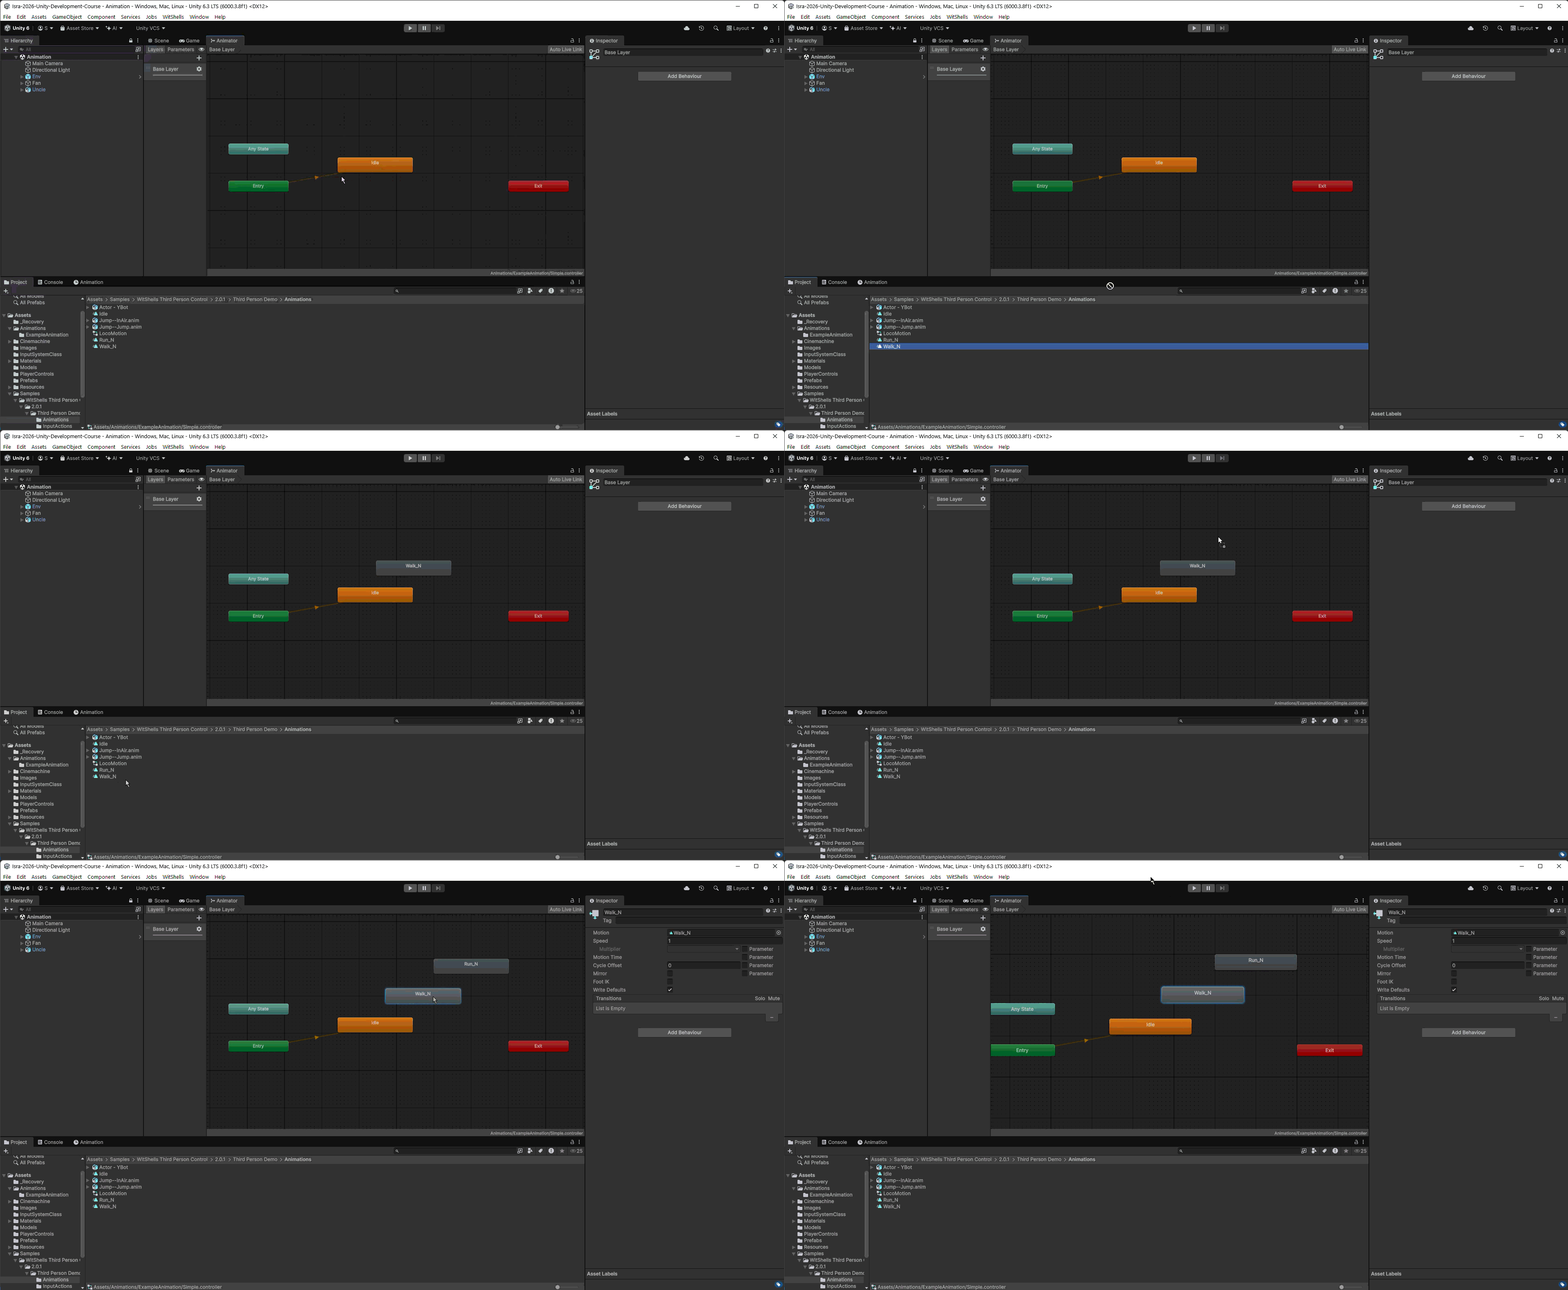
The first clip you drag in turns orange. That is the Entry state — the animation that plays first, the moment your character appears in the game. In this example, Idle is dragged in first, so Idle becomes the starting animation.
Creating Parameters and Transition Conditions
To switch between animations, you draw transition arrows between them. Each arrow can carry a condition — a rule that decides when to switch.
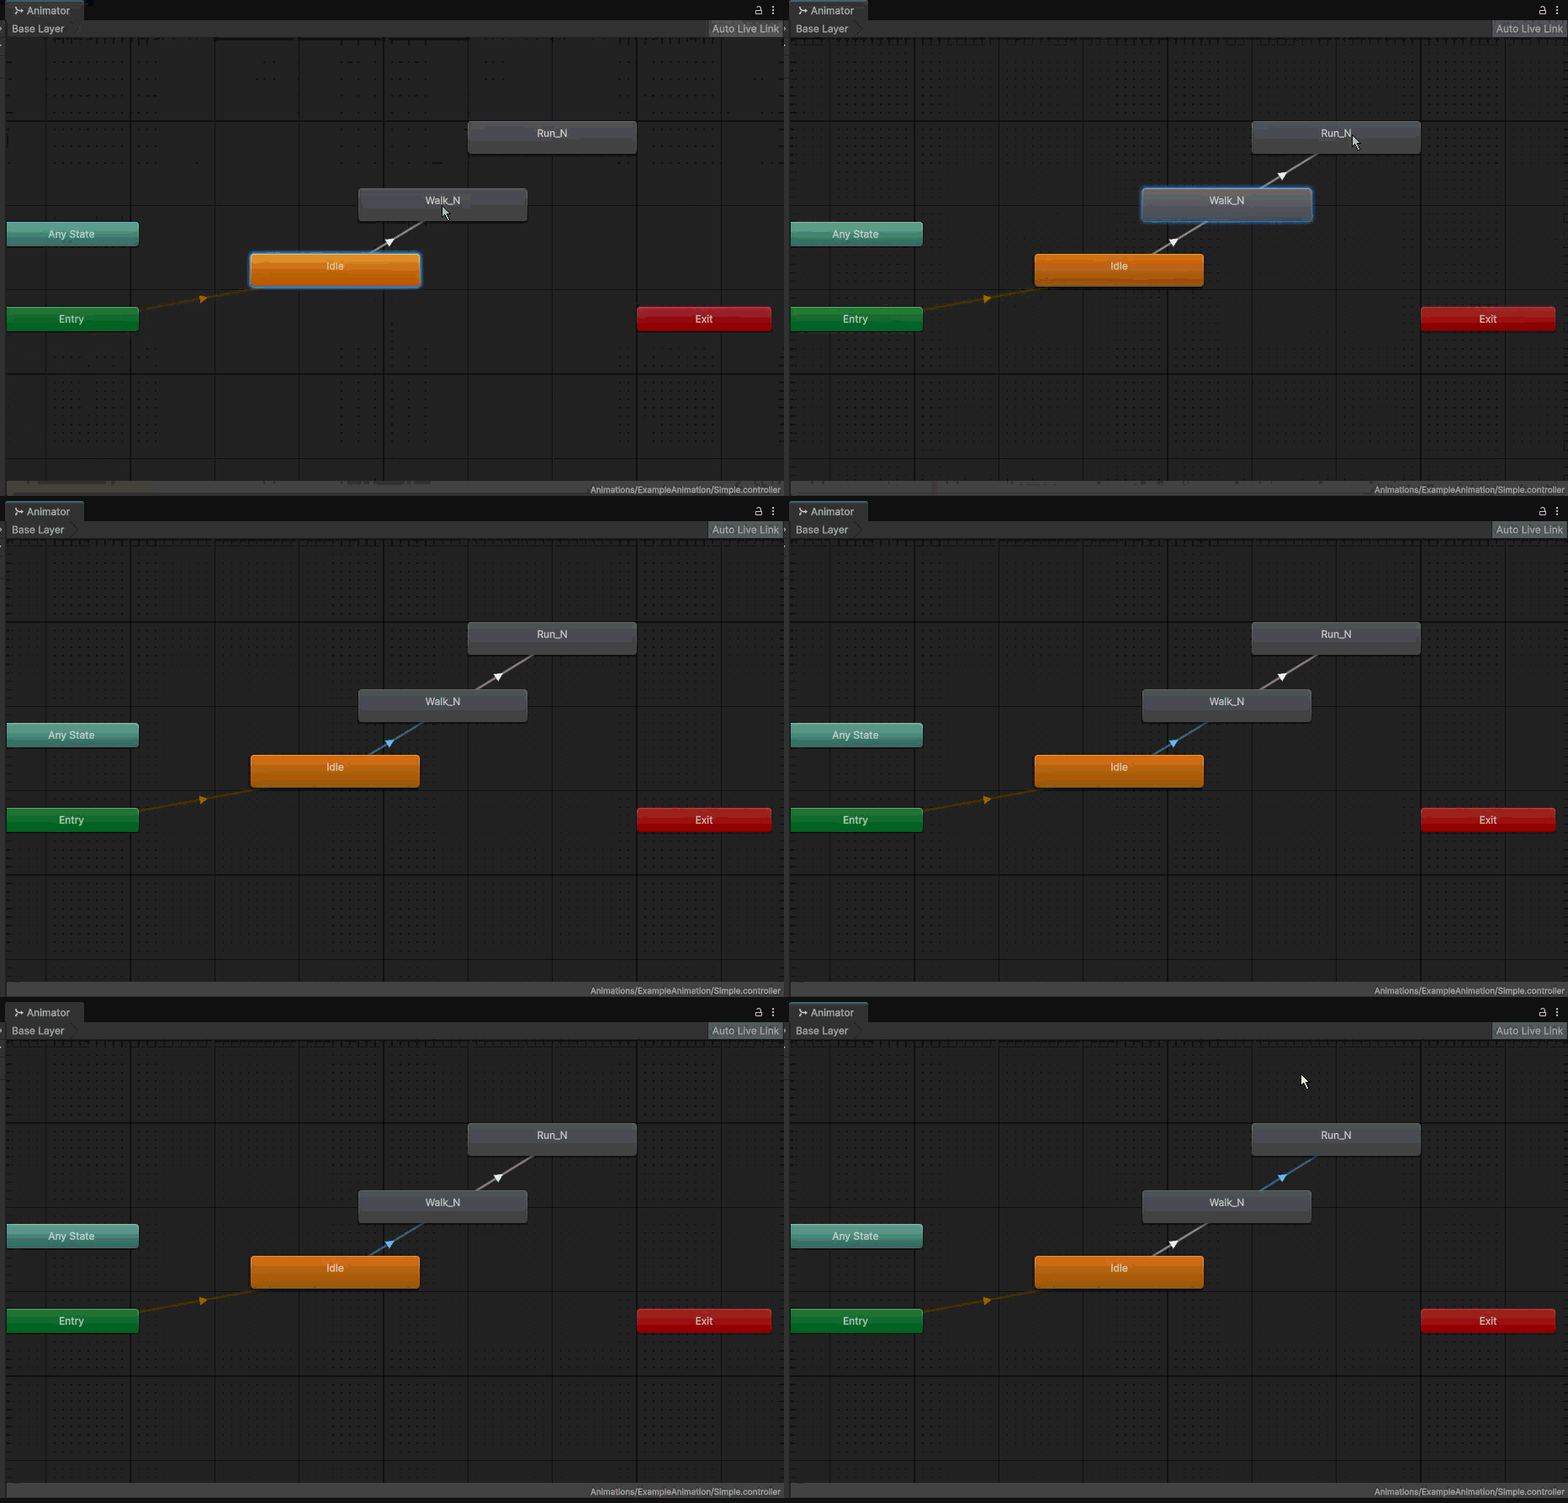
First, create a new parameter. In the Animator window, add a Float parameter and name it Move. This number will stand for how fast your character is moving.
Now set up your conditions like this:
| From | To | Condition |
|---|---|---|
| Idle | Walk | Move is greater than or equal to 0.5 |
| Walk | Run | Move is greater than or equal to 1 |
| Run | Walk | Move is less than 0.6 |
| Walk | Idle | Move is less than 0.1 |
Click each arrow and set its condition in the Inspector to match the table above.
Testing Your Animator Without Pressing Play
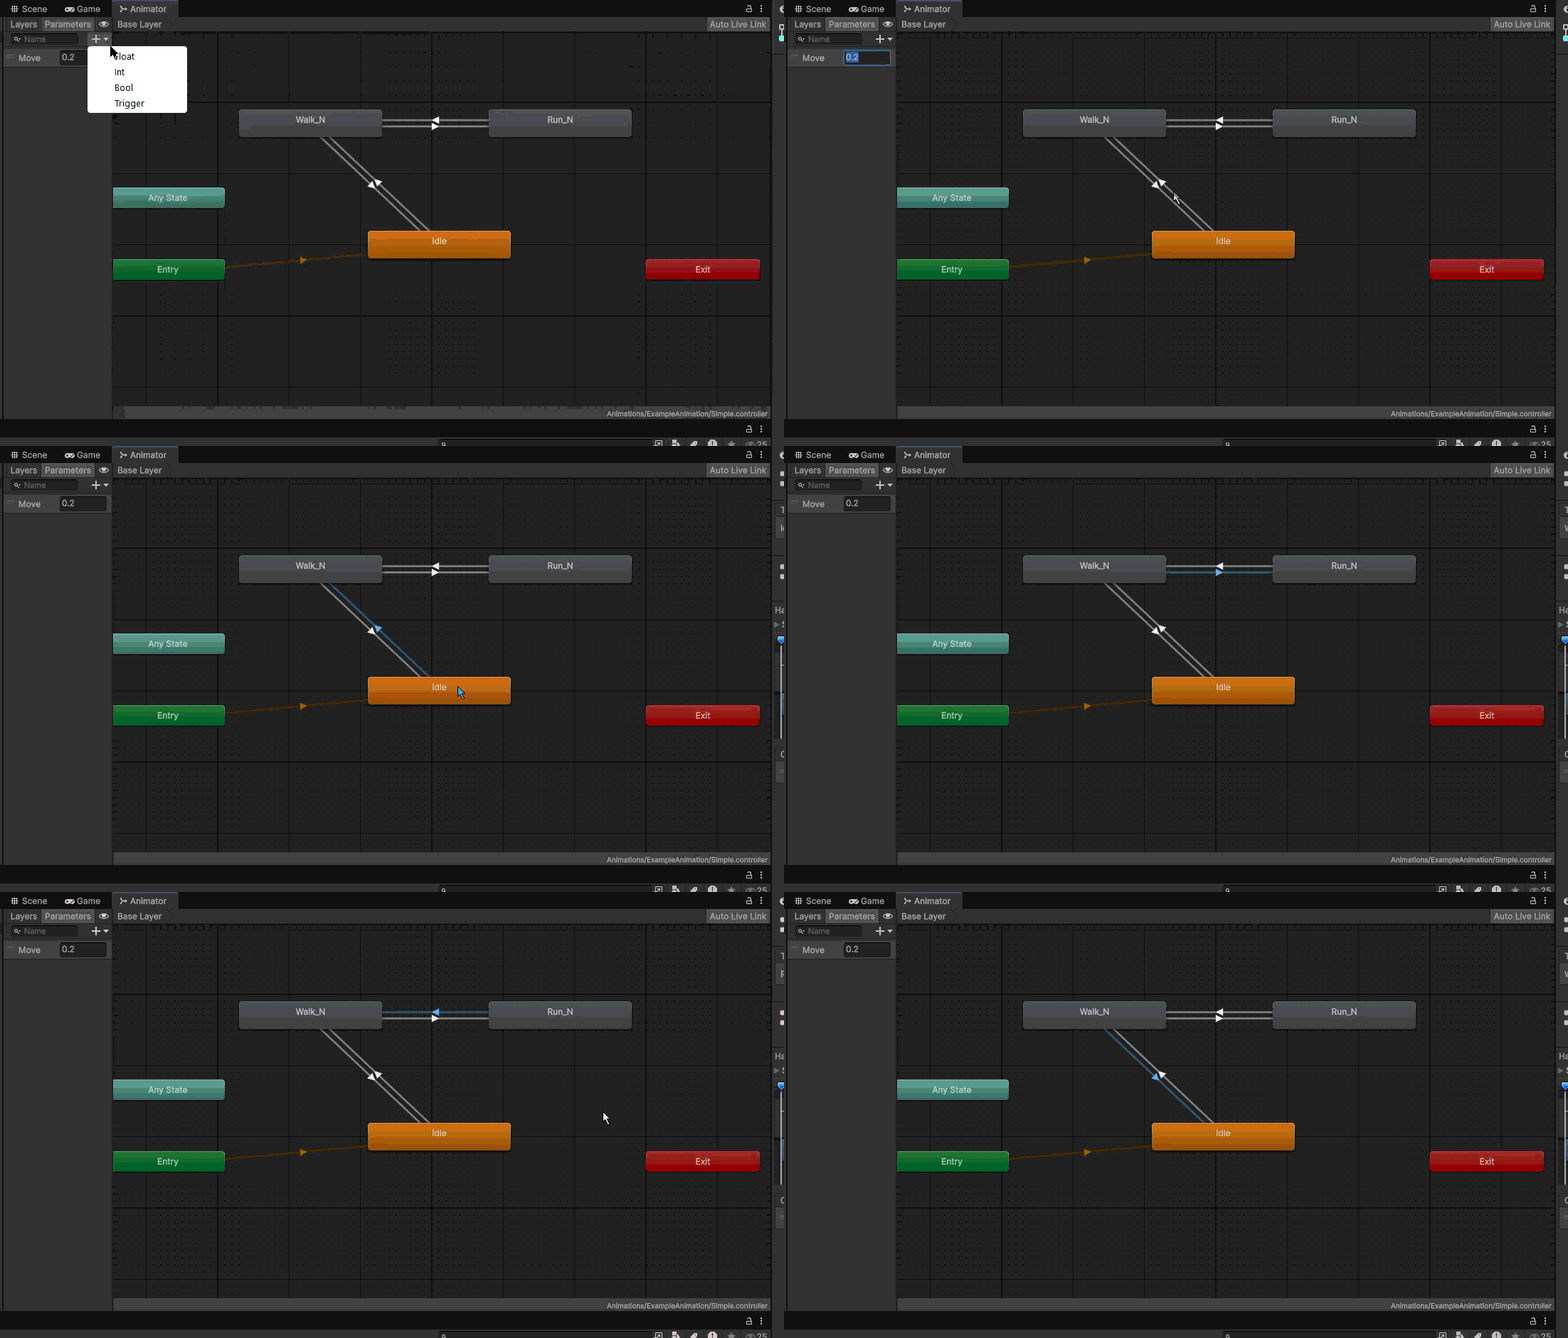
You can test your setup right inside the Animator window, even before pressing Play.
Right-click the Move parameter and change its value by hand. Watch your character switch between Idle, Walk, and Run as the value crosses each threshold from your table.
Try It: Slide the Move value up slowly from 0 to 1.5. Note the exact moment each transition happens. Does it match the table above?
Controlling the Animator With Code
In a real game, you won’t set the Move value by hand. Your script will set it based on player input. Here is a simple example:
using UnityEngine;

public class SimpleAnimatorDriver : MonoBehaviour
{
    private Animator animator;

    void Start()
    {
        animator = GetComponent<Animator>();
    }

    void Update()
    {
        float moveSpeed = Input.GetAxis("Vertical");
        animator.SetFloat("Move", Mathf.Abs(moveSpeed));
    }
}
This script grabs the Animator component once, inside Start(). Then, every frame, it reads the player’s input and sends that number to the Move parameter using SetFloat. If you had a bool or int parameter instead, you would use SetBool("ParameterName", true) or SetInt("ParameterName", 5) the exact same way.
Recap
| Term | What It Means |
|---|---|
| Keyframe | A saved value of a property at one point in time |
| Animation Clip | A file that stores a sequence of keyframes |
| Animator | The component that plays animations on a GameObject |
| Animator Controller | The asset that stores states and transition rules |
| Parameter | A variable (float, bool, or int) that controls transitions |
| Transition | A rule-based switch between two animation states |
| Animation Event | A marker that calls a function at an exact point in an animation |
| Keyframe Reduction | A setting that removes extra keyframes to shrink file size |
Check Your Understanding
- What is a keyframe?
- Why did we use an empty Wings object instead of rotating the blades directly?
- Name the three things Unity creates when you click Create in the Animation window.
- Why might a property be impossible to turn into a keyframe?
- What is the difference between Uniform and Non-Uniform keyframe reduction?
- What does the
SetFloatfunction do?
Practice Tasks
Easy
- Build your own spinning coin animation using a primitive cylinder.
- Add a second keyframe to your Fan Animation so the wings pause for one second before spinning again.
- Rename the “Move” parameter to “Speed,” and update all four transition conditions to match.
Medium
- Add an Animation Event to the fan’s clip that prints “One spin complete!” to the Console every time the loop finishes.
- Download one more Mixamo animation, like Jump, and add it to your Animator Controller with its own transition conditions.
- Create a Bool parameter called “IsJumping” and use it to transition from Idle into your Jump animation.
Hard
- Write a script that changes the Move parameter automatically based on keyboard input (WASD or arrow keys), without touching the Animator window by hand.
- Combine two conditions on a single transition arrow (for example, Move is less than 0.1 and IsJumping is false) to control switching back to Idle.
- Build your own three-part object, like a door with a hinge or a treasure chest with a lid, using the same empty-pivot trick from the Fan example. Then animate it opening and closing.
Contracted by NextSkill a Gamestorms company, delivering this course for Isra University