Lesson 7: Unity New Input System — Keyboard, Mouse & Gamepad in Unity 6
What Does an Input System Do?
To control anything in a game, we need a way to connect the player with the game. This connection is called input.
You already use input every day. On a computer, you use a keyboard and a mouse. On a phone, you use touch. These are all input devices.
When you make a game, you decide how the player controls things. For example:
- Press the arrow keys to move the player.
- Press a button to jump or shoot.
- Touch a point on the screen to select something.
The Input System is the tool that reads these actions from the player’s device and sends them into your game code.
Unity has two input systems:
- Old Input Manager (
Input.GetKey,Input.GetAxis) — the classic way. It is simple but limited. Each key is hardcoded, it is hard to support many devices at once, and there is no built-in rebinding. - New Input System — the modern way, and the topic of this lesson. It supports many devices out of the box (keyboard, mouse, gamepad, touch), lets players rebind keys, and works well for local multiplayer.
In this lesson, we will set up the New Input System and read input from keyboard, mouse, and gamepad — without writing separate code for each device.
Step 1: Install and Enable the New Input System
Most new Unity 6 projects already include the Input System package. To check, or to switch to it manually:
- Open Edit > Project Settings > Player.
- Find Active Input Handling under the Configuration section.

- Set it to Input System Package (New). Do not choose Both unless you have a real reason — most beginners should use the New Input System only.
Why not “Both”? “Both” runs the old and new systems together. It works on desktop, but it is not supported on Android and some other platforms. If you plan to build for mobile, always choose Input System Package (New).
- If the Input System package is missing, install it from Window > Package Manager, search for Input System, and click Install.
- Unity will ask to restart the editor to apply the change. Click Yes.
Step 2: Understand Input Actions
The recommended way to use the New Input System is through an Input Actions asset. This is a file where you define, in one place, every input your game needs.
When you create a new Unity 6 project, you may already see a file called InputSystem_Actions in your Assets folder. Open it, and you will see a layout like this:
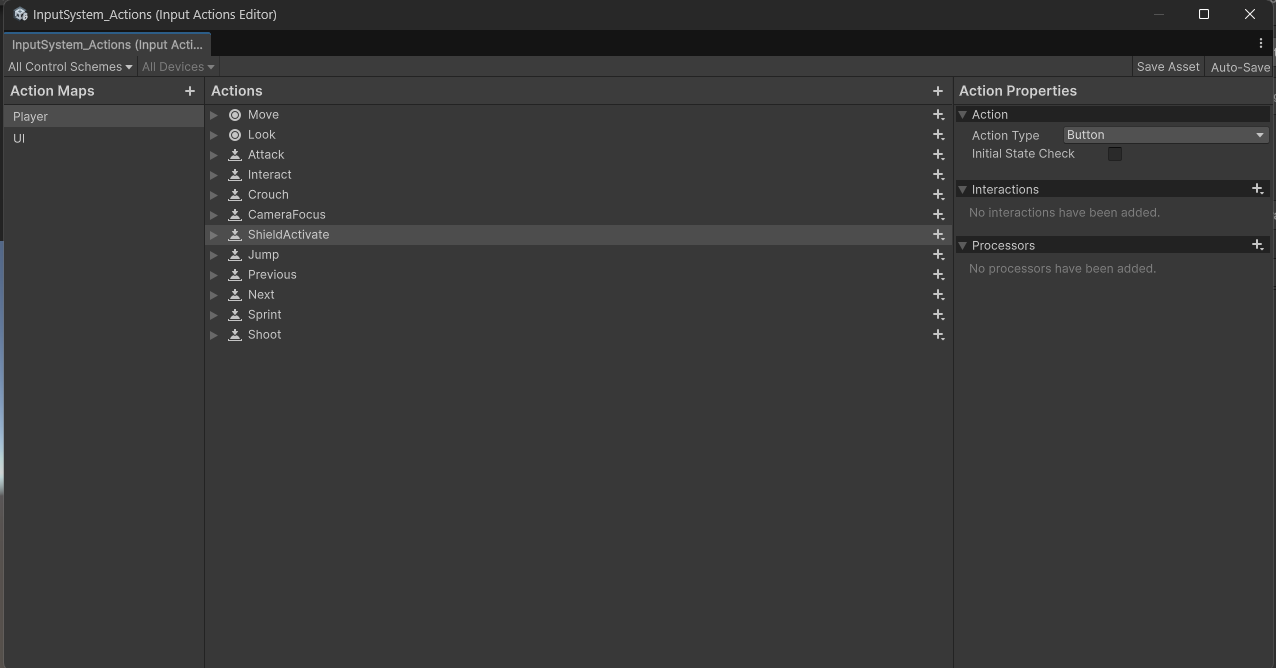
This asset has three main parts:
| Concept | What it means |
|---|---|
| Action Map | A group of actions, usually tied to a game state. Example: a “Player” map for gameplay, and a “UI” map for menus. |
| Action | The intent of the input, not the key itself. Example: “Move,” “Jump,” “Fire.” |
| Binding | The actual physical input mapped to an action. Example: the “Move” action can be bound to WASD, the arrow keys, and a gamepad stick, all at once. |
This is the biggest advantage over the old system: one action, many devices. You write “if Move is pressed” once, and the player can trigger it with a keyboard, a controller, or both — you don’t write separate code for each device.
Creating Your Own Input Actions Asset
Let’s create a fresh one so you understand every step.
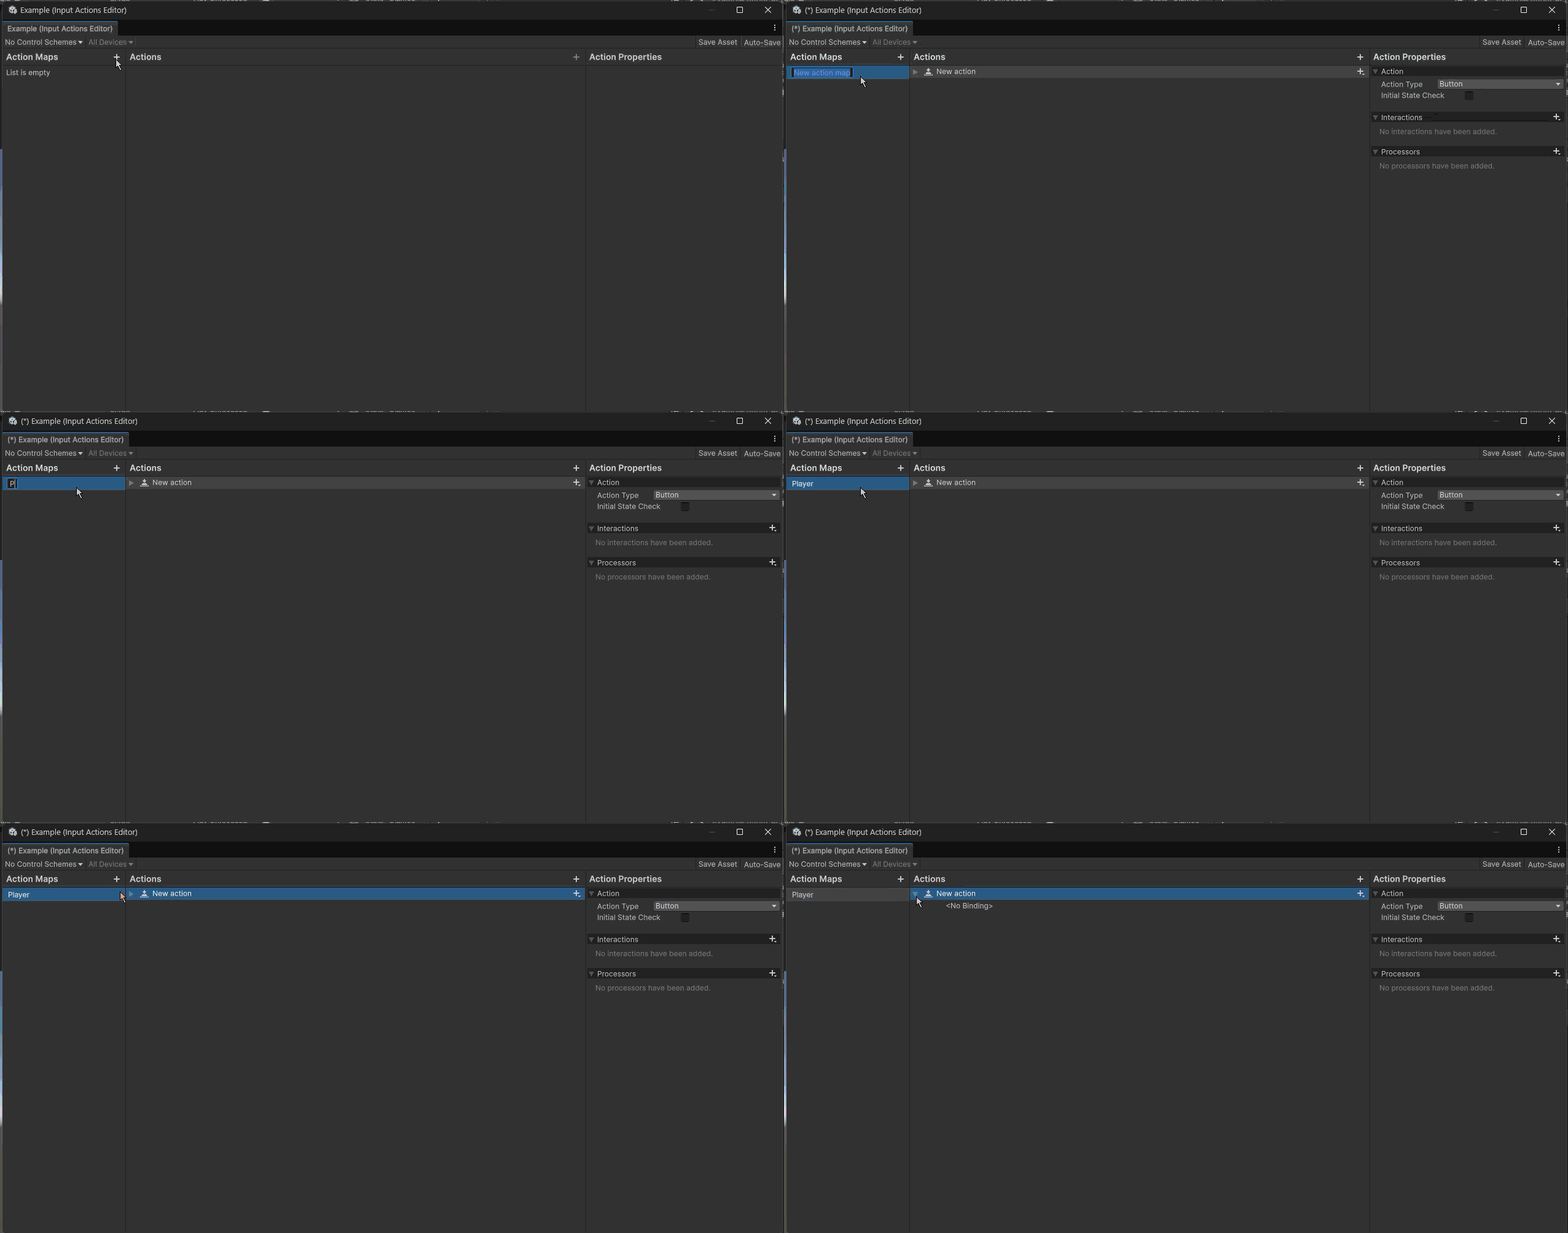
- In the Project window, right-click → Create → Input Actions. This creates a new, empty
.inputactionsfile. - Double-click it to open the Input Actions editor.
- Click the + next to Action Maps and name the new map Player.
Creating the “Move” Action
Inside the Player map, add a new action and name it Move.
By default, a new action is a Button type — good for on/off inputs like Jump. But movement needs a direction, not just on/off. So we change it:
- Action Type:
Value - Control Type:
Vector2
Why Vector2? Because movement has two axes:
- Y — forward (positive) and backward (negative)
- X — right (positive) and left (negative)
Once you set this, Unity shows a Vector2 Composite with four parts: Up, Down, Left, Right. Click each one, then click Listen, then press the key you want (for example, W for Up). Unity detects it automatically.
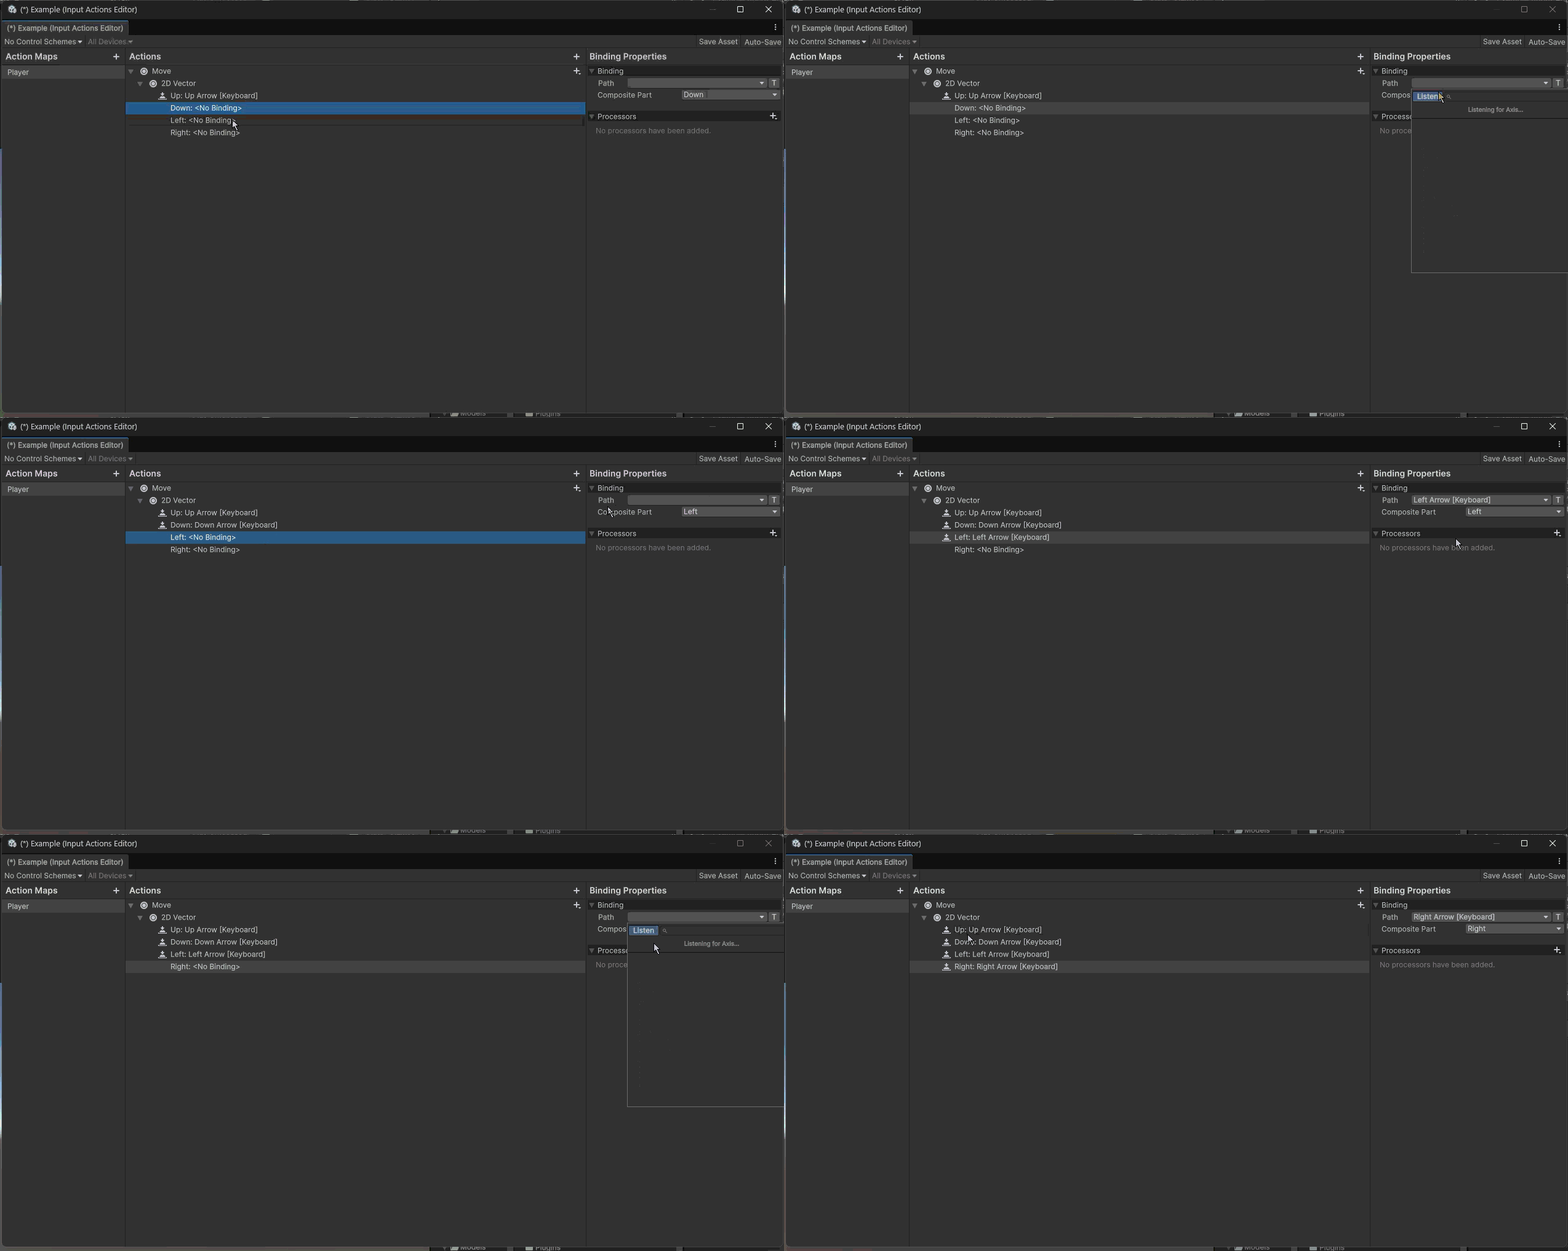
Repeat this for WASD and the arrow keys if you want both to work. Later, you can also add a gamepad stick binding to the same action — the code below will not need to change at all.
Tip: Other common Control Types you will meet later:
Button(on/off, e.g., Jump, Fire),Axis(a single float, e.g., a throttle or accelerator),Vector3(rare, used for some 3D-only input hardware).
Step 3: Read Input in Code — Four Ways
There is more than one way to read an Input Actions asset from code. Here are the ones you will use most as a beginner, from simplest to most flexible.
Method 1: Reference the Whole Asset, Poll Every Frame
Create an empty GameObject in your scene, add a new script called HandleUserInput, and write:
using UnityEngine;
using UnityEngine.InputSystem;

public class HandleUserInput : MonoBehaviour
{
    public InputActionAsset inputActionAsset;

    public Vector2 moveInput;

    private void OnEnable()
    {
        inputActionAsset.Enable();
    }

    private void OnDisable()
    {
        inputActionAsset.Disable();
    }

    private void Update()
    {
        moveInput = inputActionAsset["Move"].ReadValue<Vector2>();
    }
}
What this does:
OnEnable/OnDisableturn the whole action asset on and off with the GameObject’s lifecycle, so input does not keep working in the background when this object is disabled. (If this pattern is new to you, revisit the Unity lifecycle lesson.)Updatereads the current value of the “Move” action every frame, using its exact name as a string key:inputActionAsset["Move"].moveInputis public only so you can watch the value change live in the Inspector while testing.
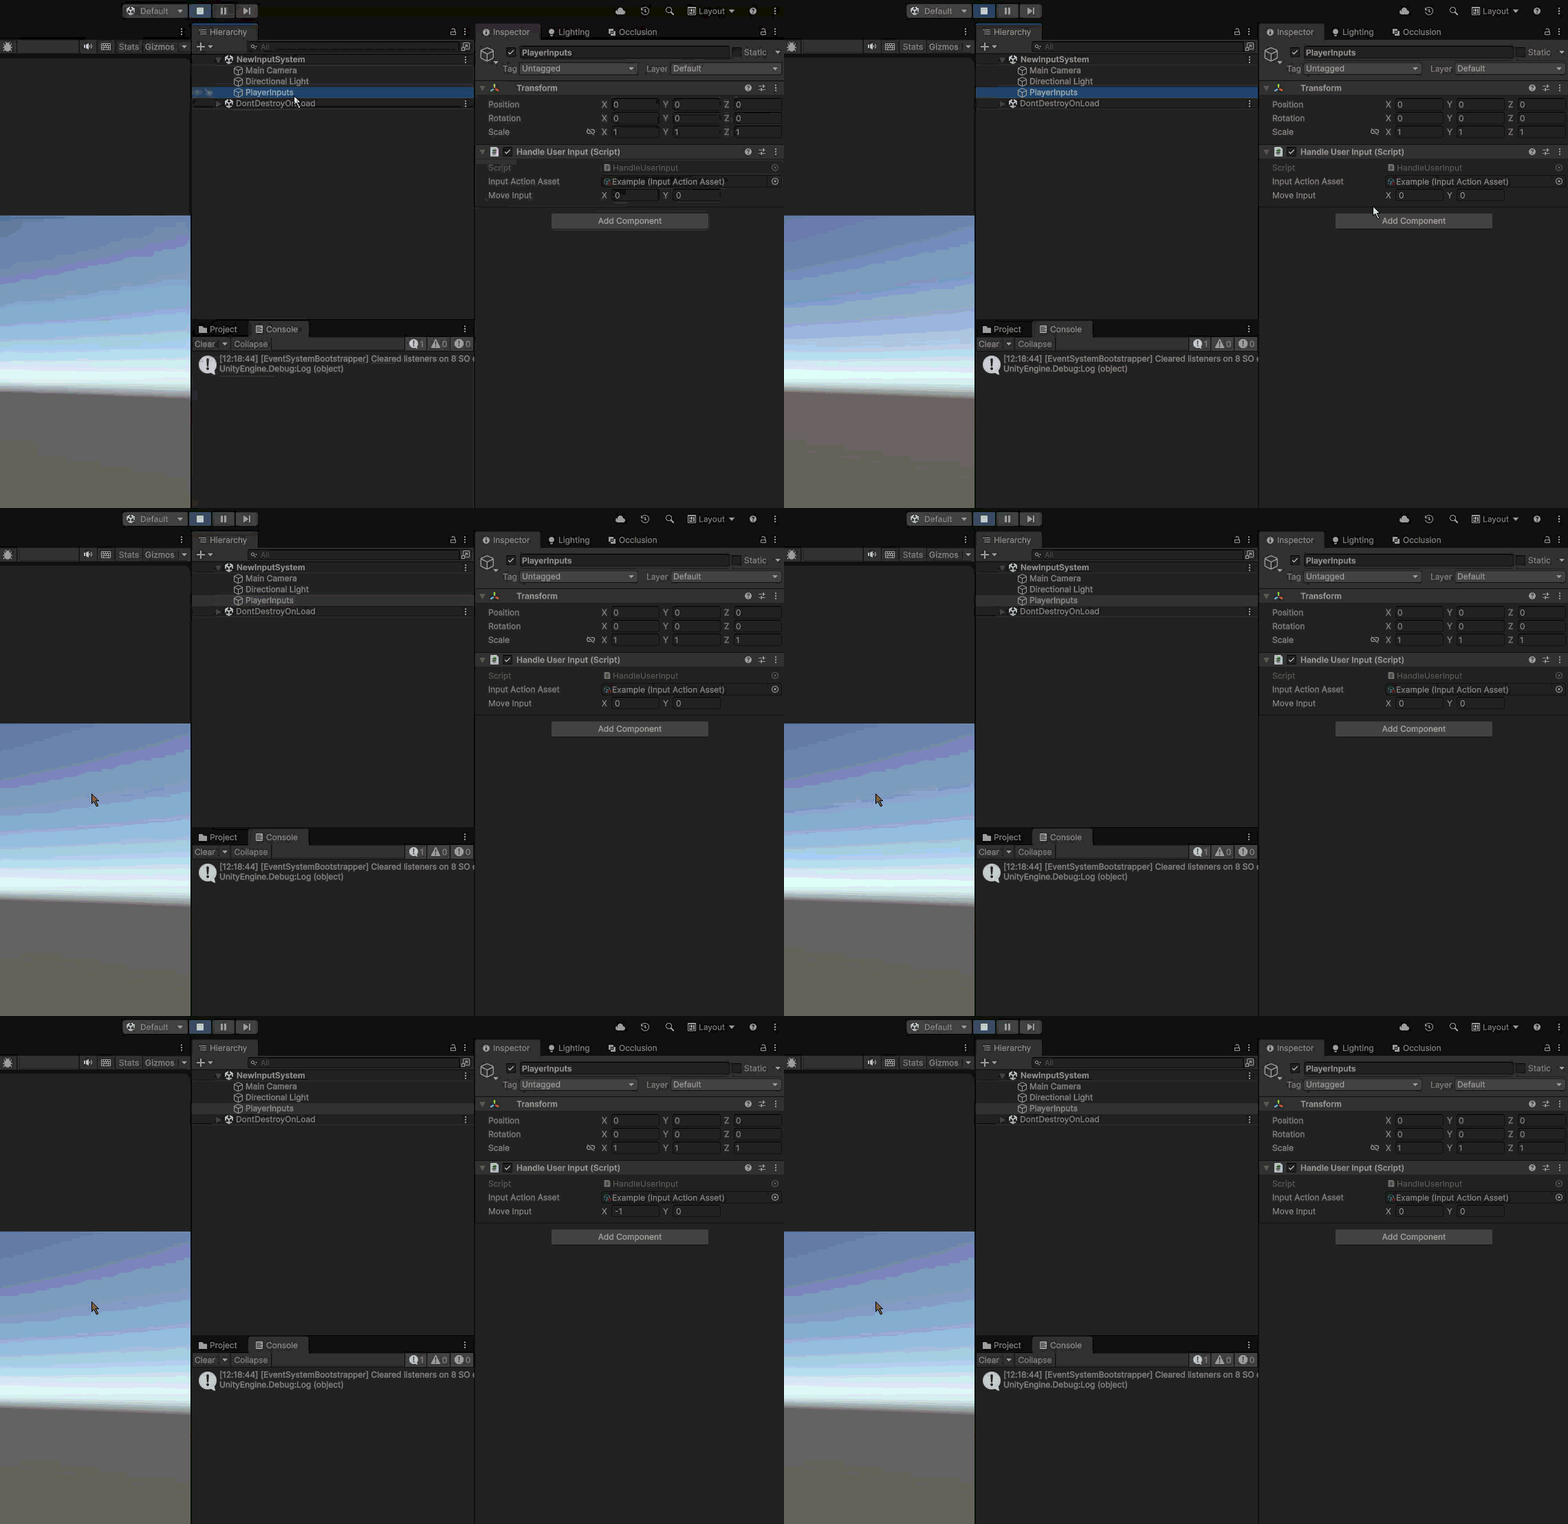
Drag your Input Actions asset onto the Input Action Asset field in the Inspector, press Play, and move — you will see the values change live:
Watch out: The string
"Move"must match the action’s name exactly, including capitalization."move"will throw an exception at runtime. This is the most common beginner mistake with this method.
Method 2: InputActionReference + Events
Polling every frame works well for continuous input like movement, but it’s wasteful for a one-time input like Jump. For that, use an event callback instead.
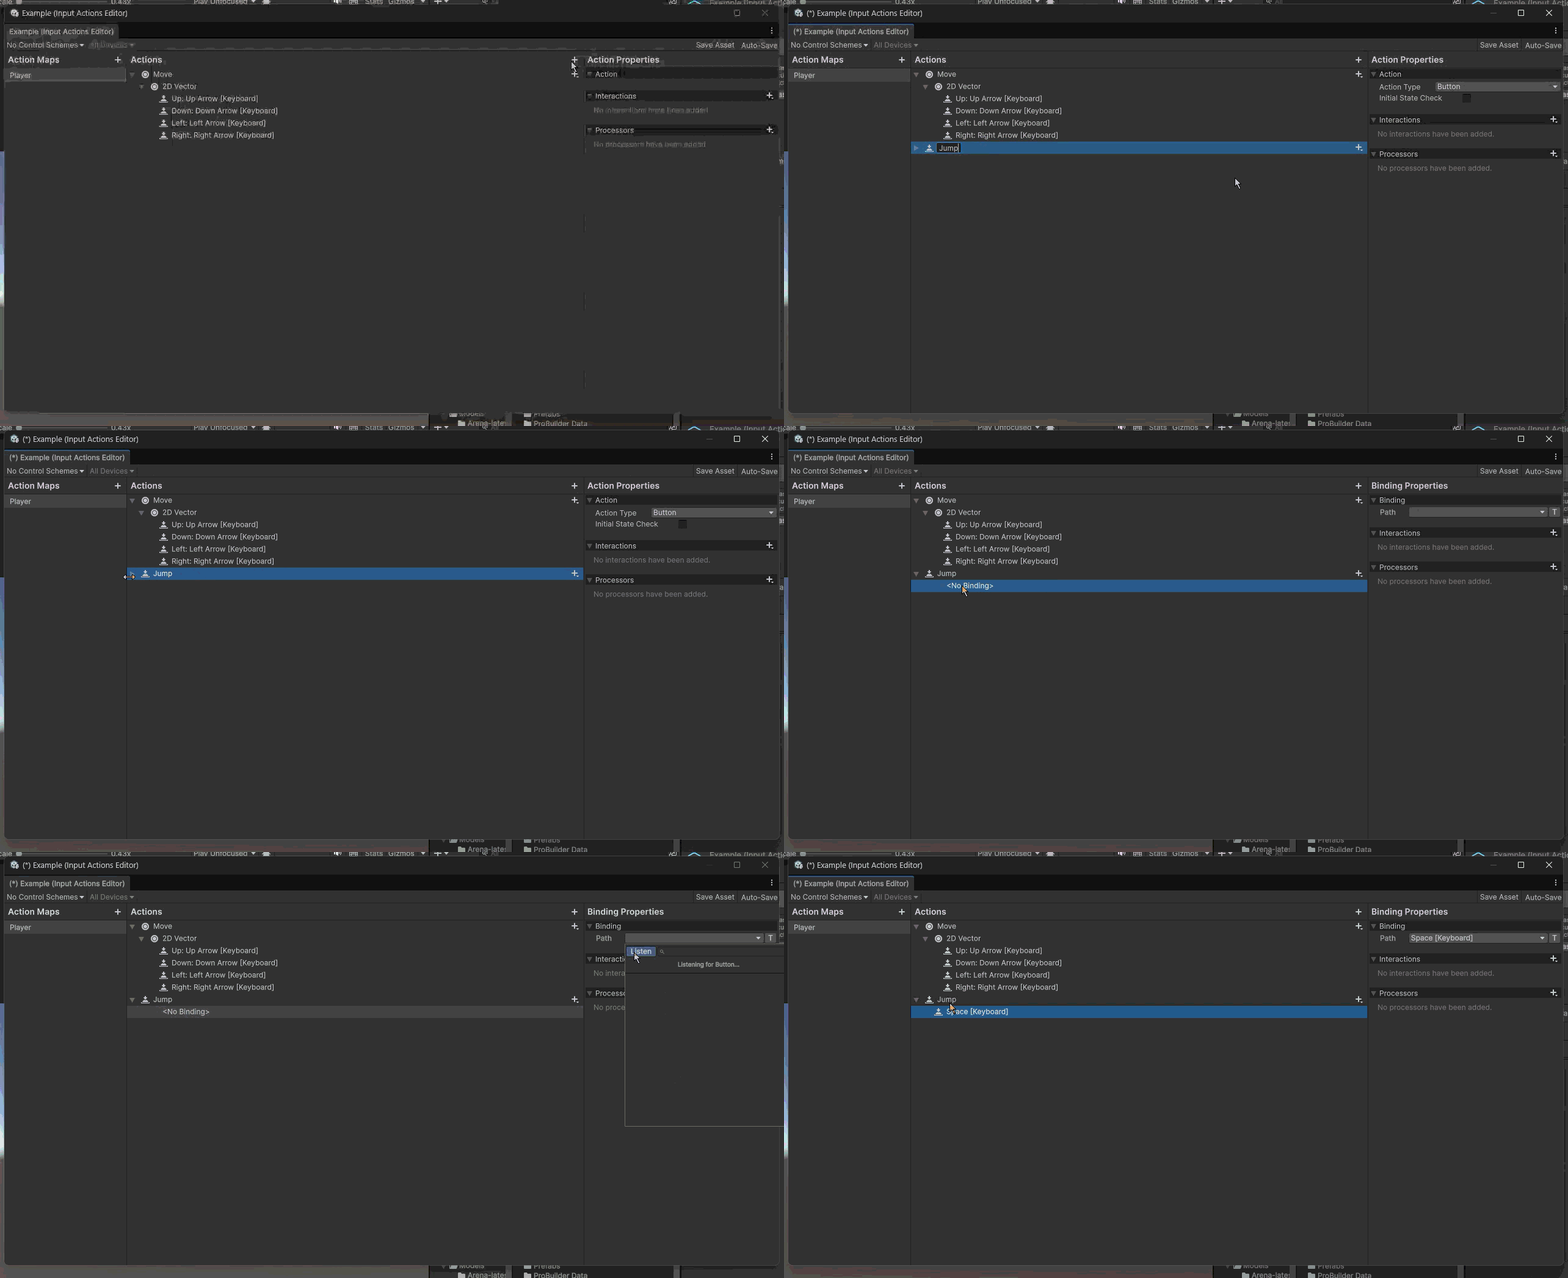
First, add a Jump action (Button type) to your Player map:
Then update the script:
using UnityEngine;
using UnityEngine.InputSystem;

public class HandleUserInput : MonoBehaviour
{
    public InputActionAsset inputActionAsset;

    [Header("Jump Input")]
    public InputActionReference jumpInputActionReference;

    public Vector2 moveInput;

    private void OnEnable()
    {
        inputActionAsset.Enable();
        jumpInputActionReference.action.performed += Jump;
    }

    private void OnDisable()
    {
        inputActionAsset.Disable();
        jumpInputActionReference.action.performed -= Jump;
    }

    private void Update()
    {
        moveInput = inputActionAsset["Move"].ReadValue<Vector2>();
    }

    private void Jump(InputAction.CallbackContext context)
    {
        Debug.Log("Jump action performed!");
    }
}
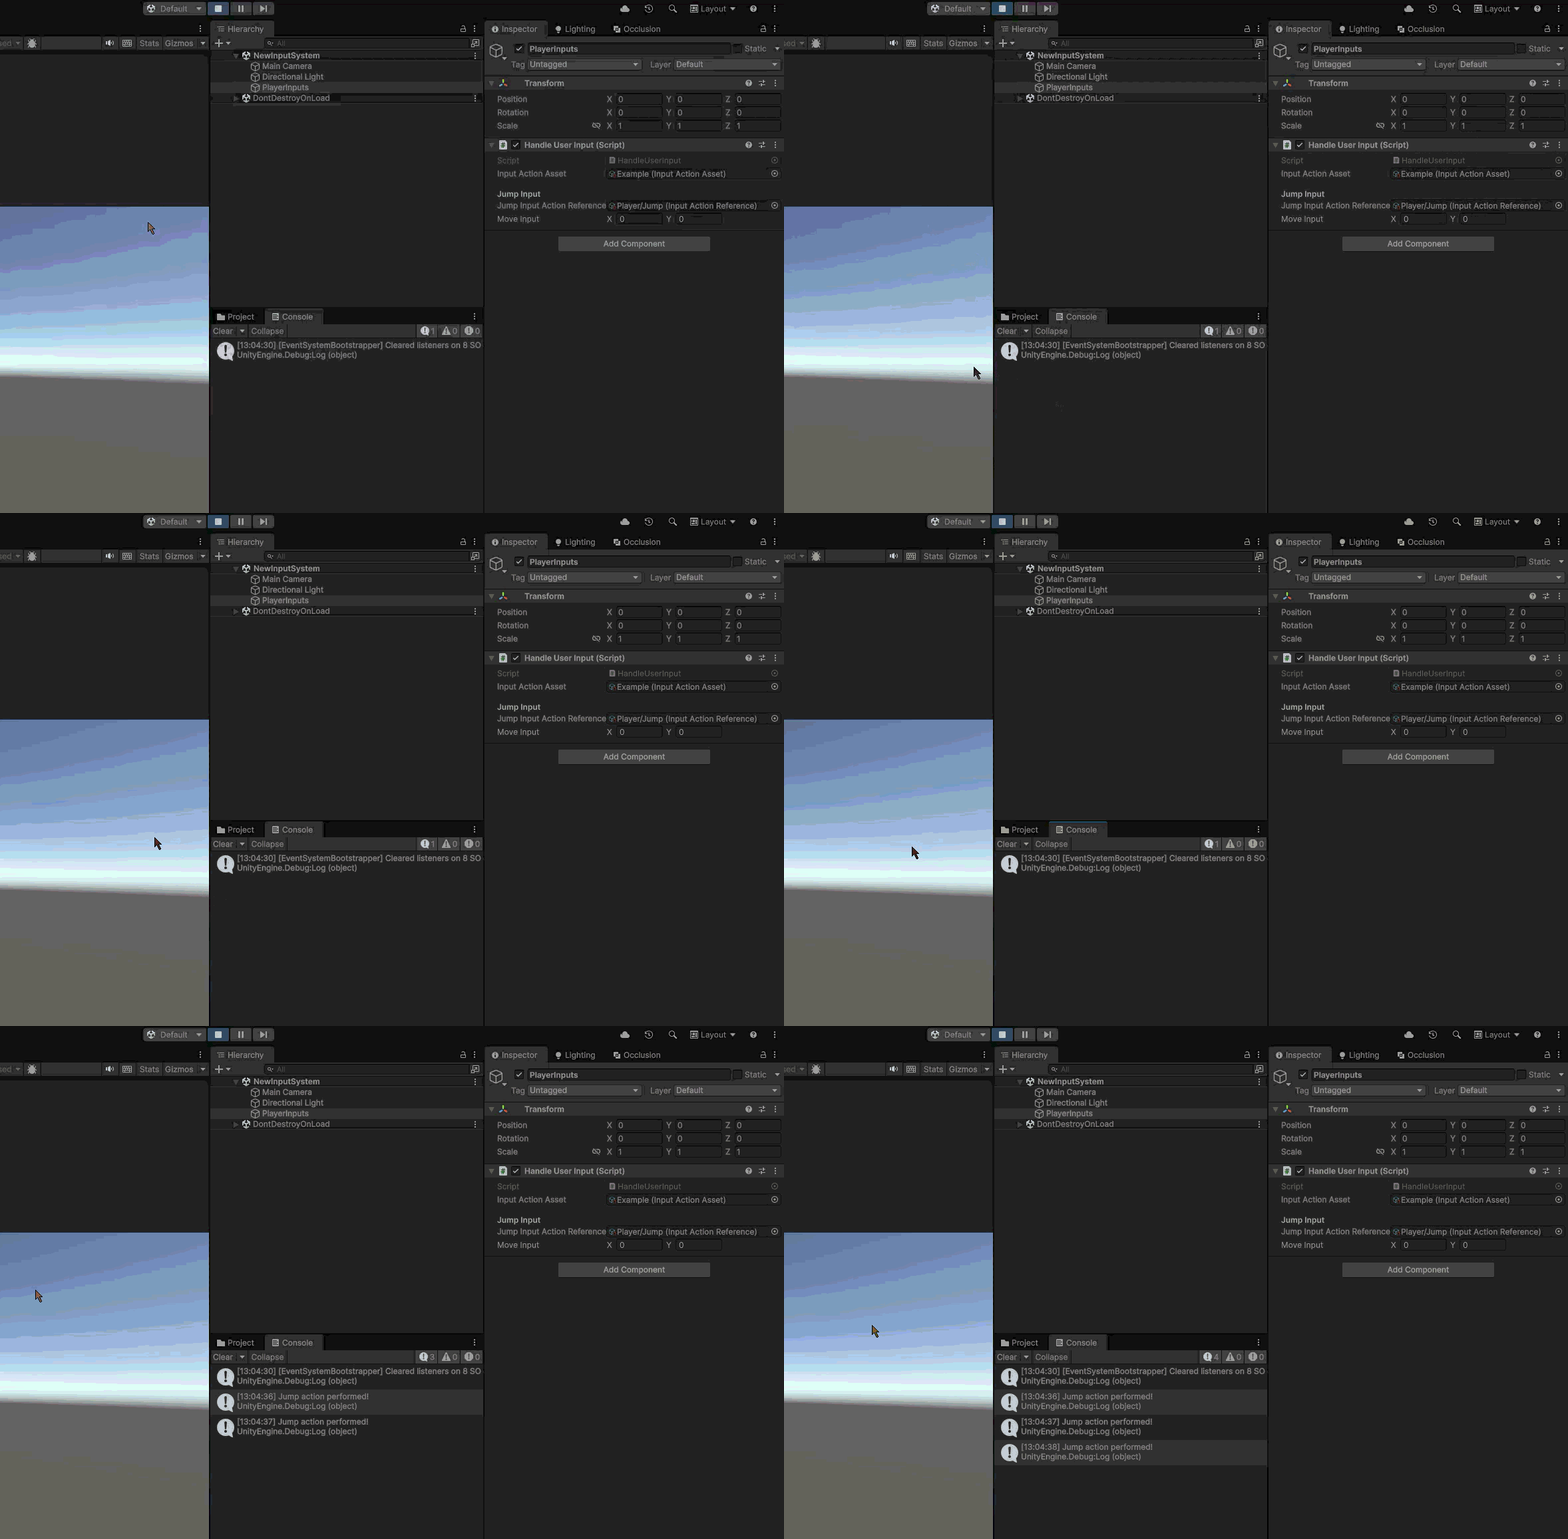
Drag the Jump action itself (not the whole asset) into the Jump Input Action Reference field. Press Play, hit Space, and check the Console:
An action can fire three possible events, called phases — not just performed:
| Phase | Fires when… | Typical use |
|---|---|---|
started |
The input begins (e.g., a button is first pressed down) | Start a charge-up animation |
performed |
The input is considered “done” (e.g., the press registers) | Trigger the jump itself |
canceled |
The input stops (e.g., button released, or interrupted) | Stop a charge-up, release a held action |
For a simple button like Jump, started and performed fire almost together. But for hold or charge mechanics, the gap between them matters a lot — more on this below, in the Interactions section.
Always unsubscribe. Notice the
-=inOnDisable. If you forget it, the callback can fire on a destroyed or disabled object and throw errors. This is one of the most common New Input System bugs.
Method 3: InputAction Declared Directly in the Script
For quick prototyping, or for a one-off input that only a single script needs, you can skip the shared asset entirely and declare an InputAction field directly:
[Header("Direct Input Action")]
public InputAction actionExample;
Enable and subscribe it the same way as before:
private void OnEnable()
{
    actionExample.Enable();
    actionExample.performed += PerformActionExample;
}

private void OnDisable()
{
    actionExample.Disable();
    actionExample.performed -= PerformActionExample;
}

private void PerformActionExample(InputAction.CallbackContext context)
{
    Debug.Log("Direct action performed!");
}
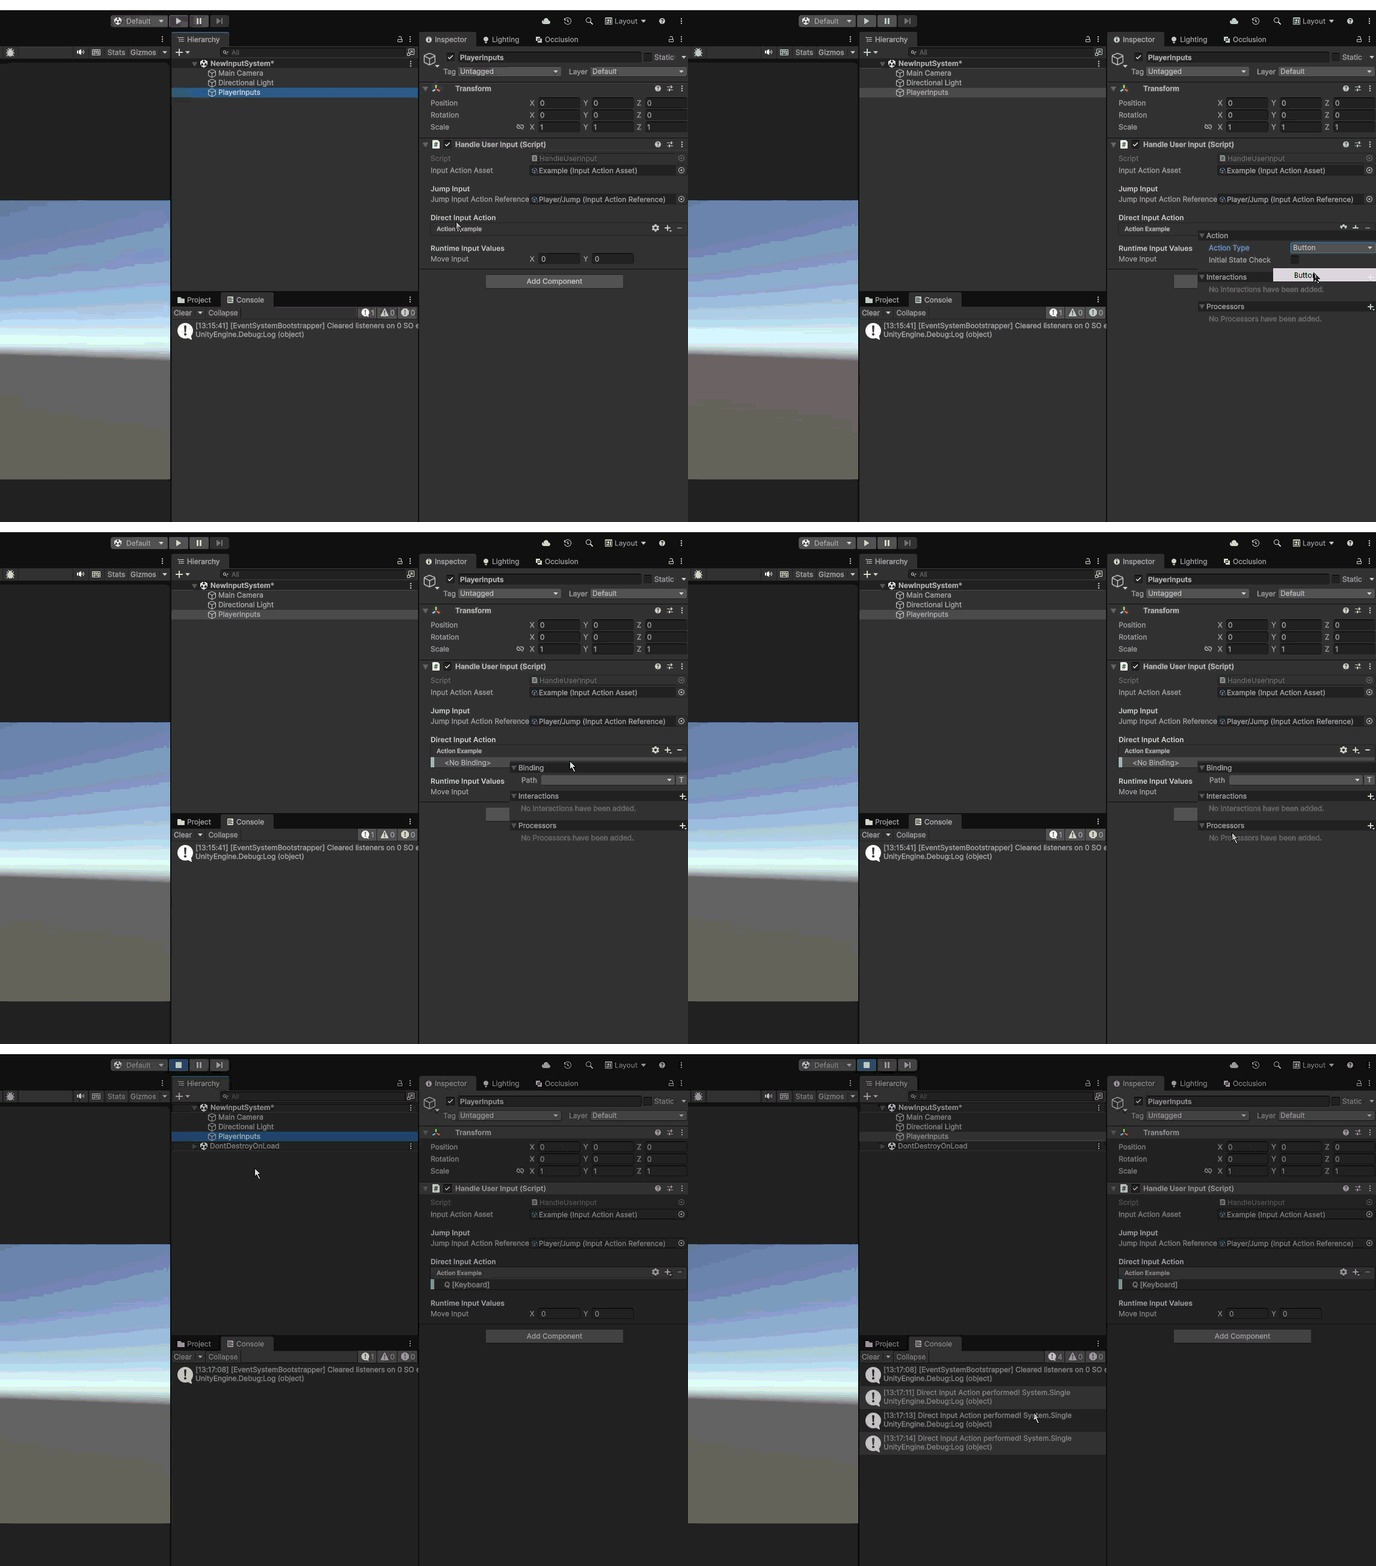
Unity shows an editable Action Type, Control Type, and binding list right in the Inspector for this field:
Use this for small experiments only. For a real project, prefer a shared Input Actions asset (Methods 1 and 2) — it keeps every input in one place and makes rebinding possible later.
Method 4: Reading Devices Directly (Testing Only)
The fastest way to check “is this key down right now” is to skip actions completely and ask the device object directly:
if (Mouse.current.rightButton.wasPressedThisFrame)
{
    Debug.Log("Right mouse button pressed!");
}

if (Keyboard.current.shiftKey.wasPressedThisFrame)
{
    Debug.Log("Shift key pressed!");
}
This is quick, but it has a real problem: it assumes the device exists. Mouse.current works fine on desktop, but if you build the same code for Android, there is no mouse — Mouse.current will be null, and this line will crash the game. On mobile, you would need Touchscreen.current instead.
Rule of thumb: use direct device access only for quick tests and debugging. For anything shipped to players, use Input Actions — one action can safely support keyboard, mouse, gamepad, and touch at the same time, and your gameplay code never needs to know which device the player is using.
More Concepts You Should Know
The workflow above covers the basics. Here are the concepts that take you from “it works” to “it works well.”
Interactions — Beyond a Simple Press
By default, a Button action fires performed the instant the key goes down. Many mechanics need more control than that. Unity’s Interactions (found in a binding’s properties) change this behavior:
- Hold — only fires
performedafter the button is held for a set time. Good for a “charged attack” or “hold to open a door.” - Press — lets you choose whether it fires on press, on release, or both.
- Tap — fires only if the button is pressed and released quickly. Good for combining with Hold, e.g., tap to punch, hold to block.
- Multi Tap — detects a double-tap or triple-tap pattern, e.g., a dash on double-tap.
Processors — Reshaping the Raw Value
Processors change the value an action returns, without changing your code at all. Common ones:
- Invert — flips the sign, e.g., invert the Y-axis for players who prefer “flight-stick” camera controls.
- Normalize — stops diagonal movement from being faster than straight movement (a classic bug with raw WASD input).
- Scale — multiplies the value, useful for adjusting mouse or stick sensitivity without touching code.
- Clamp — restricts a value to a minimum/maximum range.
Both Interactions and Processors are set inside the Input Actions editor, not in code — one more reason the New Input System is friendlier for tuning game feel.
The PlayerInput Component
Besides writing your own InputActionAsset reference (Method 1), Unity offers a ready-made component: PlayerInput. Add it to your player GameObject, assign your Input Actions asset, and choose a Behavior:
- Send Messages — calls a method like
OnMove(InputValue value)on the same GameObject. - Broadcast Messages — same as above, but also calls methods on child objects.
- Invoke Unity Events — exposes each action as a UnityEvent in the Inspector, so you can wire it up without code, similar to a Button’s
OnClick. - Invoke C# Events — exposes a single C# event (
OnActionTriggered) for more advanced, code-driven control.
PlayerInput also handles multiple simultaneous players and controllers automatically — useful for local co-op — and can auto-switch Control Schemes when it detects the player switched from keyboard to gamepad.
The Generated C# Class (Recommended for Real Projects)
Typing inputActionAsset["Move"] works, but it is not type-safe — a typo in the string only shows up as a crash at runtime. Instead, open your Input Actions asset, look at its Inspector (not the editor window), and enable:
- Generate C# Class
Unity then creates a strongly-typed class (for example, PlayerControls) with real properties like playerControls.Player.Move, complete with autocomplete and compile-time checking. This is the approach most shipped Unity games use, and it’s worth switching to once you’re comfortable with the manual method shown above.
Mouse Input Beyond Buttons
Mouse.current gives you more than button presses:
Vector2 screenPosition = Mouse.current.position.ReadValue();
Vector2 mouseDelta = Mouse.current.delta.ReadValue();   // movement since last frame — useful for camera look
float scroll = Mouse.current.scroll.ReadValue().y;
A very common beginner stumbling block: Mouse.current.position is in screen space (pixels), not world space. To use it for aiming or clicking on a 3D object, convert it first:
Ray ray = Camera.main.ScreenPointToRay(Mouse.current.position.ReadValue());
if (Physics.Raycast(ray, out RaycastHit hit))
{
    // hit.point is the world-space position the mouse is pointing at
}
Gamepad Input and Missing-Device Safety
Gamepad.current gives you sticks, triggers, and face buttons:
Vector2 leftStick = Gamepad.current.leftStick.ReadValue();
float rightTrigger = Gamepad.current.rightTrigger.ReadValue();
bool southPressed = Gamepad.current.buttonSouth.wasPressedThisFrame; // A on Xbox, Cross on PlayStation
Always guard against a missing controller before reading it directly:
if (Gamepad.current != null && Gamepad.current.buttonSouth.wasPressedThisFrame)
{
    Jump();
}
This null check is exactly why Input Actions are safer for shipped code — an action bound to “gamepad button south OR spacebar” already handles this for you, with no if statement needed.
Touch Input for Mobile
Mobile devices have no mouse or keyboard, so use Touchscreen.current instead:
if (Touchscreen.current != null && Touchscreen.current.primaryTouch.press.wasPressedThisFrame)
{
    Vector2 touchPosition = Touchscreen.current.primaryTouch.position.ReadValue();
}
For multi-touch gestures (pinch-to-zoom, two-finger drag), enable Enhanced Touch Support (EnhancedTouchSupport.Enable() in code, or through the Input Actions asset settings) and read Touch.activeTouches, a list of every finger currently on the screen.
UI Input — Menus, Buttons, and the Player/UI Switch
Unity’s UI system (uGUI) needs its own input handling to detect clicks, hovers, and controller/keyboard navigation between buttons. The New Input System provides this through:
- Input System UI Input Module — replaces the old Standalone Input Module on your EventSystem GameObject. Add it, and UI navigation (arrow keys, gamepad d-pad, mouse hover) works automatically.
- The default Input Actions asset usually ships with a separate UI Action Map (Navigate, Submit, Cancel, Point, Click), already wired to this module.
The important pattern here: only one Action Map should usually be active at a time. When gameplay is running, enable the Player map and disable UI. When a pause menu opens, flip it:
void OpenPauseMenu()
{
    inputActionAsset.FindActionMap("Player").Disable();
    inputActionAsset.FindActionMap("UI").Enable();
}

void ClosePauseMenu()
{
    inputActionAsset.FindActionMap("UI").Disable();
    inputActionAsset.FindActionMap("Player").Enable();
}
Without this, a player could still move and jump while a pause menu is open — a very common bug for beginners moving to this system.
Tips and Tricks
- Name actions like variables, not labels.
"Move","Jump","Fire"— short, PascalCase, no spaces. You will type these names (or generated properties) constantly. - Bind both keyboard AND gamepad to the same action from day one, even if you’re only testing with a keyboard. It costs nothing now and saves a painful refactor later.
- Switch to the Generated C# Class as soon as the prototype phase is over. String-based lookups (
asset["Move"]) are fine for learning, but a typo becomes a runtime bug that’s easy to miss. - Use
Valueactions for continuous input (movement, look, aim) andButtonactions for discrete input (jump, fire, interact). Picking the wrong type is a common source of “it feels laggy” bugs. - Always pair
Enable()withDisable(), and every+=with a matching-=. Do this inOnEnable/OnDisable, notStart/OnDestroy— it correctly handles objects being pooled or temporarily disabled. - Add the Normalize processor to diagonal movement early. Without it, a player moving diagonally with WASD moves faster than moving straight — a classic bug that goes unnoticed until someone points it out.
- Test control-scheme switching, not just each device alone. A player picking up a controller mid-game while the keyboard is still plugged in is the normal case for PC games, not an edge case.
Common Usage Cases
| Scenario | Suggested approach |
|---|---|
| Top-down or platformer movement | Move action, Value/Vector2, bound to WASD + left stick |
| Twin-stick shooter aiming | Separate Look action: Mouse.current.position (converted to world space) on keyboard/mouse, right stick on gamepad, in the same Control Scheme setup |
| Jump / Interact / Fire | Button actions, event-driven (performed) rather than polled every frame |
| Charged attack | Button action with a Hold interaction, using the started→performed gap to drive a charge-up bar |
| Camera look with sensitivity settings | Vector2 action reading Mouse.current.delta, passed through a Scale processor tied to a settings slider |
| Pausing gameplay for a menu | Two Action Maps (Player, UI), only one enabled at a time |
| Local co-op / split-screen | PlayerInput component, one instance per player, each auto-paired to its own device |
| Mobile release of a PC game | Same Input Actions asset, add Touchscreen bindings alongside keyboard/gamepad — no separate mobile-only input code needed |
What’s Next
You now know how to install the New Input System, build an Input Actions asset, and read input four different ways — from a manual polling script, from event callbacks, from a script-local action, and directly from a device. In the next lesson, we will take the Move and Jump actions built here and use them to actually move and jump a character, tying input into physics and animation.
Contracted by NextSkill a Gamestorms company, delivering this course for Isra University